All Graffix plugins for Adobe Illustrator are now compatible with Adobe Illustrator CC 2019. Updating the icons and cursors for ultra high-res screens is a project in progress, but for now the plugins are compatible and the UI scaling works. If you have any trouble loading or using the plugins in CC 2019, please let me know and I’ll do everything I can to get you running ASAP.
ToolShed adds an assortment of functions (including some free ones):
Radiant creates a group of lines fanning out like a pie chart at equidistant angles. Again, a preview allows you to adjust the number of divisions to match your art.
Latitude Lines creates a series of parallel lines distributed as though they were evenly spaced and wrapped around a cylinder (or globe). Use the live preview from the settings dialog to check your art before committing with the OK button.
Scale Proportionally scales an object based on the proportion between two values. Say you have a map and you know that the distance from one point to another is 16.7783 miles. You can draw a line between those points and enter the distance you’d like your scale of miles to be, and the selected line will be scaled accordingly.
Unscale Art can be used when, say, you’ve scaled a bunch of objects and one of them shouldn’t have been scaled. To return it to its original size, the plugin will figure the inverse of the scaling factor to restore it to its original size (or at least very, very close).
Scale Stroke Weight will quickly scale the line thickness of selected paths by the percentage you enter without having to futz with settings in your Scale dialog.
Minimum Stroke Weight will find all paths with a stroke thinner than your minimum and set the width accordingly.
More functions will likely be added to this plugin over time.
Please download it to try it out. There are 100 trial uses, and the Scale Stroke Weight and Minimum Stroke Weight will continue to work for free after the trial of the other functions is used.
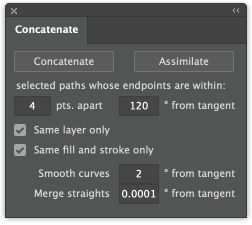
When concatenating a number of straight paths placed end-to-end, there’s often no need to keep the anchor points that once separated them. It’s also often worth simplifying the path just a little to reduce the number of anchor points. This is especially true if you plan to edit the path afterward. Now Concatenate for Adobe Illustrator CS6 and CC has been upgraded to version 16.1.5 with a setting for merging these straight segments. Even a very small value such as the default of 0.0001 (one 10,000th of a degree) will remove points when combining straight paths that were cut and rejoined. For the most hands-off handling of paths when concatenating, just enter 0 in the settings for curves and straights. This update is recommended for all users.
The popular free Select Menu plugin is now faster! I guess one could say it’s a speed bump in that its speed has been bumped up. Then again, its speed bump has been the result of removing (unless you want it) a speed bump, as in those bumps in the road intended to make you slow your vehicle down.
One recent improvement, or so I believed, was when the plugin checked for the existence of various types of objects in the current document and disabled unneeded menu items so as to save users from looking for something that’s not there. In a very large or complex document, however, that search can take a second or two, or longer, so the feature didn’t necessary save much time. With version 16.0.6, the default behavior is to enable all menu items whether needed or not. If you decide you’d rather have the menu parse the current object types, just press the Alt or Option key while selecting the Select > Object menu and the plugin will diligently search like Yoda examining the contents of Luke’s food case.
In addition to drawing at isometric angles, the plugin now includes a tool to move selected art along the isometric axes. Since it’s no longer just a line-drawing tool, it has a new, simpler name.
For those occasions when you need a different projection, just double-click the tool’s icon and enter preference settings for the angles of your X and Z axes. Since it’s not just isometric anymore, perhaps the name should reflect axonometric instead… but there are other axonometric tools in the works, and that could get really confusing later on.
If you use Hot Door’s awesome CADtools plugin, you can define your axonometric settings there and IsoTool will adjust accordingly.
IsoTool is still free. I hope you find the updated features useful!
When fine-tuning the position of a pattern, I’ve often wondered if it would be faster and easier to just zoom in, click on a point I want aligned with something else, and drag it to the new position. Nudge Panel now includes a tool to let you do just that. And d’ya know what? It really is faster and easier than clicking the nudge buttons on the panel (although you may want to make the final ever-so-small adjustments with the panel). Snapping the tool to a path or point for alignment makes precise adjustments even more quickly.
For the technically curious, the tool works by choosing a reference point in the pattern, then dragging as shown above to a destination point. It would be great to just see the pattern move with the cursor, but as with all Adobe Illustrator tools, changes while dragging are only updated in wireframe mode until the mouse or stylus is released. Only then is the affected art actually redrawn.
Download the free update for Nudge Panel 16 and try it out!
How many ways are there to cut paths? Adobe provides quite a few, but there are a lot of situations where these tools don’t work well. The Scissors tool suffices for cutting or dividing one path, providing it’s not under another art object. Most of the other methods are essentially variations on the PathFinder Divide function, useful only for dividing filled shapes to make new shapes. To simply cut through paths, whether filled or unfilled, open or closed, there’s Cutting Tools.
The latest release, 16.1, adds a new Fence Cut feature. Here’s how it works:
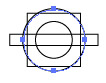
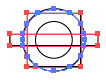
Draw a path where you want to trim. It can be straight or curved, open or closed, above or below the paths to cut. I suspect most people would just draw a rectangle to define a “neat line.”
To protect any paths crossing your Cut line, lock or hide them.
Select the Cut line path object.
Select Object > Path > Fence Cut.
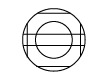
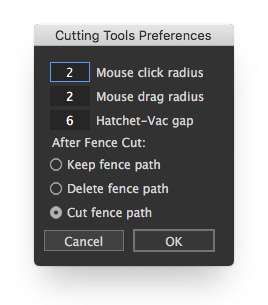
All editable paths that cross the Fence or Cut line will be cut at their intersection. Depending on your tool’s current preferences, the cut line will either be preserved, deleted, or cut along with the editable art. In the example above the larger ellipse is selected as the Cut path, and the tool is set to cut the fence path.


 Unscale Art can be used when, say, you’ve scaled a bunch of objects and one of them shouldn’t have been scaled. To return it to its original size, the plugin will figure the inverse of the scaling factor to restore it to its original size (or at least very, very close).

 When concatenating a number of straight paths placed end-to-end, there’s often no need to keep the anchor points that once separated them. It’s also often worth simplifying the path just a little to reduce the number of anchor points. This is especially true if you plan to edit the path afterward. Now Concatenate for Adobe Illustrator CS6 and CC has been upgraded to version 16.1.5 with a setting for merging these straight segments. Even a very small value such as the default of 0.0001 (one 10,000th of a degree) will remove points when combining straight paths that were cut and rejoined. For the most hands-off handling of paths when concatenating, just enter 0 in the settings for curves and straights. This update is recommended for all users.
 When fine-tuning the position of a pattern, I’ve often wondered if it would be faster and easier to just zoom in, click on a point I want aligned with something else, and drag it to the new position. Nudge Panel now includes a tool to let you do just that. And d’ya know what? It really is faster and easier than clicking the nudge buttons on the panel (although you may want to make the final ever-so-small adjustments with the panel). Snapping the tool to a path or point for alignment makes precise adjustments even more quickly.