Importing images to match another image’s transformation
The transformation matrix at work
Sometimes we scan and trace a large image in Adobe Illustrator, so large that has to be imported in pieces. You probably start out as I do, sizing, rotating, and shearing the first piece of the series so it fits.
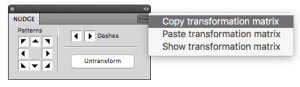 When importing the second scan, you want it to match the first piece as accurately as possible, but what if the first piece needed stretching and twisting to fit? How can anybody perform exactly the same series of operations? I’d found myself “transformed” into a corner once too often and found a way around that dilemma, then built it into the options in the flyout menu of the Nudge Palette plugin for easy access. It’s all based on a property found in every art object in an Adobe Illustrator file called a transformation matrix. A series of six numeric values (named Tx, Ty, A, B, C, and D) define the location, scale, rotation and shearing of an object, and we can make it work for us. Here’s how: Select the first raster object and copy its transformation matrix. Next, import the new image and paste that matrix into it. Bam, it snaps onto the first image.
The images are stacked, though, and need to be stitched together. If there’s a bit of overlap in the images, an easy way to quickly align the two images is by pressing “5” to set the new, still-selected image’s opacity to 50%. Now overlap the images so they match, and press “0” to set its opacity back to 100%.
Repeat this process with every piece you have that make up the whole scanned image, and you’ll have a composite that fits (assuming all of the pieces were scanned at the same orientation).
You can also use this technique to replace a carefully-positioned image with another, with the same transformations as the original. This technique has saved me a lot of time, especially with images that required significant manipulation to fit.
I hope it works for you, too!
![]()