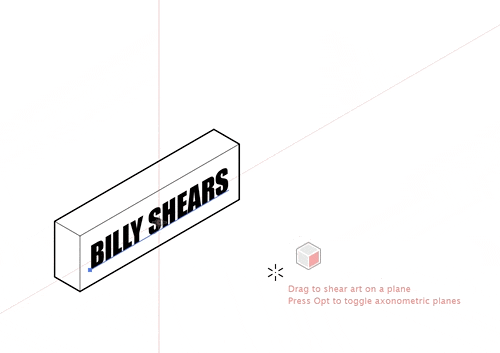
AxoTools now includes an Axo Shear tool that will allow you to shear artwork that’s already been projected onto an axonometric plane. It functions similar to Adobe’s Shear tool in that its default anchor point is the center of the selection, but you can click to place the anchor anywhere you’d like.
The plugin will display a cube annotation with one of the three axonometric faces highlighted. Simply tap the Alt/Option key to choose the plane you’re working on. Drag to shear the art, and the current shear angle will be shown near the cursor. Press the Shift key while dragging to constrain the shear to increments of 15°.
To shear art numerically on a projected plane, Alt/Option click on a location for the anchor point of the operation. In the dialog box that appears, fill in the shear amount, the axis angle to shear on, and the face upon which to shear.
The new tool is available in the current version of AxoTools for Adobe Illustrator 2019 – 2022. You can download it here for either Mac or Windows.
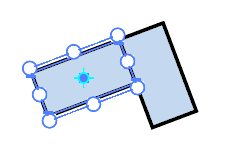
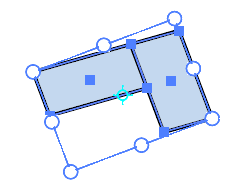
One of my favorite tools in Adobe Illustrator is the Free Transform tool, but it does have a few quirks in more recent versions of Illustrator. Say you have a shape made of two rectangles, one of which is rotated 90° from the other, and both rotated some random small amount. With one rectangle selected while using Adobe’s Free Transform Tool, all is well.
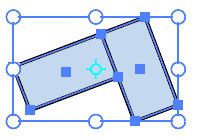
Now select the second rectangle and the bounding box is no longer rotated with the selection.
With ToolShed’s new Transform tool, the bounding box is always rotated to match the topmost object, so you can transform these rectangles as though they were one object. One way around this would be to use the Square Up plugin to square the objects along their dominant axis, but that’s now an unnecessary step.
If you press the shift key while rotating, ToolShed’s Transform tool will rotate only the bounding box, which makes it easy to stretch your art along any angle you wish!
Using Adobe’s Free Transform tool, I often grab the handle on a side to stretch it a bit taller or wider, but then it goes all cattywompus. Using the Free Transform tool on more recent versions of Illustrator requires us to first lock proportions by clicking an icon in another tiny palette that, it seems, is always hidden behind other panels. In addition, grabbing a corner to rescale it often seems to rotate the art instead of scaling it. Ain’t nobody got time for that! ToolShed’s Transform tool doesn’t skew and doesn’t rotate from a corner, so for most purposes, you can work more quickly and with fewer surprises.
Remember, you can download ToolShed and try it out with a thousand trial uses that don’t expire before you have a chance to seriously test it. They don’t expire at all!
The Tangent Arc Tool in the ToolShed plugin has just been updated with a simple, but important improvement. Now when you begin drawing an arc, it can begin at any angle you want. Just click, and a guide line will be drawn from the clicked point to the current cursor location (press Shift to constrain to an increment of 45°). Once you press your mouse or stylus and begin to drag, the arc’s start angle will be locked in and your cursor location will determine the arc’s endpoint.
ToolShed 16.2.2 also adds stability improvements and is recommended for all users.
If you haven’t tried ToolShed, you can download it here and enjoy 1,000 free uses spread out over as much time as you need.
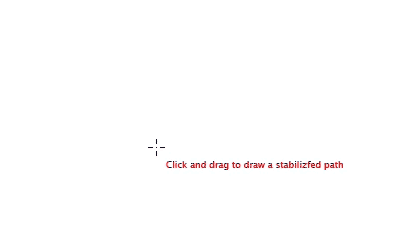
Stabilized Pencil tool adds a “leash” to a pencil to smooth its motion, similar to Photoshop’s smoothed brushes. Keep sharp corners where you want them and smooth the broad strokes. Pulling the pen point begins with a slight buffer, and a ring around the pen point indicates that there’s “slack” in the leash, so your stroke won’t start with a jerk. The new path is simplified according to settings you choose. If the new path is drawn at the endpoint of another, it’s then automatically concatenated into one continuous path.
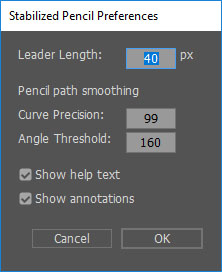
Customize its behavior by double-clicking the Stabilized Pen tool icon to access its Preferences. There, specify a leader length (or 0 for none) and path smoothing settings to match Adobe’s Object > Path > Simplify option. You can also choose whether to display the onscreen help text and annotations. Press the Alt/Option key when releasing the mouse button to skip the path simplification — the “high res” path can then be simplified later.
The ToolShed plugin has three tools and seven functions. I hope you find it useful. There’s a pretty good chance I’ll be bringing more tools to the shed in the not-too-distant future, which will make it an even better value.
You’ll probably find this most useful if you sometimes need to clean up CAD or GIS files, or tidy up artwork done by “other” people.
Click:
On an endpoint or intermediate anchor point to delete it
On a path segment to add an anchor point
Shift click:
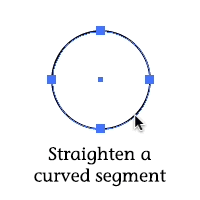
On an endpoint or intermediate anchor point to make it a corner point and collapse its handles
On a control point to make its anchor a corner point (no change in the location of the control points)
On a path segment to make the adjoining anchor points corner points and collapse the control handles for that segment
Option/Alt click:
On an endpoint to extend its control handle
On an intermediate anchor point to make it a smooth point and rotate the control handles to become tangent
On a control point to rotate it to become tangent to the adjacent segment’s control handle
On a path segment to make its anchor points smooth, extend the control handles, and rotate the handles to become tangent to adjacent beziers
Shift-Option/Alt click:
On an endpoint does nothing
On an intermediate anchor point toggles it between a corner and smooth point
On a control point toggles its anchor point between a corner and smooth point
Don’t want to memorize modifier keys? No problem, just select the option to display help text showing your options for whatever you’re doing!
So, essentially, clicking adds/deletes points, shift clicks make things angular, Option/Alt clicks make things smooth, and shift-option toggles them.
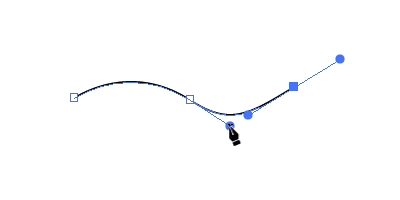
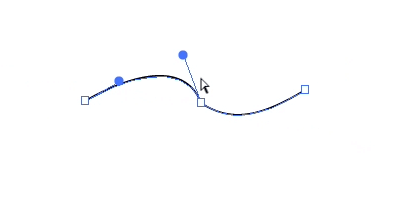
When the tool’s cursor is over a selected path, its control handles will be highlighted even if Illustrator currently doesn’t display them, and anchor points will be marked with a square for corner points or a circle for smooth points.
Dragging a control handle adjusts it, constrained to its original angle.
Dragging a selected anchor point will move it, constrained to the path’s tangent angle, even if it’s under other art objects.
Shift-drag a control point or anchor point to constrain its movement to each increment of 45 degrees.
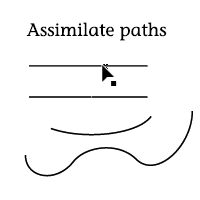
Drag a segment to find another path to assimilate and a smoothed segment will be added connecting the two paths.
Available now for Adobe Illustrator CS6 through CC 2018, Mac or Windows. From $10, or FREE for Productivity Pack licenses.


 Stabilized Pencil tool adds a “leash” to a pencil to smooth its motion, similar to Photoshop’s smoothed brushes. Keep sharp corners where you want them and smooth the broad strokes. Pulling the pen point begins with a slight buffer, and a ring around the pen point indicates that there’s “slack” in the leash, so your stroke won’t start with a jerk. The new path is simplified according to settings you choose. If the new path is drawn at the endpoint of another, it’s then automatically concatenated into one continuous path.