Iván Gómez S. [PROFEIVAN] has produced an excellent video on YouTube demonstrating AxoTools’ Perspective panel. He has done other videos on AxoTools, which are all nicely done and clearly walk users through demo projects. Please check out the videos and support this channel on YouTube.
Note: The gear icon at the bottom brings up a menu to choose an audio track with English or Spanish.
For a couple of years now I’ve had a set of Notes panels in progress for ToolShed, but hadn’t released it because of ongoing display issues with the Windows versions. Since Adobe is rolling out beta features, I figured I might as well do so also, since the Document Notes panel in particular has been really useful for me.
There are three panels you call from Illustrator’s Windows menu, in the Notes menu group. First and probably most useful is the Document Notes panel.
This resizable panel displays text that is attached to the document. I use it to paste instructions sent in an email, which can be visible regardless of where I scroll in the document. It’s especially helpful for a list of callouts that need to be cut or copied out and pasted into the document. The text frame supports text styles and colors, and I can’t change that, so I added a button to remove all formatting from the text to make it easier to read.
In Illustrator’s Attributes panel, you can add notes to any selected artwork. The Artwork Notes panel gathers a list of all art that has notes attached, and displays them in a list.
You have two options. You can Alt/Option-click on the item to select it, or double-click it to edit the note in a dialog (you can also edit it in the Attributes panel).
Next is a Layer Notes panel where you can assign notes to layers. Alt/Option-click on the item to select the layer, or double-click a row to bring up a dialog to edit the note.
I hope you find these additional features helpful. If you have suggestions on how to improve it, please let me know. Many of my plugin features came from user requests.
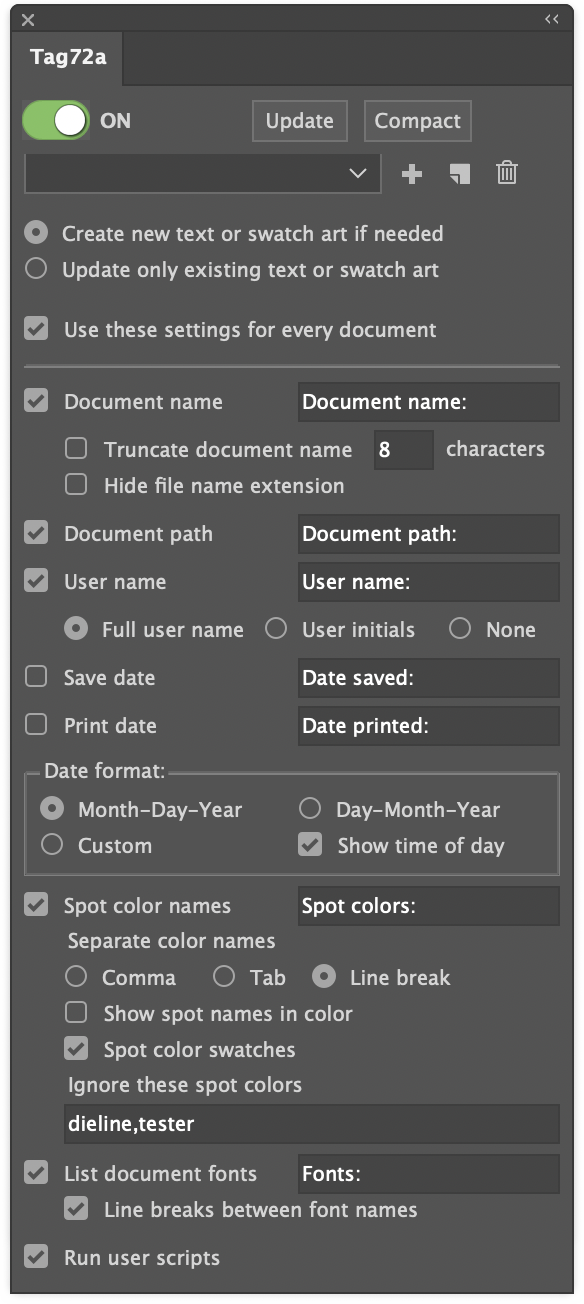
It seems that everyone running Tag72a needs something unique in their document information reporting. The settings panel has grown considerably trying to address as many user requests as possible, but along with flexibility comes the appearance of complexity!
One more preference has now been added, however, that should serve the purpose of countless additional items: the option to automatically run user scripts along with its own updates.
Why would you want to run a custom script? Well, for example:
Reformat a date to any of the many alternatives to the two formats in Tag72a.
Parse a filename to derive additional information such as version, language, region.
Re-order the spot color list so that certain colors are always shown first.
Simply check the “Run user scripts” option and Tag72a will look for and run any found scripts by these names.
Tag72a_doc_opened
Tag72a_doc_changed
Tag72a_doc_print
Tag72a_doc_save
Tag72a_doc_save_copy_as
Tag72a_update
Tag72a_every_event
You only need to use the script (or scripts) that are relevant to you. Some things to keep in mind are:
Doc Changed event happens every time a user switches from one document to another, including when a new document is opened or sometimes when a document is closed. You may not want to use both Doc Opened and Doc Changed events if one or the other does what you want. If both Doc Opened and Doc Changed run, it is not a bug, because Adobe Illustrator signals to the plugin that both events took place.
Doc Print and Doc Save happen just before the actual save or print takes place.
Doc Save Copy As happens just after you have saved a copy as, which enables the data to be updated from the saved version back to the currently-open version.
Update happens only when you click the Update button in the panel.
Every Event happens right after any of the other scripts runs, and works for all events regardless of what other scripts are there. You may want to put some scripting in Every Event and other scripting in specific events, depending on your needs.
All scripts run after Tag72a makes its own updates.
Your scripts may need to check the contents of the document to determine whether the script needs to run, because another event may have just run the script. Then again, it may not hurt anything if your script happens to run twice.
You can use either AppleScript or JavaScript. The plugin will run whichever version of the script Adobe Illustrator added to its Scripts menu.
If you write a custom script for one or more of these events, please share your idea with other users!
The second Worker72a plugin is now available here. When Text Overflow Alert is installed, it automatically scans all documents when opened for text frames or text paths with overflowed text, and selects it for you to inspect and edit as needed. You can read more about it on its product page or follow upcoming Worker 72a plugins on the Worker72a download page.
The plugin is on sale through August 2022, with prices as low as $3.00 for an individual license.
Look for more Worker72a plugins in the near future.
Worker72a is now part of the Graffix family of Adobe Illustrator plugins
Doug Habben has been writing Adobe Illustrator plugins for a couple of decades, and in 2006 began offering them to the public under the banner of Worker72a. Doug and I have been in touch for many years, trading tips as fellow part-time plugin developers. After several years of retirement from his day job, Doug decided to retire from his own business, as well, and contacted me about handling and maintaining his plugins going forward. We obviously reached an agreement and for the first time, Worker72a plugins will be available for Windows, and also run natively on the new Apple M1 processors.
The first of Doug’s plugins to migrate over is White Overprint Detector. When installed, it automatically scans all opened documents for text or path art with white overprinting strokes or fills, and selects it for you to inspect and edit as needed. You can read more about it on its product page or follow upcoming Worker 72a plugins on the Worker72a download page.
The plugin is on sale through August 2022, with prices as low as $3.00 for an individual license.
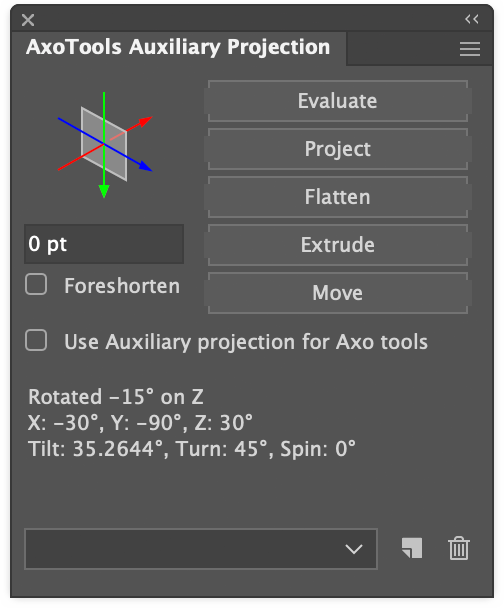
Wrangling those oddball oblique angles just got a lot easier!
If you do technical illustrations or just work in isometric, you’ve probably struggled with surfaces that don’t lie on any of the isometric planes. AxoTools’ Transformations panel helps coerce orthographic art into any series of known rotations, but now you have a tool to help place your flat art onto surfaces at oddball angles. Tame those angled walls and tilted panels!
The new Auxiliary Projection panel helps you determine the projection of a path that’s been twisted into something resembling a parallelogram at any angle. With it, you can flatten the oblique art back to an orthographic view, project orthographic art to fit the oblique projection, extrude and move art along the projection’s axes, and draw new matching art following the auxiliary projection’s axis angles.
AxoTools comes with a thousand free trial uses that you can use at your leisure to download and try it out.
For current users, this is a free update. Through May 2022, regular licenses are 1/3 off and annual licenses 1/2 off, starting at only $5.00!
Available for Adobe Illustrator CC 2019 through 2022, Mac or Windows.
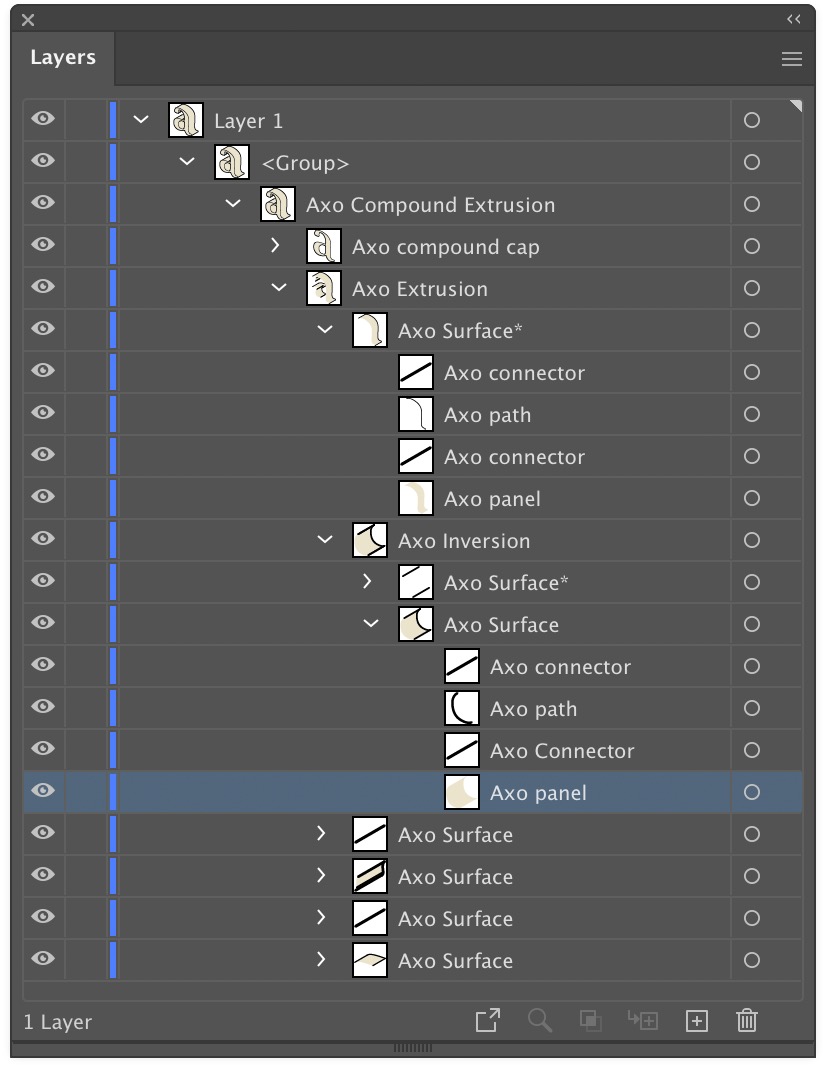
AxoTools is not a 3D application, but tries to assist illustrators in achieving a 3D look the best it can. Simple shapes are pretty straightforward, but complicated shapes can wind over and under each other like an Escher drawing. In that case, AxoTools evaluates the paths and makes its best guess on correctly stacking the pieces.
When a path is extruded, AxoTools creates closed paths for fillable areas and open paths of multiple stroke weights. To make things more easily edited, the pieces are organized into groups. In the Layers panel, you can expand these groups to find the pieces you may want to edit. Compound paths contain elements nested inside of other elements, so things get a bit more complex.
The front surface is named as a “cap,” and is placed above all of the edge pieces. The edges, which give it depth, are divided into surfaces. Each surface is composed of fillable “panels,” stroked “paths” that follow the original path’s shape, and “connector” pieces for corners that connect the front cap to the rear cap (the rear cap and hidden surfaces may or may not be drawn depending on your Extrude panel settings).
Those of you who have had Graffix plugins for Adobe Illustrator for a while know that version updates and even new features are almost always free. In fact, every update since 2014 has been free, and although some significant updates are currently in progress, none are planned to require an additional payment.
When new features, improvements to existing features, or just addressing issues that occasionally arise, I like to get fixes and improvements in the hands of users as soon as practical.
On the other hand, I realize that unzipping the download, then navigating through the file system to place the plugin in Illustrator’s Plug-ins folder is a hassle. Illustrators have too much to do to be saddled with busywork like this!
When I rebuilt my plugins using Hot Door’s CORE libraries in 2014, I was encouraged that it had built-in almost all the tools I needed to automatically install updates (key word: almost). A fellow developer recently alerted me to an approach that finally made the last piece of this process possible. Some of the plugins available for download now have the auto-install system added, and the rest of the plugins will be updated as well in the near future.
When the new plugins fetch an update, they will automatically install it, and move the “read-me” doc file to a “Graffix plugins” folder located in your Documents folder. I only wish I could have enabled this sooner!
IMPORTANT UPDATE: The auto-install, I found out too late, only works reliably on Mac systems, and then only when the Plug-ins folder has its permissions set to read/write for everybody. Current plugins test for the known limits and, if necessary, will send a link to your browser to download as it used to. If you’ve already downloaded a plugin with auto-install, you’ll have to manually download an update from the site. I sincerely apologize for the inconvenience. Please remember, I’m just an illustrator like you who’s figured out how to write plugins, and that limited experience sometimes shows.


 AxoTools is not a 3D application, but tries to assist illustrators in achieving a 3D look the best it can. Simple shapes are pretty straightforward, but complicated shapes can wind over and under each other like an
 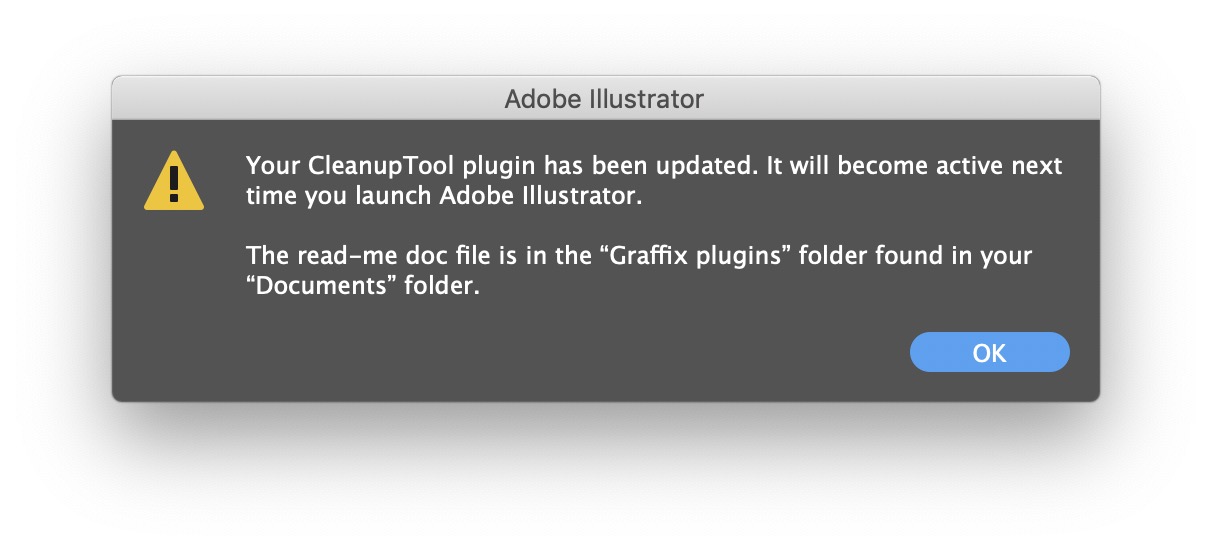 On the other hand, I realize that unzipping the download, then navigating through the file system to place the plugin in Illustrator’s Plug-ins folder is a hassle. Illustrators have too much to do to be saddled with busywork like this!