Illustrator 2023 compatible
All Graffix plugins are now Illustrator 2023 compatible. Please subscribe to the Support Email Newsletter for future compatibility and other service announcements.
Thanks,
![]()
All Graffix plugins are now Illustrator 2023 compatible. Please subscribe to the Support Email Newsletter for future compatibility and other service announcements.
Thanks,
![]()
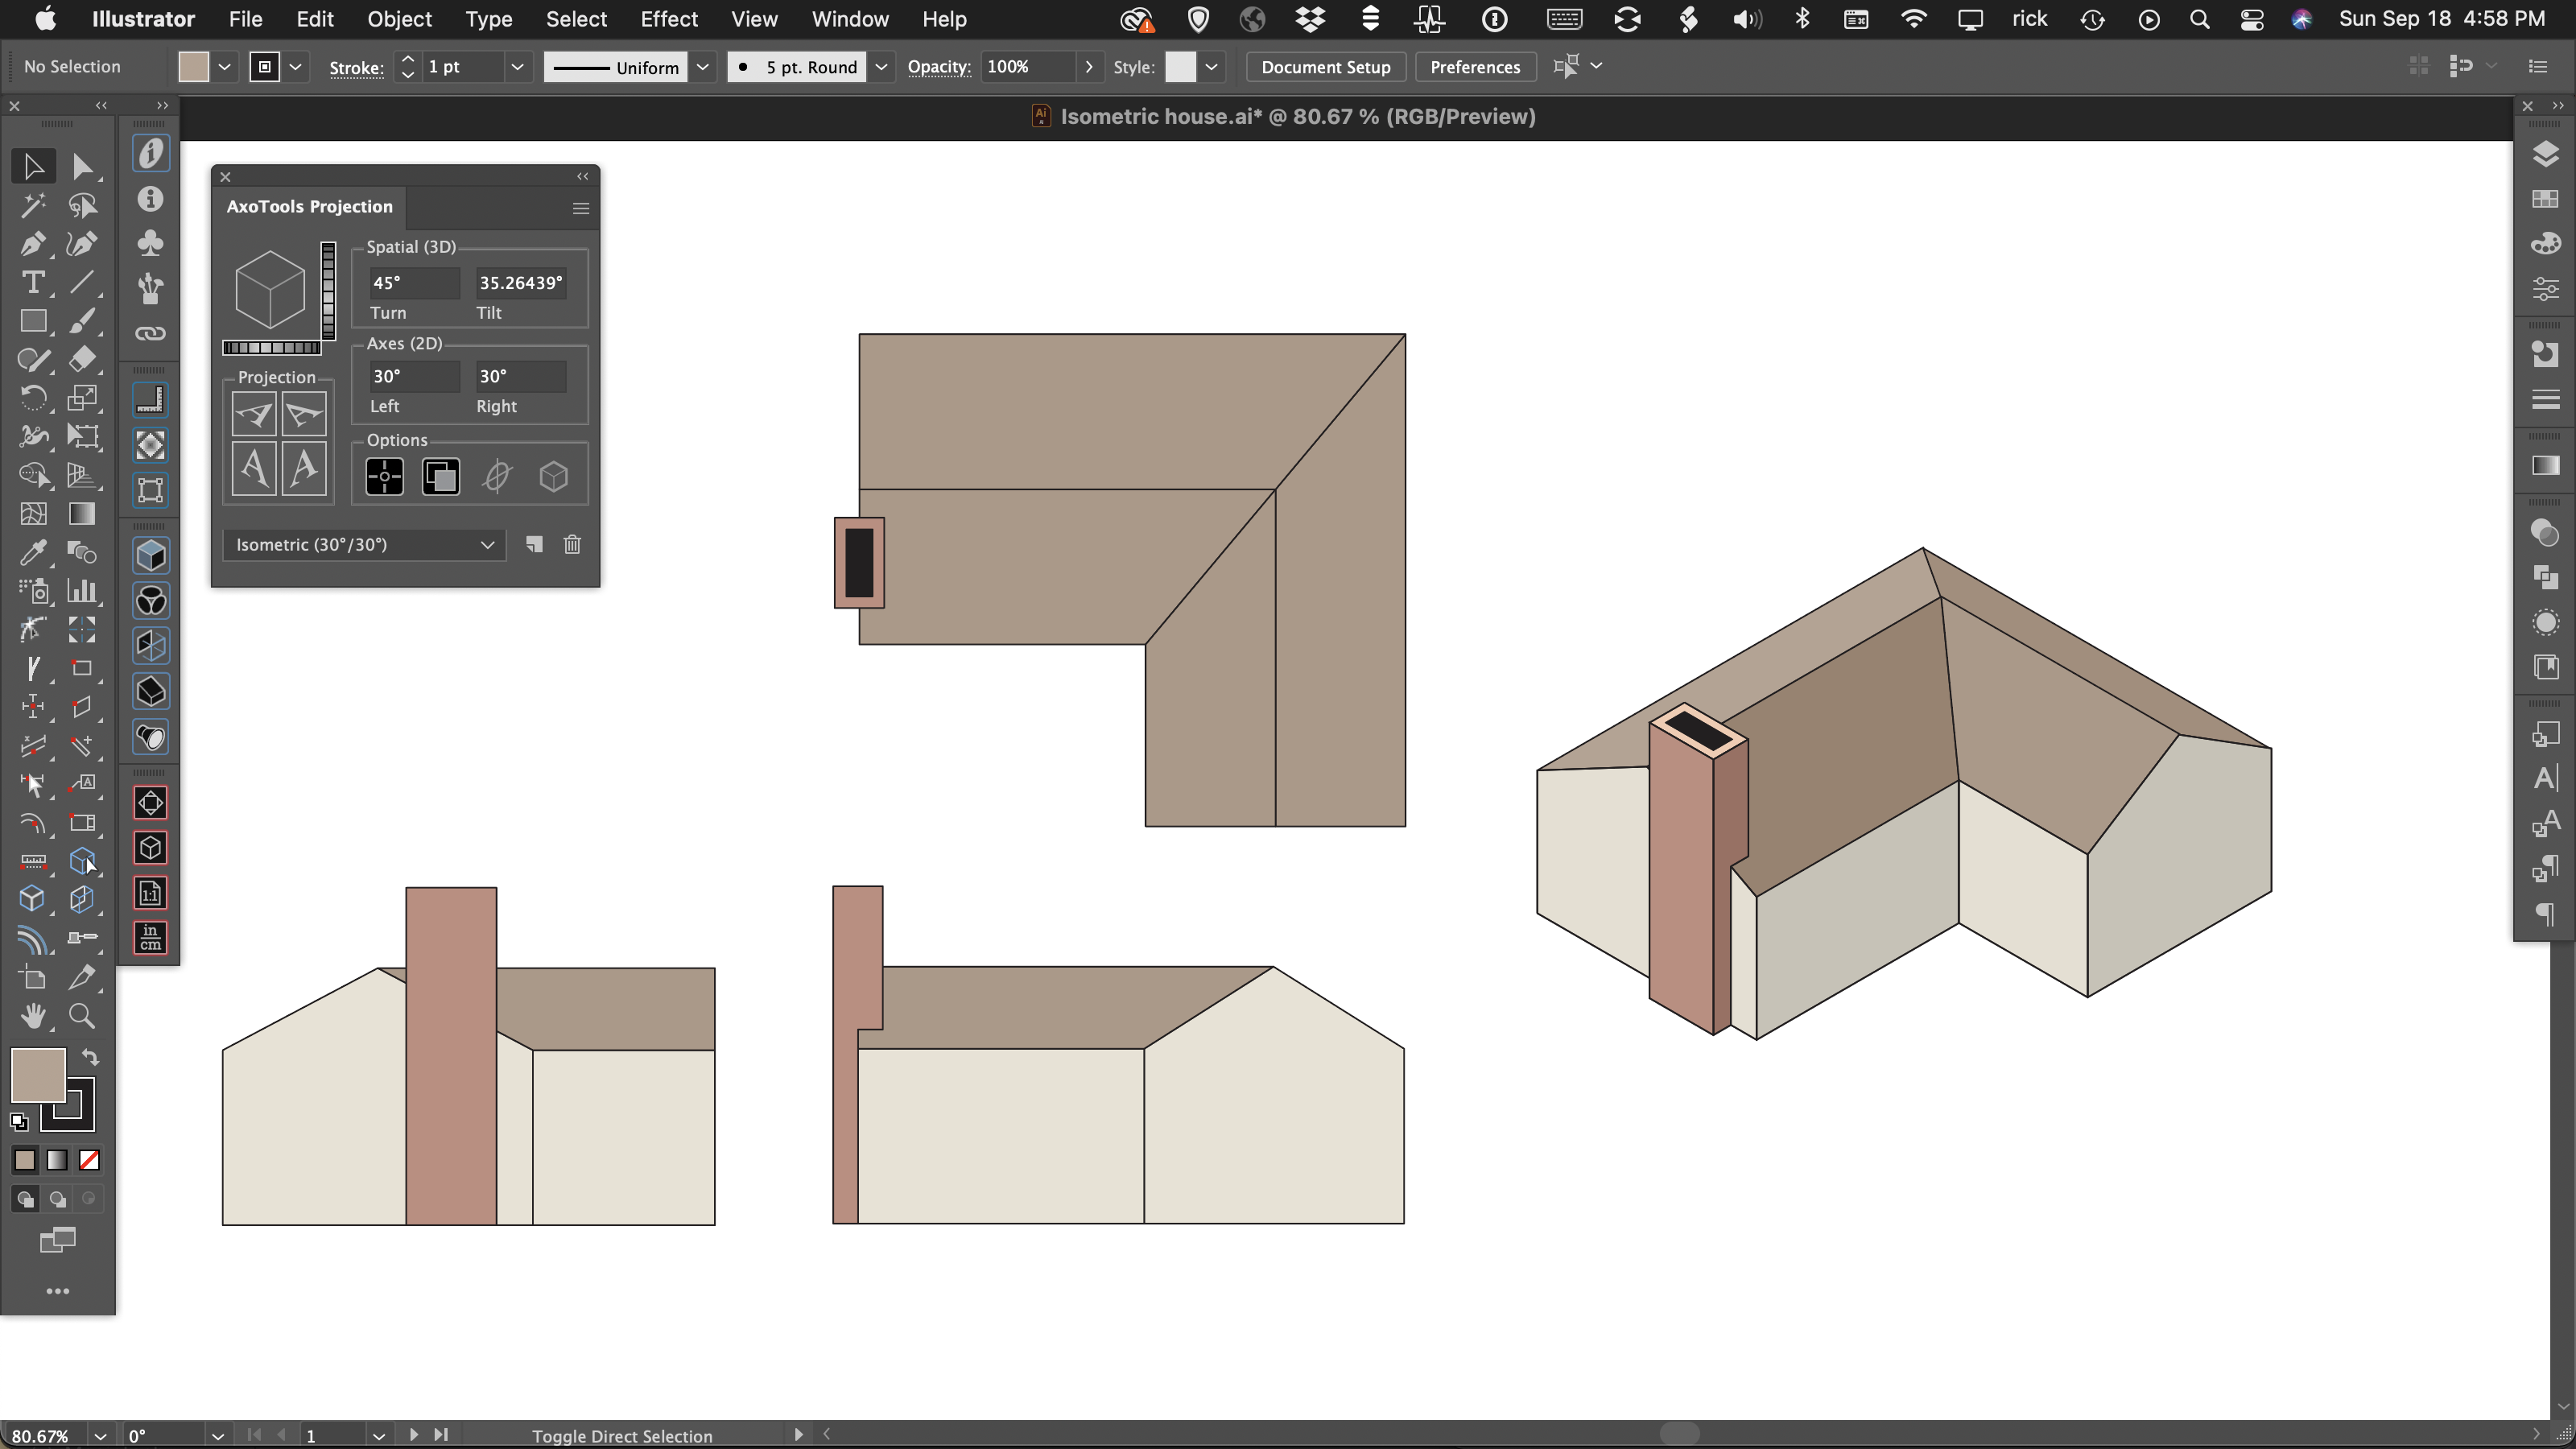
It really is possible to project these orthographic drawings of a house to isometric in less than a minute! I actually did it in 35 seconds!
This video gives an overview of the process using AxoTools in Adobe Illustrator. You can find the step-by-step instructions and link to the project file (saved for Adobe Illustrator CC 2019) here:
Project and extrude in isometric
The technique highlights AxoTools’ project-in-place functionality using reference points for quick, accurate placement, ad well as extruding in an axonometric view, measured from a corresponding distance dragged in a flat ortho view.
This visual approach eliminates tedious measuring or counting of isometric grid units. Try it! If you don’t have AxoTools, you can download it here.
![]()

The latest update to AxoTools includes three improvements to shaded fills on extruded art. First, curved paths now have a gradient fill to more accurately show the curvature of the surface.

Second, the lighting is based on the location of a theoretical light source, so surfaces are shaded based on their actual orientation relative to the light, and no longer assigned a simple “top,” “left,” or “right” tint or shade.
Third, the light source is user-definable.
When you extrude a path, its fill color is used as the base color for shading values. For each base color AxoTools uses, it creates a gradient that’s stored in the document’s Swatches panel. To use your own gradient for shade values, just fill your starting object with the gradient and extrude it.
There is also a new panel where you can make adjustments to your light and shading, but it’s important to stress that you don’t ever have to fuss with those controls in order to use the new lighting and shading features. Most of you will probably want to stop reading here and just go download the update!
For those other few people in the room who want to take things a notch or two higher, the new panel works in three areas:
At the top of the panel is a series of five color well widgets that represent the five stops on the shading gradient ramp for your current document color. The gradient itself represents the range of all possible colors to apply to your fills. AxoTools generates a shaded gradient ramp for each fill color you start with when you extrude with the shading option enabled.
The gradient represents the range of possible tints and shades available based on the angle of the lighting. The first gradient stop represents the lightest highlight color where the light hits it at a 90° angle. Using the default settings, the angle of light on the left isometric plane falls very close to the second stop, which is set to the original color. The third stop represents the shade when the light hits an object on its edge, and stops 4 and 5 represent the rear surfaces, with the last stop showing the effect of backlighting.
The light source’s location is defined with the familiar Tilt and Turn adjustments, which are relative to the viewer. Following these are slider controls for the light intensity, ambient light, and amount of backlighting. As you make adjustments to the lighting properties, the color wells along the top of the panel will preview the results of changes to the intensity, ambient, and backlight lighting properties.
At the bottom right, the “Reset to defaults” button will restore the default settings for all slider controls.
Below the color wells are two buttons relating directly to them. The “Rebuild gradient” button will generate five shades of the current document color.
The “Save gradient” button, I’ll confess, was included for the true “explorers.” If you changed the colors in the color well controls, either by changing lighting properties or using the color pickers in the color wells, this will overwrite the gradient ramp used for the base color.
Please see the online documentation for more information.
I hope you find this new feature useful!
![]()
Today I released the first in a series of short videos covering topics relating to AxoTools, both using the plugin and doing technical illustration in general. The first video briefly describes different types of projections for the benefit of those who don’t come from a technical illustration background.
The next in the series will cover how to begin an isometric drawing in AxoTools. Other possible topics may include:
If you have other suggestions for short video subjects, please leave a comment below!
I’d like to thank Ron Kempke, AxoTools’ co-author, as well as Matt Jennings of Industrial Artworks, and Greg Maxson of Greg Maxson Illustration for the use of their illustrations and advice in getting this video series started.
![]()
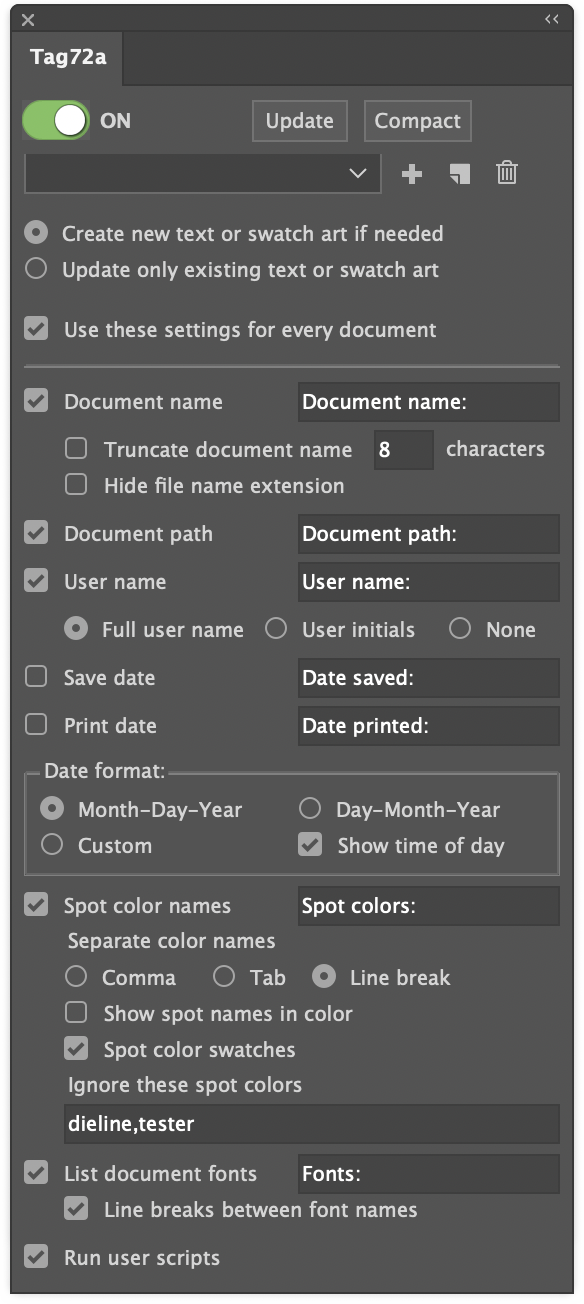
You can download and try Tag72a for free from the Worker72a product page. For detailed information, please see the Tag72a online documentation.
This is the same Tag72a plugin you’ve known from Worker72a, updated for Windows and Apple M1. Evaluate with 500 free trial uses.
![]()
![]() The Locked or Hidden Detector (LorH) is now available in the Worker72a collection. This plugin for Adobe Illustrator scans your documents for art objects that are locked or hidden. You can run it with a menu selection or set it to automatically scan every document you open.
The Locked or Hidden Detector (LorH) is now available in the Worker72a collection. This plugin for Adobe Illustrator scans your documents for art objects that are locked or hidden. You can run it with a menu selection or set it to automatically scan every document you open.
This update now runs under Windows and on Apple’s new M1-series processors. You can download it and evaluate it with 500 free trial uses.
![]()

If you use Hot Door’s CADtools plugin for Adobe Illustrator, you already know how AxoTools complements its extensive set of tools and features with additional options for axonometric drawing. With CADtools to quickly and accurately create orthographic art and AxoTools to project and finish axonometric views, you’ve got the best set of technical illustration tools available for Adobe Illustrator.
AxoTools has improved its integration with Hot Door’s CADtools plugin to share axonometric projections and document scales. To enable this, first select one or both of the CADtools options in AxoTools’ Preferences dialog.
The preferences dialog can be called by double-clicking any of the AxoTools tools or in the menus at Illustrator > Preferences > Graffix Plugins > AxoTools… (Mac) or Edit > Preferences > Graffix Plugins > AxoTools… (Windows).
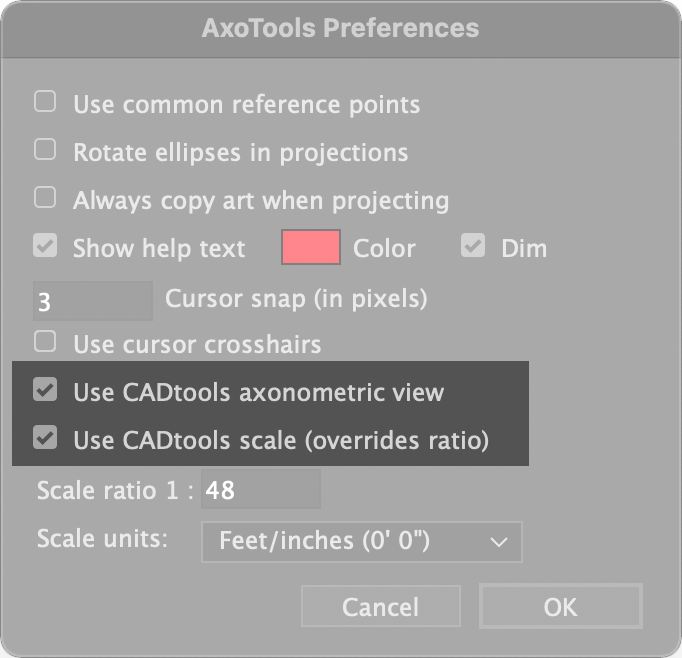
CADtools offers an extensive array of options for formatting values, but in AxoTools you’ll have to choose from the presets in the Scale units menu in the Preferences dialog.
To import CADtools’ scale or axonometric settings as set in its CADaxonometric panel, first ensure that you have CADtools installed and have checked the AxoTools preference to use CADtools axonometric view. Next select “Load CADtools settings” from the flyout menu in AxoTools’ Projection panel. The first time you do this, it may take a few seconds to make the connection from one plugin to another, but subsequent calls to CADtools will happen very quickly.
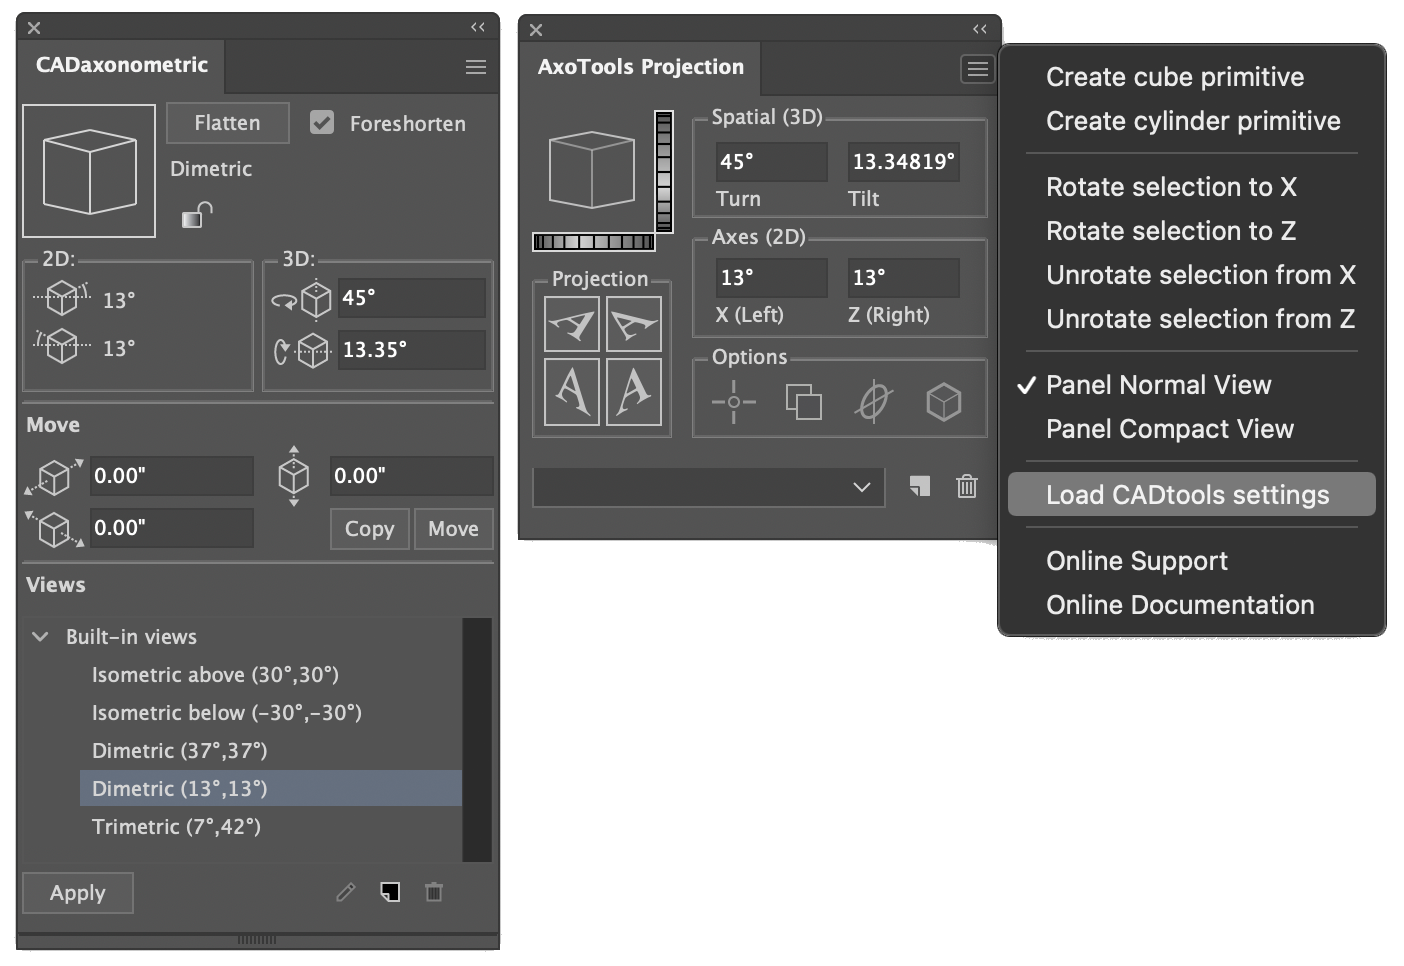
If you change the scale or axonometric settings in CADtools, AxoTools will not be alerted and so cannot automatically import the new settings. In that case, you must manually update AxoTools by selecting “Load CADtools settings” again from the Projection panel’s flyout menu. Every time you open or change your current document, AxoTools will look for CADtools to import its settings. If you don’t have CADtools installed, it’s recommended that you uncheck these two settings.
For more information on Hot Door’s excellent CADtools plugin, please visit https://hotdoor.com.
![]()
AxoTools 23.1.2 adds three new tools to create axonometric arcs, ellipses, and rectangles. Each tool draws directly on either the left, right, or top axonometric plane, or can be created numerically with a dialog box. As with many other tools in the AxoTools plugin, tap the Alt or Option key to toggle between different planes. dimensions will be scaled and formatted according to the new Preferences settings for the document
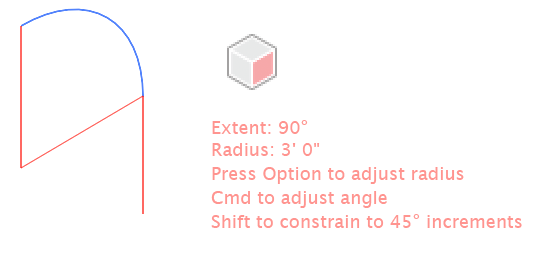 As you drag with the Axo Arc tool, the arc will appear highlighted. You can drag the arc forward or backward, left or right. Guide lines will appear to show the location of the arc center as well as a tangent line of the arc’s exit angle. If your preferences select Help text, the tool will also display the current arc’s extent angle and radius.
As you drag, press the Alt or Option key to adjust a fixed radius, or press the Ctl or Cmd key to change the arc’s starting angle. Press the shift key to constrain the arc’s extent to increments of 45°.
Click with the tool to display a dialog box to create an arc numerically. The Start angle represents the angle before projecting the arc to its axonometric plane, so you won’t need to hassle with converting angles on the screen to simple flat art. For example, a Start angle of 0° in the dialog would be drawn at 30° in an isometric top or right side view, and a 90° extent makes a quarter of a circle, regardless of the angles on the screen. Here, too, you can specify the radius of the arc with dimensions given in units you specify, such as feet or meters, and scaled to the current document ratio defined in your AxoTools preferences. Finally, choose whether the arc should curve to the left or to the right.

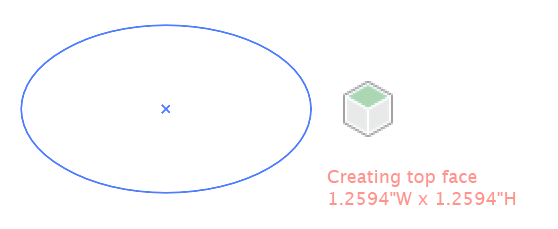 As you drag with the Axo Ellipse tool, the ellipse will appear projected onto your current axonometric plane. If your preferences select Help text, the tool will also display the current width and height using the units specified in your preferences and scaled to your document scale.
As you drag, press the Alt or Option key to anchor the ellipse at its center point. Press the shift key to constrain the ellipse to a circle.
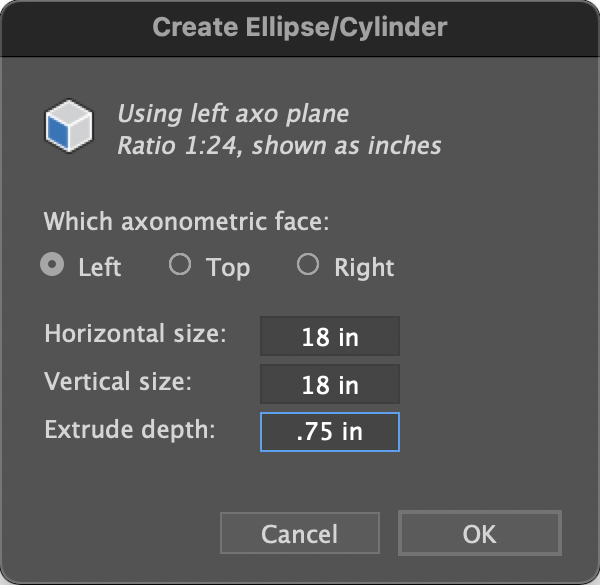
Click with the tool to display a dialog box to create an ellipse numerically. Enter a height and width, which will be scaled according to the document scale in your preferences. You can also enter a depth to extrude the ellipse to create a cylinder. Stroke widths and shaded fills will be adjusted according to your Axo Draw settings if you have that options set in your preferences.
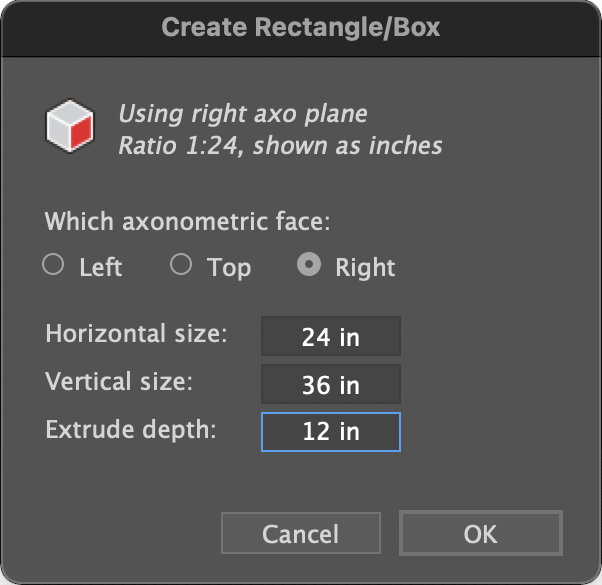
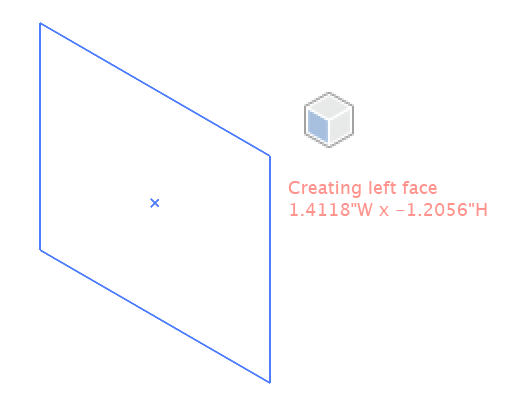 The Axo Rectangle tool works similar to the Axo Ellipse tool, except that it draws a rectangle. Like the Axo Ellipse tool, pressing the Shift or Alt/Option keys work as they do in Adobe Illustrator’s built-in Ellipse or Rectangle tools, only the art is drawn on an axonometric plane.
Click with the tool to display a dialog box to create a rectangle numerically. Enter a height and width, which will be scaled according to the document scale in your preferences. You can also enter a depth value to extrude the ellipse to create a box. It can be styled according to your Axo Draw settings and preferences settings.
These three tools have been among the most requested features, so it’s exciting to now make them available. Tutorial videos will be coming to demonstrate how to use them.
![]()