Select Menu speed bump
The popular free Select Menu plugin is now faster! I guess one could say it’s a speed bump in that its speed has been bumped up. Then again, its speed bump has been the result of removing (unless you want it) a speed bump, as in those bumps in the road intended to make you slow your vehicle down.
One recent improvement, or so I believed, was when the plugin checked for the existence of various types of objects in the current document and disabled unneeded menu items so as to save users from looking for something that’s not there. In a very large or complex document, however, that search can take a second or two, or longer, so the feature didn’t necessary save much time. With version 16.0.6, the default behavior is to enable all menu items whether needed or not. If you decide you’d rather have the menu parse the current object types, just press the Alt or Option key while selecting the Select > Object menu and the plugin will diligently search like Yoda examining the contents of Luke’s food case.
Did I mention that it’s free? Yup, still free.
![]()

 When fine-tuning the position of a pattern, I’ve often wondered if it would be faster and easier to just zoom in, click on a point I want aligned with something else, and drag it to the new position. Nudge Panel now includes a tool to let you do just that. And d’ya know what? It really is faster and easier than clicking the nudge buttons on the panel (although you may want to make the final ever-so-small adjustments with the panel). Snapping the tool to a path or point for alignment makes precise adjustments even more quickly.
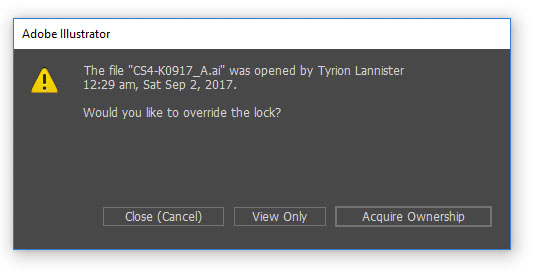
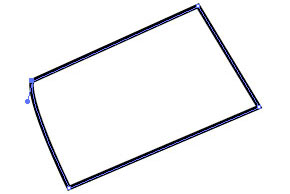
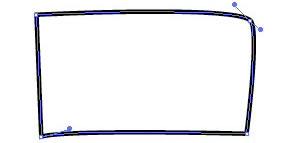 Newer versions of Illustrator CC have tools that allow you to draw casual rectangles and it automatically converts them to nice, square objects. But what if you’re working with customer-supplied art or something that had been distorted by previous transformations? You probably won’t start with something as sorry as the image shown here, but it’s not a problem if you did.
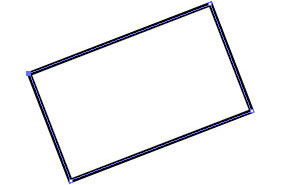
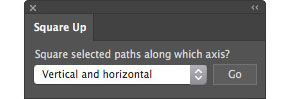 Using the Square Up plugin for Adobe Illustrator, simply select “Vertical and horizontal” from the popup menu and click the Go button.
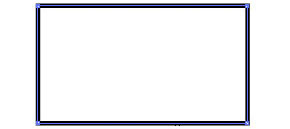 Almost instantly, your path(s) will become nice and square!
 What if your art is rotated, and you want it to stay that way? No problem…
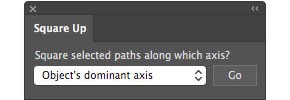 Just select “Object’s dominant axis from the popup menu and the plugin will calculate the general angle of your art.
 When placing many rectangular shapes where several may need to be at the same arbitrary angle or each a bit different, the Free Transform tool is really helpful.
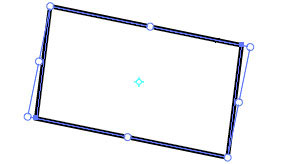 After dragging duplicates of the same rectangle around, you may notice it’s a bit skewed. I found with the newer versions of Illustrator that constrained transformations are no longer a given, and accidentally distorting a rectangle is unfortunately easy.
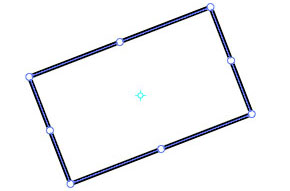
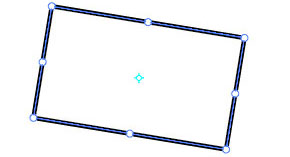 It’s no problem with Square Up, though. With the click of a button, the art is re-squared and the bounding box’s rotation is set to match the rotation of the art. If you do technical or production art, this could be a real timesaver. Go ahead and give it a test run. The trial period is based on usage, not time, so you’ll have plenty of opportunities to put it through its paces and try out the other modes, such as aligning to the AI Preferences constrain angle or just collapsing the control handles to remove all curves from the path.
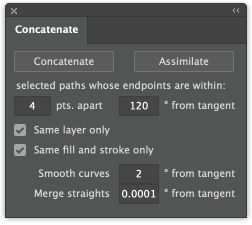 This is the best version of Concatenate ever (IMHO), and I find it’s a real pleasure to use. This update is highly recommended for all users. “What’s new?” you might ask. First, the two checkbox options are gone. Averaging anchor points is now built in. Why would anyone want short connectors between them? If you do, by all means let me know and if there’s enough demand, I’ll be happy to bring that back. Next, the option to average the control points is gone. I’ve never used it, since the results have never really given results I was happy with. Instead, I added an option to smooth joins between two curved paths by aligning the control handles. Of course, we don’t always want all curves smoothed, so there’s a setting to specify a range within which smoothing will be done. With a setting of 0, only paths that are already perfectly aligned will remain perfectly aligned. I.e., nothing changes. You could enter a value up to 180 degrees, in which case every curved join will be smoothed. You can set this to any setting that gives you a satisfactory result.