CC 2018 plugins for Mac and Windows online
Yay!
CC 2018 updates for both Mac and Windows are now available.
CC 2018 updates for both Mac and Windows are now available.
All Graffix plugins have something in common, whether it’s a module of code to add an About Box, handle preferences, or other functions. All of these shared libraries have had improvements made to them, making the plugins more stable, more reliable, and with better memory management. Every plugin available for CS6, CC, CC 2014, CC 2015, CC 2015.3, and CC 2017 (all 132 variations) now has an update available They’re recommended for all users.
And once you’ve downloaded those updates, you may notice that the read-me doc has been updated, as well, with clearer instructions on where to place the plugin. There’s also a link to the support area of this web site, which has been updated with an FAQ section and will see more frequent and meaningful help topics.
Many thanks to all users who have shared their questions, comments, and observations, which led to these improvements.
All the best,
![]()
 We’ve come to pretty much take for granted how quickly plugins work, regardless of the complexity of the calculations and manipulations they may do. Concatenate is designed to handle everyday small jobs, but also take on tasks that simply aren’t practical otherwise. Sometimes imported files can contain many layers and a gazillion paths. Seriously, I’ve worked with files containing over 200 layers and over 2,000,000 objects. Yes, two million paths! I kid you not.
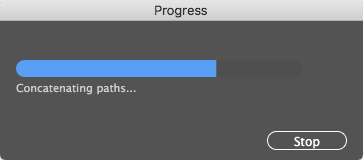
Pre-CS6 versions of Concatenate had a progress bar and could be cancelled if things were moving too slowly, or if you’re just impatient like me. When the developers’ landscape changed with CS6 and CC, there were a few things that took a while to work around, and the progress/cancel feature is now back. The progress bar is nice, but the option to cancel an operation that’s taking longer than expected can be a lifesaver, like an emergency brake, escape pod, ejection seat, or special super-powers when life gets complicated.
Helpful tip no. 2: You can simplify the assimilate process by hiding or locking layers that aren’t relevant.
Concatenate 16.1.1 is recommended for all users, especially those who may forget to save before trying ludicrously reckless things. You can trust me on this…
![]()
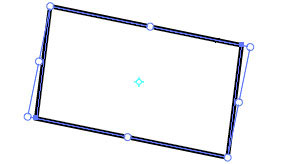
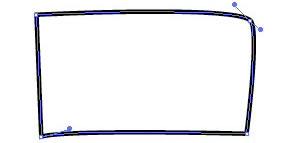 Newer versions of Illustrator CC have tools that allow you to draw casual rectangles and it automatically converts them to nice, square objects. But what if you’re working with customer-supplied art or something that had been distorted by previous transformations? You probably won’t start with something as sorry as the image shown here, but it’s not a problem if you did.
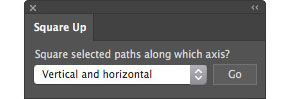 Using the Square Up plugin for Adobe Illustrator, simply select “Vertical and horizontal” from the popup menu and click the Go button.
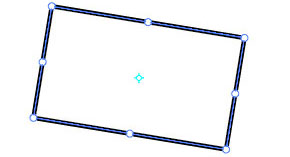
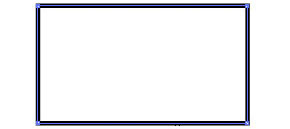 Almost instantly, your path(s) will become nice and square!
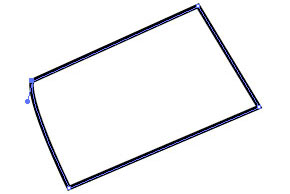 What if your art is rotated, and you want it to stay that way? No problem…
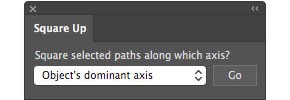 Just select “Object’s dominant axis from the popup menu and the plugin will calculate the general angle of your art.
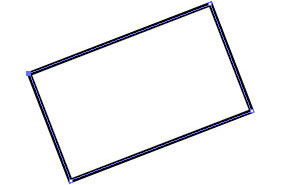
If several objects are selected, all of them will be squared to the same angle.
 When placing many rectangular shapes where several may need to be at the same arbitrary angle or each a bit different, the Free Transform tool is really helpful.
 After dragging duplicates of the same rectangle around, you may notice it’s a bit skewed. I found with the newer versions of Illustrator that constrained transformations are no longer a given, and accidentally distorting a rectangle is unfortunately easy.
 It’s no problem with Square Up, though. With the click of a button, the art is re-squared and the bounding box’s rotation is set to match the rotation of the art. If you do technical or production art, this could be a real timesaver. Go ahead and give it a test run. The trial period is based on usage, not time, so you’ll have plenty of opportunities to put it through its paces and try out the other modes, such as aligning to the AI Preferences constrain angle or just collapsing the control handles to remove all curves from the path.
You can find it here, and download the one for your platform and AI version. Can this be made easier to use, or more flexible? Feel free to say so. Your comments and suggestions are always welcomed. I’m an illustrator, too, so as Red Green says, “we’re all in this together.”
![]()
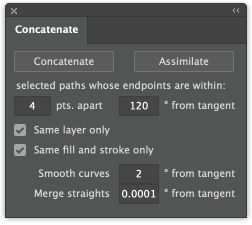 This is the best version of Concatenate ever (IMHO), and I find it’s a real pleasure to use. This update is highly recommended for all users. “What’s new?” you might ask. First, the two checkbox options are gone. Averaging anchor points is now built in. Why would anyone want short connectors between them? If you do, by all means let me know and if there’s enough demand, I’ll be happy to bring that back. Next, the option to average the control points is gone. I’ve never used it, since the results have never really given results I was happy with. Instead, I added an option to smooth joins between two curved paths by aligning the control handles. Of course, we don’t always want all curves smoothed, so there’s a setting to specify a range within which smoothing will be done. With a setting of 0, only paths that are already perfectly aligned will remain perfectly aligned. I.e., nothing changes. You could enter a value up to 180 degrees, in which case every curved join will be smoothed. You can set this to any setting that gives you a satisfactory result.
A couple of under-the-hood changes that allow the plugin to run faster are less obvious. Most significant is a change that makes Concatenate smarter about which paths to consider for assimilation, which also solves a problem of occasional benign errors and their pesky dialogs, most noticeable when layers are hidden.
But wait, there’s more to come! Concatenate is often used with very large map or CAD files, and when it’s evaluating tens, or even hundreds of thousands of path segments, operations can take much more than the almost instant results we’re used to. For those situations, a progress bar will be added soon.
If you have observations about this update or ideas of any way Concatenate or Assimilate can be made better, please let me know. Remember, I’m an illustrator like you and, as Red Green used to say, “We’re all in this together.”
![]()
Another free plugin! I really can’t call it new because this one’s been a popular download for years, but it is still free. It does one simple function: it draws straight lines constrained to isometric angles (unless you hold down the shift key for 45-degree constraints or Option/Alt for no constraints), but this time, however, it’s a bit better. It borrows some functions from the Concatenate plugin so new lines are automatically joined if they’re drawn from the endpoint of another.
You probably already know that isometric drawings are easier when you turn on Smart Guides with the 60-degree preset and construction guides checked. Combine this with the free Isometric Actions and isometric clipart, and that was pretty much my toolkit for technical and assembly drawings until I discovered CADtools. Isometric Line Tool, however, is still one of my main tools. I gave it the keyboard shortcut “Y” (naturally) and use it often for simple tasks.
Please feel free to download and try the Isometric Line Tool. I hope it serves you long and well!
![]()
 Buried not-too-deeply in Adobe’s SDK (Software Developer’s Kit) is a list of pre-defined art object types. While some were included in Illustrator’s Select > Object menu, many more were not. It seemed useful to select the other object types, as well, and objects such as paths had properties that were easily obtained and often helpful to select within an illustration. In that spirit, I wrote Select Menu plugin and, given that it was relatively simple to build and applicable to casual users, I’d make it available for free.
It’s not always clear though, what each object type represents, so please understand than some of these choices are simply passed along to you to use to the extent that Adobe uses them when creating their digital form of your artwork. For example, if you use the Shaper tool in CC 2017, you’ll see in the Layers Panel that a Shaper Group has been created. That object type isn’t in the list, though, so finding them would involve examining every object in the document and examining its structure and properties to select those that fit the definition of a Shaper Group. I hope to find enough data on Shapers, Envelopes, and other objects to add them to the menu, so updates are likely in the foreseeable future.
Illustrator CC added Point Text Objects and Area Text Objects, so Select Menu adds them for CS6 users as well. In addition, it adds the following 27 items for everybody:
I hope the menu is as helpful for you as it has been for me. If it fails to select an object you feel it should, please copy that object into a separate Illustrator document and send it to me as a bug report. If I can find the problem, I’ll fix it.
The topic of item selection can be taken much farther, though, so if you want a real selection power tool, you’ll probably not find one better than Hot Door’s NitPicker plugin, which I find indispensable in addition to Select Menu.
![]()
If you’re familiar with the Square Up plugin, you may happy to know that it’s now available for Illustrator CS6 through CC 2017.
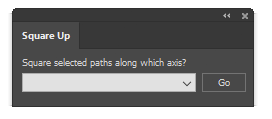 Have you ever been given a project with almost-usable art to use as a starting point? You know, the kind where straight lines should be at right angles, but it’s just a little bit cockeyed? I used to manually snap every point to a grid, but thought “good grief, there must be a simpler way.” That’s when I got the idea for Square Up. With it, you can just select the paths you want to straighten, select how you want them aligned, and “click” it’s done. There are four methods of squaring which could probably benefit from a brief explanation.
 I might mention that the plugin now comes in a new, compact size. At first I made a panel that mimicked the dialog shown here, then realized it didn’t have to be that huge. Even though panels (remember when we called them palettes?) have some real advantages over modal dialog boxes, there is a point where they begin to crowd our work area so I promise not to make mine larger than they really have to be.
Please feel free to try it out!
![]()