The Locked or Hidden Detector (LorH) is now available in the Worker72a collection. This plugin for Adobe Illustrator scans your documents for art objects that are locked or hidden. You can run it with a menu selection or set it to automatically scan every document you open.
This update now runs under Windows and on Apple’s new M1-series processors. You can download it and evaluate it with 500 free trial uses.
The second Worker72a plugin is now available here. When Text Overflow Alert is installed, it automatically scans all documents when opened for text frames or text paths with overflowed text, and selects it for you to inspect and edit as needed. You can read more about it on its product page or follow upcoming Worker 72a plugins on the Worker72a download page.
The plugin is on sale through August 2022, with prices as low as $3.00 for an individual license.
Look for more Worker72a plugins in the near future.
Worker72a is now part of the Graffix family of Adobe Illustrator plugins
Doug Habben has been writing Adobe Illustrator plugins for a couple of decades, and in 2006 began offering them to the public under the banner of Worker72a. Doug and I have been in touch for many years, trading tips as fellow part-time plugin developers. After several years of retirement from his day job, Doug decided to retire from his own business, as well, and contacted me about handling and maintaining his plugins going forward. We obviously reached an agreement and for the first time, Worker72a plugins will be available for Windows, and also run natively on the new Apple M1 processors.
The first of Doug’s plugins to migrate over is White Overprint Detector. When installed, it automatically scans all opened documents for text or path art with white overprinting strokes or fills, and selects it for you to inspect and edit as needed. You can read more about it on its product page or follow upcoming Worker 72a plugins on the Worker72a download page.
The plugin is on sale through August 2022, with prices as low as $3.00 for an individual license.
If you use Hot Door’s CADtools plugin for Adobe Illustrator, you already know how AxoTools complements its extensive set of tools and features with additional options for axonometric drawing. With CADtools to quickly and accurately create orthographic art and AxoTools to project and finish axonometric views, you’ve got the best set of technical illustration tools available for Adobe Illustrator.
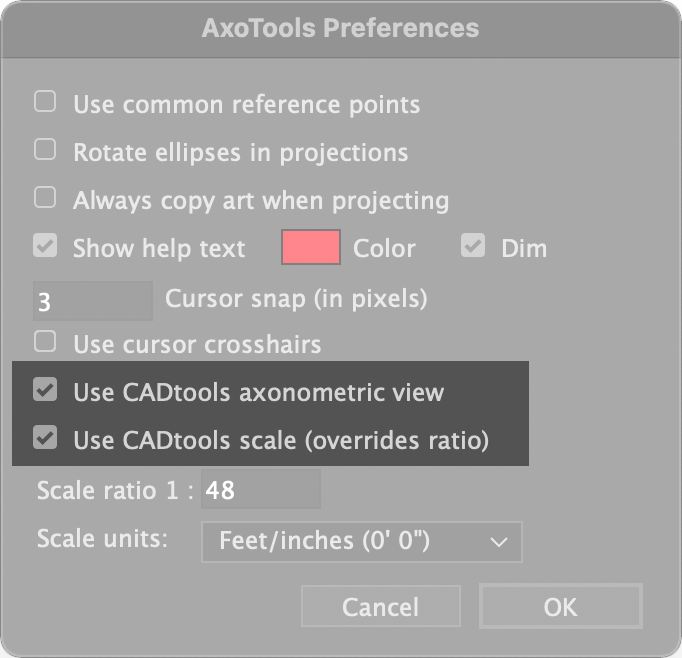
AxoTools has improved its integration with Hot Door’s CADtools plugin to share axonometric projections and document scales. To enable this, first select one or both of the CADtools options in AxoTools’ Preferences dialog.
The preferences dialog can be called by double-clicking any of the AxoTools tools or in the menus at Illustrator > Preferences > Graffix Plugins > AxoTools… (Mac) or Edit > Preferences > Graffix Plugins > AxoTools… (Windows).
CADtools offers an extensive array of options for formatting values, but in AxoTools you’ll have to choose from the presets in the Scale units menu in the Preferences dialog.
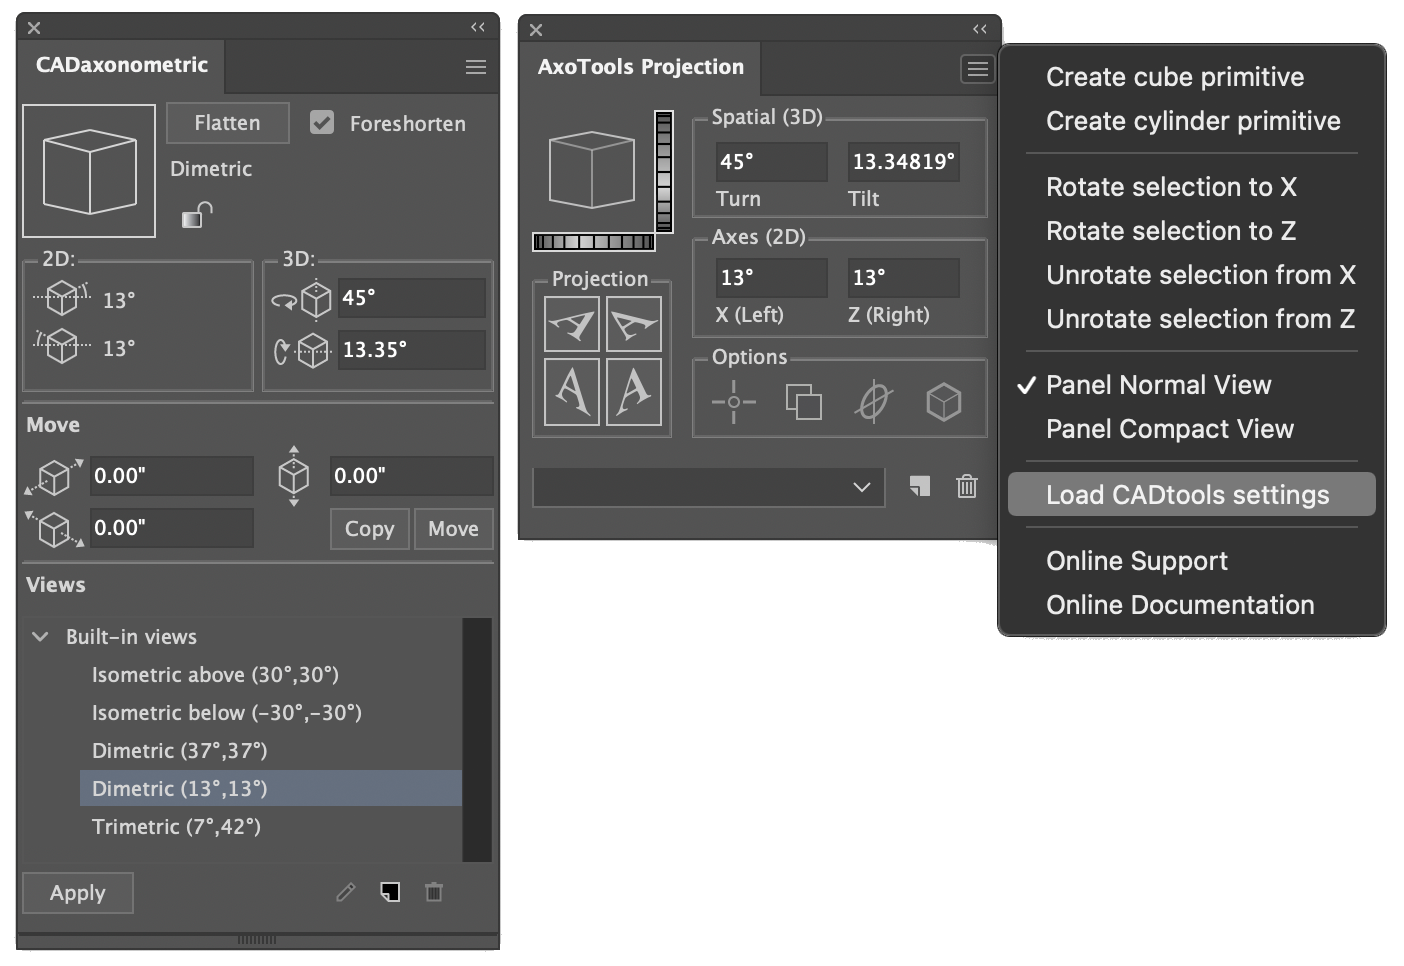
To import CADtools’ scale or axonometric settings as set in its CADaxonometric panel, first ensure that you have CADtools installed and have checked the AxoTools preference to use CADtools axonometric view. Next select “Load CADtools settings” from the flyout menu in AxoTools’ Projection panel. The first time you do this, it may take a few seconds to make the connection from one plugin to another, but subsequent calls to CADtools will happen very quickly.
If you change the scale or axonometric settings in CADtools, AxoTools will not be alerted and so cannot automatically import the new settings. In that case, you must manually update AxoTools by selecting “Load CADtools settings” again from the Projection panel’s flyout menu. Every time you open or change your current document, AxoTools will look for CADtools to import its settings. If you don’t have CADtools installed, it’s recommended that you uncheck these two settings.
For more information on Hot Door’s excellent CADtools plugin, please visit https://hotdoor.com.
AxoTools 23.1.2 adds three new tools to create axonometric arcs, ellipses, and rectangles. Each tool draws directly on either the left, right, or top axonometric plane, or can be created numerically with a dialog box. As with many other tools in the AxoTools plugin, tap the Alt or Option key to toggle between different planes. dimensions will be scaled and formatted according to the new Preferences settings for the document
Axo Arc tool
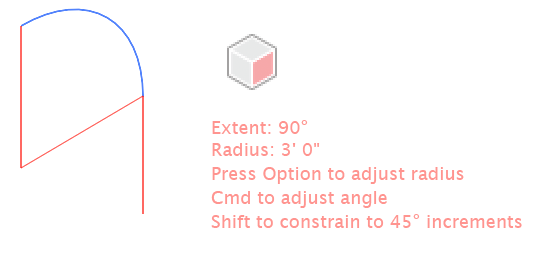
As you drag with the Axo Arc tool, the arc will appear highlighted. You can drag the arc forward or backward, left or right. Guide lines will appear to show the location of the arc center as well as a tangent line of the arc’s exit angle. If your preferences select Help text, the tool will also display the current arc’s extent angle and radius.
As you drag, press the Alt or Option key to adjust a fixed radius, or press the Ctl or Cmd key to change the arc’s starting angle. Press the shift key to constrain the arc’s extent to increments of 45°.
Click with the tool to display a dialog box to create an arc numerically. The Start angle represents the angle before projecting the arc to its axonometric plane, so you won’t need to hassle with converting angles on the screen to simple flat art. For example, a Start angle of 0° in the dialog would be drawn at 30° in an isometric top or right side view, and a 90° extent makes a quarter of a circle, regardless of the angles on the screen. Here, too, you can specify the radius of the arc with dimensions given in units you specify, such as feet or meters, and scaled to the current document ratio defined in your AxoTools preferences. Finally, choose whether the arc should curve to the left or to the right.
Axo Ellipse tool
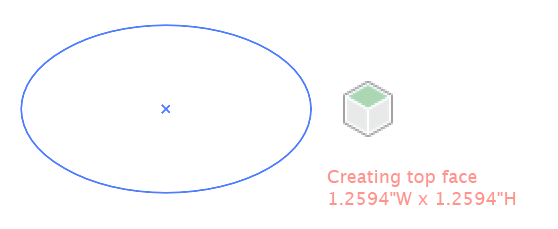
As you drag with the Axo Ellipse tool, the ellipse will appear projected onto your current axonometric plane. If your preferences select Help text, the tool will also display the current width and height using the units specified in your preferences and scaled to your document scale.
As you drag, press the Alt or Option key to anchor the ellipse at its center point. Press the shift key to constrain the ellipse to a circle.
Click with the tool to display a dialog box to create an ellipse numerically. Enter a height and width, which will be scaled according to the document scale in your preferences. You can also enter a depth to extrude the ellipse to create a cylinder. Stroke widths and shaded fills will be adjusted according to your Axo Draw settings if you have that options set in your preferences.
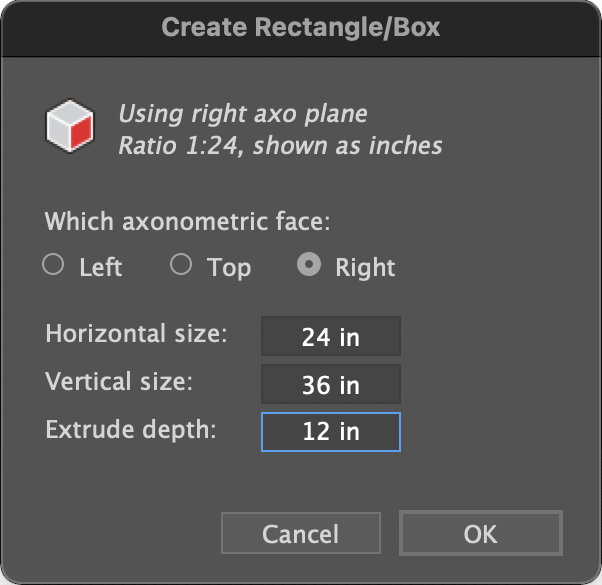
Axo Rectangle tool
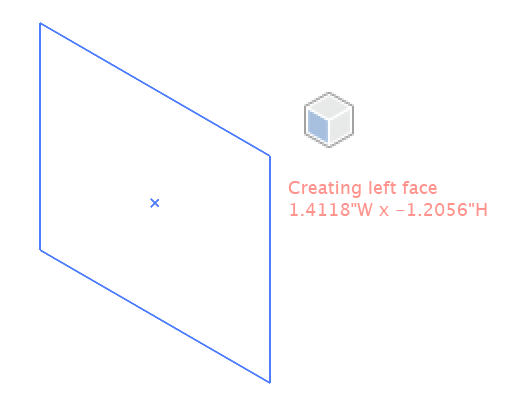
The Axo Rectangle tool works similar to the Axo Ellipse tool, except that it draws a rectangle. Like the Axo Ellipse tool, pressing the Shift or Alt/Option keys work as they do in Adobe Illustrator’s built-in Ellipse or Rectangle tools, only the art is drawn on an axonometric plane.
Click with the tool to display a dialog box to create a rectangle numerically. Enter a height and width, which will be scaled according to the document scale in your preferences. You can also enter a depth value to extrude the ellipse to create a box. It can be styled according to your Axo Draw settings and preferences settings.
These three tools have been among the most requested features, so it’s exciting to now make them available. Tutorial videos will be coming to demonstrate how to use them.
AxoTools now includes an Axo Shear tool that will allow you to shear artwork that’s already been projected onto an axonometric plane. It functions similar to Adobe’s Shear tool in that its default anchor point is the center of the selection, but you can click to place the anchor anywhere you’d like.
The plugin will display a cube annotation with one of the three axonometric faces highlighted. Simply tap the Alt/Option key to choose the plane you’re working on. Drag to shear the art, and the current shear angle will be shown near the cursor. Press the Shift key while dragging to constrain the shear to increments of 15°.
To shear art numerically on a projected plane, Alt/Option click on a location for the anchor point of the operation. In the dialog box that appears, fill in the shear amount, the axis angle to shear on, and the face upon which to shear.
The new tool is available in the current version of AxoTools for Adobe Illustrator 2019 – 2022. You can download it here for either Mac or Windows.
Some of you may recall using a free “Isometric Line Tool” plugin for Adobe Illustrator. I wrote it in 1997 to simply draw straight lines constrained to isometric angles. When I rewrote my plugins for CS6 and CC, it was renamed simply “IsoTool.”
The plugin was discontinued after it was included in AxoTools, but remained free to use after the trial had expired. As AxoTools gained new features, the free tool could seem buried amid nine tools and six panels. Now AxoTools includes a “Free” mode to accommodate those users. Unlicensed installation of the plugin have a menu item File > AxoTools > Show only free AxoTools features. If you choose this item, the next time you launch Adobe Illustrator, AxoTools will load only the free features. As part of AxoTools, the free parts go beyond the old line tool.
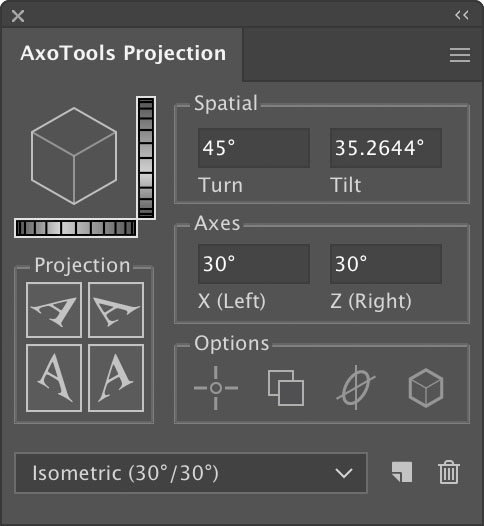
The Projection panel gives you any axonometric projection you choose, not just isometric. The Projection buttons won’t do anything and the Options are irrelevant, but the preset menu will allow you to save and quickly recall your favorite settings.
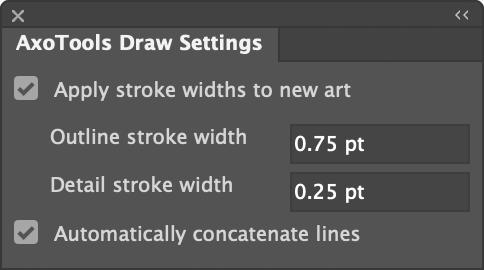
Now you can choose to automatically apply either of two line weights as you draw, as well as to automatically concatenate lines. The stroke widths you choose will be saved in your plugin’s preferences.
The multi-purpose Axo tool now retains its Move functions for selected artwork for Free mode users to easily move artwork along the current axonometric paths. This includes selected anchor points within a path.
The Axo Measure tool is also available for free. It measures distances and angles, including the delta between two angles, as measured on any of the axonometric or orthographic planes.
And if you later decide to go for a license (annual licenses are currently on sale for only $5/year), that remains an option as well. You can download it here for Adobe Illustrator 2019 – 2022 for either Mac or Windows.
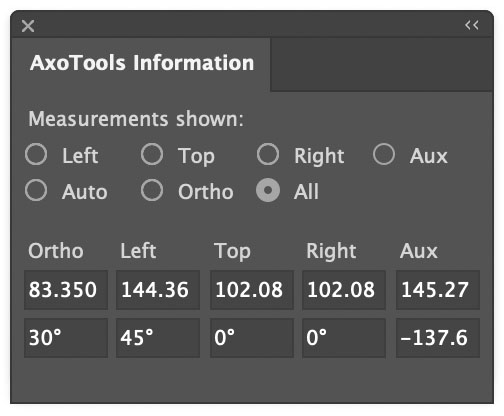
AxoTools 23.0.2 adds a new tool that acts as both an axonometric ruler as well as a protractor. It allows you to measure distances and angles in any of the three axonometric axes, scaled for the foreshortening factor of that plane, whether its projection is isometric, dimetric, or trimetric. Measurements are displayed for all axo planes as well as orthographic.
The tool is automatically constrained along your current axonometric axes, or press Shift to constrain to the nearest 45°, or press Alt/Option for no constraints at all.
In the Info panel, choose a set of measurements to display, or choose “Auto” to let the tool guess what you’re measuring based on the direction you drag the mouse. Choose “All” to see all results in fields where you can copy values to paste elsewhere.
To use the tool, simply click and drag to measure a distance and an angle. To measure the difference between two angles on an axonometric plane, click once to set an anchor point, then drag an arc from one point to another.
The free update is available for Adobe Illustrator CC 2019, 2020, 2021, and 2022.

 As you drag with the Axo Arc tool, the arc will appear highlighted. You can drag the arc forward or backward, left or right. Guide lines will appear to show the location of the arc center as well as a tangent line of the arc’s exit angle. If your preferences select Help text, the tool will also display the current arc’s extent angle and radius.
 As you drag with the Axo Ellipse tool, the ellipse will appear projected onto your current axonometric plane. If your preferences select Help text, the tool will also display the current width and height using the units specified in your preferences and scaled to your document scale.
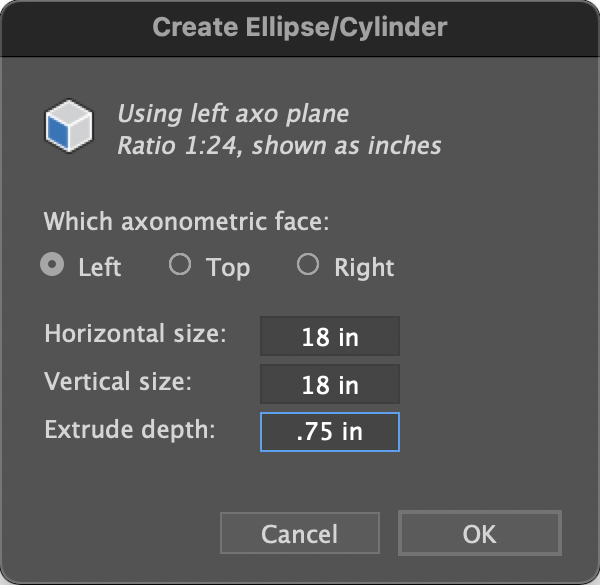
 The Axo Rectangle tool works similar to the Axo Ellipse tool, except that it draws a rectangle. Like the Axo Ellipse tool, pressing the Shift or Alt/Option keys work as they do in Adobe Illustrator’s built-in Ellipse or Rectangle tools, only the art is drawn on an axonometric plane.