Select Menu for CC
 Buried not-too-deeply in Adobe’s SDK (Software Developer’s Kit) is a list of pre-defined art object types. While some were included in Illustrator’s Select > Object menu, many more were not. It seemed useful to select the other object types, as well, and objects such as paths had properties that were easily obtained and often helpful to select within an illustration. In that spirit, I wrote Select Menu plugin and, given that it was relatively simple to build and applicable to casual users, I’d make it available for free.
It’s not always clear though, what each object type represents, so please understand than some of these choices are simply passed along to you to use to the extent that Adobe uses them when creating their digital form of your artwork. For example, if you use the Shaper tool in CC 2017, you’ll see in the Layers Panel that a Shaper Group has been created. That object type isn’t in the list, though, so finding them would involve examining every object in the document and examining its structure and properties to select those that fit the definition of a Shaper Group. I hope to find enough data on Shapers, Envelopes, and other objects to add them to the menu, so updates are likely in the foreseeable future.
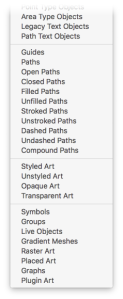
Illustrator CC added Point Text Objects and Area Text Objects, so Select Menu adds them for CS6 users as well. In addition, it adds the following 27 items for everybody:
- Legacy Text Objects
- Path Text Objects
- Guides
- Paths
- Open Paths
- Closed Paths
- Filled Paths
- Unfilled Paths
- Stroked Paths
- Unstroked Paths
- Dashed Paths
- Undashed Paths
- Compound Paths
- Styled Art
- Unstyled Art
- Opaque Art
- Transparent Art
- Symbols
- Groups
- Live Objects
- Gradient Meshes
- Raster Art
- Placed Art
- Graphs
- Plugin Art
I hope the menu is as helpful for you as it has been for me. If it fails to select an object you feel it should, please copy that object into a separate Illustrator document and send it to me as a bug report. If I can find the problem, I’ll fix it.
The topic of item selection can be taken much farther, though, so if you want a real selection power tool, you’ll probably not find one better than Hot Door’s NitPicker plugin, which I find indispensable in addition to Select Menu.
![]()

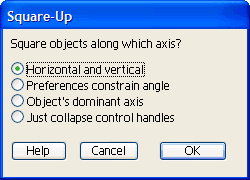
 Have you ever been given a project with almost-usable art to use as a starting point? You know, the kind where straight lines should be at right angles, but it’s just a little bit cockeyed? I used to manually snap every point to a grid, but thought “good grief, there must be a simpler way.” That’s when I got the idea for Square Up. With it, you can just select the paths you want to straighten, select how you want them aligned, and “click” it’s done. There are four methods of squaring which could probably benefit from a brief explanation.
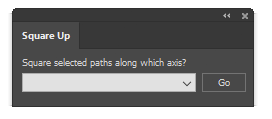
 I might mention that the plugin now comes in a new, compact size. At first I made a panel that mimicked the dialog shown here, then realized it didn’t have to be that huge. Even though panels (remember when we called them palettes?) have some real advantages over modal dialog boxes, there is a point where they begin to crowd our work area so I promise not to make mine larger than they really have to be.
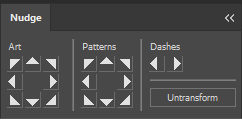
 When I draw a floor plan and place a pattern of a grid drawn at a given architectural scale behind it, I want the upper-left corner to align with the grid. How useful would a grid be, really, if it were simply plopped randomly behind the art? To use the plugin, I select the path with the pattern fill and click on one of the eight directional triangles to move the pattern left, right, up, down, or diagonally by one point. If I press the Command/Control key, the movement is divided in half, or the Option/Alt key will divide the moment by four. On a Mac, pressing the Control key while clicking will divide the distance by eight, and holding combinations of these keys will combine the effects so that I can make adjustments of 1/64 of a point. Pressing the shift key, too, will make each key work as a multiplier to move the pattern farther with each click.