Another free plugin! I really can’t call it new because this one’s been a popular download for years, but it is still free. It does one simple function: it draws straight lines constrained to isometric angles (unless you hold down the shift key for 45-degree constraints or Option/Alt for no constraints), but this time, however, it’s a bit better. It borrows some functions from the Concatenate plugin so new lines are automatically joined if they’re drawn from the endpoint of another.
You probably already know that isometric drawings are easier when you turn on Smart Guides with the 60-degree preset and construction guides checked. Combine this with the free Isometric Actions and isometric clipart, and that was pretty much my toolkit for technical and assembly drawings until I discovered CADtools. Isometric Line Tool, however, is still one of my main tools. I gave it the keyboard shortcut “Y” (naturally) and use it often for simple tasks.
Please feel free to download and try the Isometric Line Tool. I hope it serves you long and well!
If you’re familiar with the Square Up plugin, you may happy to know that it’s now available for Illustrator CS6 through CC 2017.
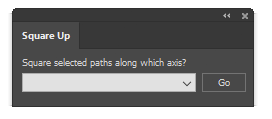
Have you ever been given a project with almost-usable art to use as a starting point? You know, the kind where straight lines should be at right angles, but it’s just a little bit cockeyed? I used to manually snap every point to a grid, but thought “good grief, there must be a simpler way.” That’s when I got the idea for Square Up. With it, you can just select the paths you want to straighten, select how you want them aligned, and “click” it’s done. There are four methods of squaring which could probably benefit from a brief explanation.
Horizontal and vertical: OK, this one may be self-explanatory, but I’ll elaborate anyway. The plugin first collapses all control handles so that any organic shape will become a polygon or polyline. It then measures the angle of each segment, and if it’s roughly vertical, the horizontal position of the endpoints are averaged so that it becomes true vertical, with similar treatment of horizontal segments. If it’s somewhere around 45 degrees, it just leaves it.
Preferences constrain angle: This one works similar to the first option, but aligns segments either parallel or perpendicular to whatever you set your constrain angle to in Illustrator’s preferences.
Object’s dominant axis: This is my favorite. I found that as I use Illustrator’s Free Transform tool to resize and rotate a rectangular object, like the outline of a structure on a map or architectural plan, the object gradually degrades to something resembling a parallelogram. The plugin measures all of the segments’ angles and averages them, then uses that as a major axis to align with. It even works on a group of objects that need to be rotated to the same angle.
Just collapse control handles: Because sometimes all we want is to sharpen the corners.
I might mention that the plugin now comes in a new, compact size. At first I made a panel that mimicked the dialog shown here, then realized it didn’t have to be that huge. Even though panels (remember when we called them palettes?) have some real advantages over modal dialog boxes, there is a point where they begin to crowd our work area so I promise not to make mine larger than they really have to be.
What’s your least favorite tool in Adobe Illustrator? Don’t get me wrong, Illustrator is an amazing piece of software, but with so many great features, something’s bound to be, um, less great. For me, that bit of mediocrity is the Scissors tool. Without a doubt, it performs a very necessary function, but I long wished I could get around the error message “Please use the scissors tool on a segment or anchor point (but not an endpoint) of a path.” It’s possible, of course, to dismiss the dialog and choose not see it again, but the finicky behavior is still there, making it a hassle to trim stacked or intersecting paths.
In 2001 I finished the first version of Cutting Tools, beginning with the Hatchet tool, designed not to throw up its hands and abandon the job site if the top path at that location happens to be an endpoint. There’s often another path under there, or maybe several, which I’d like to slice through in one fell “thwack!” Next I added the Table Saw and Saber Saw, which accommodated even more path destruction in one gesture. Once I had amassed a collection of leftover paths to clear away, either extreme laziness or a desire for efficiency inspired a quick-delete tool. I soon added a shortcut from the Hatchet so I could sever and sweep in one move of the stylus. Early versions of the Vector Vac animated the vectors spinning and shrinking as they got pulled into the vacuum. At first the effect was fun, but it soon just seemed silly.
Although it was the first of my plugins to rewrite for CS6 and CC, Cutting Tools’ multiple iterators and mutable arrays took a little time to tame, but the plugin is now updated and ready to be cut loose. I hope you find it useful. The plugin comes pre-loaded with a thousand trial uses for your evaluation. Really, 1,000! You may never want to run [Illustrator] with scissors again.
How often have you placed a pattern into a path, but needed to align the pattern with other art, but without moving the path? With a little guesswork and patience, it can be done, but there ought to be a simpler, more straightforward way. And there is!
When I draw a floor plan and place a pattern of a grid drawn at a given architectural scale behind it, I want the upper-left corner to align with the grid. How useful would a grid be, really, if it were simply plopped randomly behind the art? To use the plugin, I select the path with the pattern fill and click on one of the eight directional triangles to move the pattern left, right, up, down, or diagonally by one point. If I press the Command/Control key, the movement is divided in half, or the Option/Alt key will divide the moment by four. On a Mac, pressing the Control key while clicking will divide the distance by eight, and holding combinations of these keys will combine the effects so that I can make adjustments of 1/64 of a point. Pressing the shift key, too, will make each key work as a multiplier to move the pattern farther with each click.
Have you ever drawn a dashed line diverging from another? With the Dashes adjustments, you can precisely slide the dashes on a path forward or back along a path to align them as needed.
With the CC release, you can also select art objects and move them in small increments. I find this helpful for things like fine-tuning the placement of city names on maps or other situations where snapping isn’t helpful.
After working with pattern adjustments I found that patterns from existing art may have been scaled, rotated, or sheared, and to regain control of the pattern, there’s an Untransform button. Besides restoring a pattern to its original proportions, it also works on images (making them easy to export with the highest quality possible) and on other placed images such as EPS.
Please feel free to download it and try it out. In demo mode, you can take your time because the trial period doesn’t expire, but is instead based on a thousand test clicks. I’m sure you’ll find it a useful addition to your Illustrator workflow. As always I welcome your comments, questions, or suggestions.
Everyone who pays for software seems to have an opinion on subscription models, not often positive. I can understand, though, how for some people it actually works pretty well. Let it go on the record that I would never (as in never ever) move my Illustrator plugins to a subscription-only basis, but timed licensing is supported by the online authentication software I have (kudos to NSP-Code for a great product), and it got me thinking that it may be a nice option to offer. Sometimes a job arrives with CAD files that could make a nice starting point for the project. Rather than manually trace it all, it might be nice to “rent” Concatenate for the duration of the project and reuse many or most of those vectors. I think a lot of people would agree that the twenty bucks for Concatenate is pretty small compared to the savings it returns in its first project alone. Or when you divide a ten-dollar plugin into a few months’ fee, it pretty much comes down to pocket change. Then again, maybe there’s a situation that works for both parties, like one year’s access to Productivity Pack or a site or corporate license. I’m open to suggestions!
As development progresses, I’m pleased to offer public betas of the three free plugins, Arrowheads, Isometric Line Tool, and Select Menu for CS6–CC 2017. Just scroll down on the Plugin page until you see the new blue beta buttons.
If you use a version of CC that’s not included here, please let me know and I’ll be happy to add it. Some of the features are yet to be added, but they’re useful enough as is that I use them myself every day. Please let me know if you encounter any unexpected behavior or have an improvement you’d like to see added.
To sign up to test the other plugins, please visit the beta area and follow the instructions there.
Every plugin I’ve written has a story, or more specifically, experiences in using Adobe Illustrator when I’ve thought “Gee, if one could only…” and so in 1993 I wrote Concatenate to address a frequent dilemma.
If you’ve ever imported CAD files or GIS data for maps, chances are your first reaction was something like “wow, there’s a lot of detail here, it’ll save me a ton of time!” But once you started working with it you probably had some reservations, thinking “Oh no, this must be made up of a gazillion tiny pieces!”
That’s what I thought when I started working on maps like this one of the Twin Cities for an article by Steve Glischinski in the December 2003 issue of Trains magazine. The image on the left shows USGS (US Geological Survey) data imported into Adobe Illustrator via Avenza’s MAPublisher plugin. Here I had imported data for streets and highways, railroads, and inland waterbodies. It looked much more like a map once I simplified and colored it with the help of my Concatenate plugin.
As this image of small-town streets and highways here shows, GIS data is similar to imported CAD data in that it’s made up of many short paths laid end-to-end. Generally, the paths end at every point where they meet or cross another path.
By selecting one or more paths, I used Concatenate’s Assimilate function to join the paths whose endpoints were within 0.25 points apart and within 10° of tangent. By adjusting this setting, I could control which paths were concatenated, restricting it to those that formed a fairly straight line. A second pass concatenated the other side of the divided highway. Now this main road can be given a prominent style and the secondary roads made lighter and/or thinner.
As you can see in the top right image, the inland lakes were stroked and filled with blue. Most of them are already joined as closed paths with occasional cleanup, but the rivers had to be concatenated into longer paths which I then applied Illustrator’s Object > Path > Simplify function on (usually set to curved lines between 97-100% accuracy). Hiding other layers helped eliminate visual clutter as well as restricting selections to the paths I needed to work on. The many streets made the city railroad map use more memory and storage than was really needed, so I used the Concatenate plugin on that, also, again starting by concatenating lines within a few degrees of tangent, then selecting and concatenating again with slightly larger values. Finally, I simplified the paths to remove excess points so that the street grids became what they appeared to be, longer streets that simply crossed each other. This becomes especially important when creating art for digital media, since low-power phones and tablets have to draw every line if the art is left in vector format.
So, where is Concatenate for CS6 and CC now?
Concatenate is currently in beta testing and coming along nicely. I use it myself regularly at my day job, and today worked on refining the Assimilate function. It’s available to testers now and should be released soon.
In its public debut, the plugin will likely be missing the ability to record it as an Action, but I felt users who rely on it would prefer earlier access and a few free updates as I restore original features and add some new ones, as well.
You can expect versions for CS6, CC, CC 2014, CC 2015, CC 2015.3, and CC 2017, in addition to Mac OS X and Windows 32- and 64-bit versions. I’d like to thank our friends at Hot Door for providing the tools that made these newer versions possible.
The first Graffix plugin for Illustrator CS6, Select Menu, is now available. Another update is coming for CC versions, soon after other plugins are updated. The next version of Select Menu is expected to add other object types, such as point text and area text. As always, this version is free!
Update: Separate versions are needed for 32- or 64-but versions for Windows.
If you find Select Menu useful, but long for more options, you may want to check out Hot Door Software\’s NitPicker panel. It allows you to select art items according to an array of criteria, and save those settings for future custom searches.
 Have you ever been given a project with almost-usable art to use as a starting point? You know, the kind where straight lines should be at right angles, but it’s just a little bit cockeyed? I used to manually snap every point to a grid, but thought “good grief, there must be a simpler way.” That’s when I got the idea for Square Up. With it, you can just select the paths you want to straighten, select how you want them aligned, and “click” it’s done. There are four methods of squaring which could probably benefit from a brief explanation.
 I might mention that the plugin now comes in a new, compact size. At first I made a panel that mimicked the dialog shown here, then realized it didn’t have to be that huge. Even though panels (remember when we called them palettes?) have some real advantages over modal dialog boxes, there is a point where they begin to crowd our work area so I promise not to make mine larger than they really have to be.
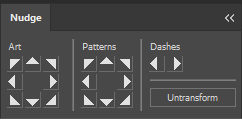 When I draw a floor plan and place a pattern of a grid drawn at a given architectural scale behind it, I want the upper-left corner to align with the grid. How useful would a grid be, really, if it were simply plopped randomly behind the art? To use the plugin, I select the path with the pattern fill and click on one of the eight directional triangles to move the pattern left, right, up, down, or diagonally by one point. If I press the Command/Control key, the movement is divided in half, or the Option/Alt key will divide the moment by four. On a Mac, pressing the Control key while clicking will divide the distance by eight, and holding combinations of these keys will combine the effects so that I can make adjustments of 1/64 of a point. Pressing the shift key, too, will make each key work as a multiplier to move the pattern farther with each click.

 As this image of small-town streets and highways here shows, GIS data is similar to imported CAD data in that it’s made up of many short paths laid end-to-end. Generally, the paths end at every point where they meet or cross another path.
 By selecting one or more paths, I used Concatenate’s Assimilate function to join the paths whose endpoints were within 0.25 points apart and within 10° of tangent. By adjusting this setting, I could control which paths were concatenated, restricting it to those that formed a fairly straight line. A second pass concatenated the other side of the divided highway. Now this main road can be given a prominent style and the secondary roads made lighter and/or thinner.
 The first Graffix plugin for Illustrator CS6,