This page will be updated as needed; please check back periodically.
Go back to Documentation
ToolShed is a collection of utility functions accessed through tools and menus in Adobe Illustrator.
Tools:
![]() Stabilized Pencil tool adds a “leash” to a pencil tool to smooth its travels similar to Photoshop’s smoothed brushes. Create corners where you want them and draw smooth broad strokes with ease. Choose your leader length and path smoothing settings.
Stabilized Pencil tool adds a “leash” to a pencil tool to smooth its travels similar to Photoshop’s smoothed brushes. Create corners where you want them and draw smooth broad strokes with ease. Choose your leader length and path smoothing settings.
![]() Offset Open Paths offsets an open or closed path; open paths offset as open, not closed! Use a dialog or tool to offset one or many copies on one or both sides of the target path.
Offset Open Paths offsets an open or closed path; open paths offset as open, not closed! Use a dialog or tool to offset one or many copies on one or both sides of the target path.
![]() Tangent Arc tool draws circular arcs that are tangent to another path or smoothly continues a path at the angle of its endpoint. The extent of the arc can be very small or nearly a full circle. Press the Alt/Option key to draw a tangent straight line, or press Shift to constrain its angle to increments of 15 degrees.
Tangent Arc tool draws circular arcs that are tangent to another path or smoothly continues a path at the angle of its endpoint. The extent of the arc can be very small or nearly a full circle. Press the Alt/Option key to draw a tangent straight line, or press Shift to constrain its angle to increments of 15 degrees.
![]() Transform tool that differs from Adobe’s in that it will not skew your art and lets you choose an anchor point for scaling and rotating.
Transform tool that differs from Adobe’s in that it will not skew your art and lets you choose an anchor point for scaling and rotating.
![]()
Bracket tool draws line-style braces using a radius and stroke weight you set in the preferences. Press Alt/Option to flip it the opposite direction, Shift to constrain its angle, or the Up/Down arrow keys to adjust the radius as you draw.
Menu items:
- NEW! Remove Duplicate Paths deletes duplicate paths or individual segments of paths that duplicate the bottom-most path.
- NEW! Notes panels display text attached to the document, layers, and individual art items.
- Offset Open Path works the same as the tool, but with a dialog.
- Stacking order lets you change the order of objects based on their position. Options include center, left, right, top, and bottom, ascending or descending. Another option lets you change the stacking order by the size/area of the object. A third option lets you reverse the stacking order, even if the objects are on different layers with other art objects between them.
- Create Path Array > Logarithmic creates a series of parallel lines distributed as though they were evenly spaced and wrapped around a cylinder, with live preview.
- Create Path Array > Radial creates a group of lines fanning out like a pie chart at equidistant angles, with live preview.
- Unscale art will figure the inverse of a scaling factor to restore objects to their original size (or at least very, very close).
- Scale to Proportion scales art relative to two given values.
- Scale Stroke Weight will scale the line thickness of selected paths without scaling the art itself.
- Minimum Stroke Weight will find all paths with a stroke thinner than your minimum and set the width accordingly.
- Fade will lighten or darken the stroke and/or fill of a path object by a given percentage.
- Isolation menu items allow keyboard shortcuts and recording for entering isolation mode, isolating the next level up, and exiting isolation mode.
Free features
These features are entirely FREE. They will continue to work without licensing (even after the trial period has expired):
- Bracket tool
- Bust Up Paragraphs
- Stacking Order
- Unscale
- Scale to Proportion
- Scale Stroke Weight
- Minimum Stroke Weight
- Isolation menu
Stabilized Pencil tool
 Stabilized Pencil tool adds a “leash” to a pencil tool to stabilize it, similar to Photoshop’s smoothed brushes. Keep corners where you want them and smooth the broad strokes. Once drawn, the path is simplified according to settings you choose.

Preferences for the Stabilized Pencil tool are available by double-clicking the tool’s icon.
The Leader Length setting is the maximum distance between your pen point and cursor, similar to the “Leash length” in Photoshop.
The Curve Precision and Angle Threshold values are comparable to the corresponding settings in Adobe Illustrator’s Object > Path > Simplify… dialog.
“Show annotations,” “Show help text,” and color settings are described with the general ToolShed preferences below.
Offset Open Path tool

Offset Open Path creates an offset copy of a path. Click and drag on a path. It does not need to be selected. If your source path is open, the tool creates another open path, not a closed outline of a thicker version of the path!
As you drag, press Alt or Option to offset paths on the opposite side of your path. Press Shift to flip the offset path from one side or the other. Press the Cursor Up (arrow) key to add additional offset paths between the original path and the new one you’re dragging out of it. Before releasing the mouse, press Control or Command to delete the original path and leave only the copy/copies.
When used on a compound path, it creates offset copies of every path in the compound. The new offset paths are also combined into a new compound path.
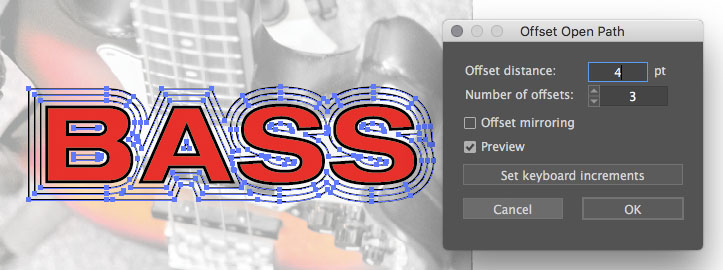 Click on a path to bring up the Offset Open Path dialog. It does not matter whether the path is selected.
Here you can enter the distance of the offset, as well as the number of times to offset the path.
Check “Preview” to see a preview of the offset paths.
Click the “Set keyboard preferences” button to show the ToolShed Preferences dialog, which is described below.
Click OK to apply the offset paths, or press the Esc key or click Cancel to cancel the operation.
Tangent Arc tool
 Tangent Arc tool draws circular arcs constrained tangent to another path or appends it to the end of another path, smoothly added at the angle of the endpoint. Drag the mouse to intuitively determine both the radius of the curve and its extent, which can be a degree or two or nearly a complete circle.
Press Alt/Option to draw a straight line constrained tangent from a curved path or extending an existing path. Press Shift to constrain the line’s angle or arc’s curvature to increments of 15 degrees.
If you click and drag to draw a new arc that is not constrained to another path, it will start at the 0 angle. To assign a different starting angle, click (do not drag yet), then as you move the mouse a line will be drawn between the click point and cursor point. When that guide line displays an angle you like, start dragging to define your arc endpoint.
As you drag, press Shift to constrain the arc’s extent to increments of 15 or Ctrl/Cmd to lock the current radius°.
Transform tool
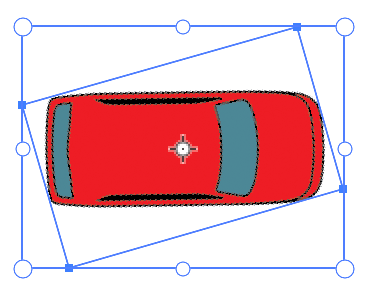
 ToolShed’s Transform tool is similar to Adobe Illustrator’s Free Transform tool, but with some important differences. For one thing, it cannot shear art, so you cannot accidentally shear art when all you want to do is scale it. (If you want to shear the art, you still have the Adobe tool with which to do that.) ToolShed’s Transform tool gives you the option to move the anchor point for scaling and rotating, and you can also change the angle of your bounding box.
In this map example, say we need to make this structure narrower while keeping its sides square to each other, but its bounding box doesn’t align with the art.
To quickly fix this, simply shift-click on any of the straight path segments you want to align the bounding box with.
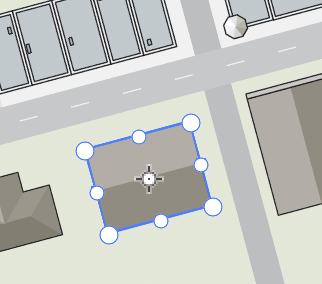
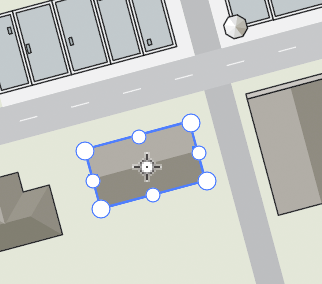
The bounding box will now appear at the proper angle, and you can safely resize it using the control handles on its sides.
The Transform tool stores and reads the rotation angle from the art. If the object is a group, it reads the rotation information from the group object. You can click the tool to read the rotation angle from the topmost contents of the group. When you ungroup the art, each item it contains will use its own original rotation value.
Here is a summary of modified clicks you can use with ToolShed’s Transform tool:
- Click to recalculate the bounding box based on the art’s contents
- Alt/Option-click to choose your own anchor point for scaling and rotating
- Double-click to reset the bounding box and also reset the anchor point to the selection center
- Alt/Option-drag to rotate the bounding box
- Shift-click to rotate the art to align with a chosen point on a path
- Shift-Alt/Option-click to align the bounding box with a point on a path.
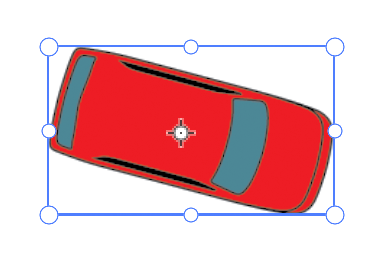

Now, say we have another object to add, but it is a raster object, and so we cannot pick up the angle of a path segment. First Alt/Option click to place a new anchor point somewhere along a straight edge of the image, then Alt/Option-drag outside of the image area to rotate the bounding box. You can now scale and rotate the art using the handles without shearing the image.
Another option is to use the menu command Object > Transform > Restore Original Rotations. As shown in the fourth image above, this will rotate the art to the angle set in its bounding box, and the bounding box will be reset to 0.
A related bounding box item, Object > Transform > Get Bounding Box Rotation will display a dialog showing the bounding box rotation of the topmost selected art.
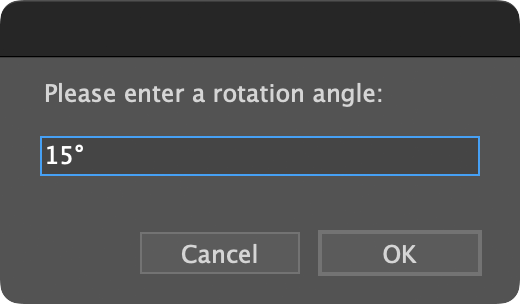 The menu item Object > Transform > Set Bounding Box Rotation will display a dialog similar to the one shown above where you can enter a new bounding box rotation angle to assign to the selected art.
Note: When setting the bounding box angle from the menu, the new setting is applied to every selected item, including those contained in groups. When selecting a group, the tool will display the bounding box rotation of the parent group object, but when ungrouped, each object will retain its original rotation angle. When multiple items are selected, it will display the rotation angle of the topmost art object.
Bracket tool
 The bracket tool draws a path forming a bracket (or brace). As you drag, you can hold the Alt/Option key to flip it the opposite direction, and/or Shift to constrain it to the nearest 45° angle. Your curve radius is displayed in the on-screen help text, but you can adjust it dynamically by pressing the Up/Down keys. The increments it uses, in combination with Shift and Alt/Option, can be set in ToolShed’s Preferences. There you can also set the default stroke width for this path, as well as the Radiant and Latitude Lines that ToolShed draws. That dialog can be called in the same menu area as other Illustrator and plugin preferences, or by double-clicking the Bracket tool.
This tool is FREE, no activation required.
 Object > Create Path Array > Radial…
This creates a group of lines fanning out like a pie chart at equidistant angles. Again, a preview allows you to adjust the number of divisions to match your art.
 Object > Create Path Array > Logarithmic…
This reates a series of parallel lines distributed as though they were evenly spaced and wrapped around a cylinder (or globe). Use the live preview from the settings dialog to check your art before committing with the OK button.
Object > Replace with Top Object
This function replaces selected art with a different art object. For example, say you have six blue circles that you want to replace with gold stars. Make sure that the star is the topmost object, located above the others in the layer panel. Select the menu item Object > Replace with Top Object. The blue circles will be replaced with gold stars, like this:
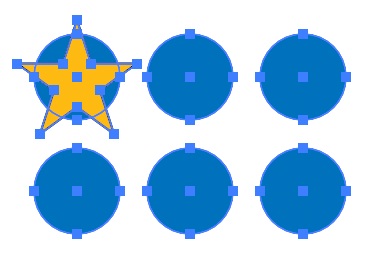

Here you see six stars, but in the Layers panel, there are seven. What’s up with that?

The star was identified as the reference art, and the six circles below it became target art. Each target object was replaced, so you now have a duplicate star under the original reference art. Your reference art could be something used in some other part of your illustration, so this behavior is often useful. This time, however, press Alt or Option as you select the menu item, and the reference art will be deleted after all substitutions have been made. The new art will be positioned centered over the target art.
This menu item is FREE, no activation required.
Object > Bust Up Paragraphs
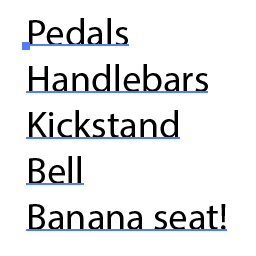
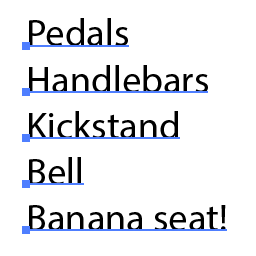
We quite often have a text file with a list of callouts or labels to add to an illustration. We can re-type them in Illustrator, copy and paste each item one at a time, or paste the text into Illustrator and run a script to separate each line into individual point text objects. I wrote an AppleScript for this about 30 years ago (really) and later made an InDesign version for my colleagues doing page design. I’m guessing it’s probably not too soon 😉 to incorporate this into a plugin menu item. If you select one or more text objects, either point text or area text, it will divide them into several point text objects which you can then move individually as needed.
This menu item is FREE, no activation required.
Object > Transform > Scale to Proportion…
 Scale to Proportion scales an object based on the proportion between two values. Say you have a map and you know that the distance from one point to another is 16.7783 miles. You can draw a line between those points and enter the distance you’d like your scale of miles to be, and the selected line will be scaled accordingly.
This menu item is FREE, no activation required.
Object > Transform > Unscale Art…
 Unscale Art can be used when, say, you’ve scaled a bunch of objects and one of them shouldn’t have been scaled. To return it to its original size, the plugin will figure the inverse of the scaling factor to restore it to its original size (or at least very, very close).
This menu item is FREE, no activation required.
Object > Fade…
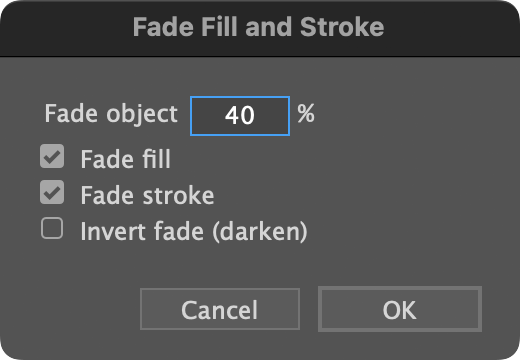 Fade will lighten or darken art without changing its opacity.
You may, for example, have several objects in a series of instruction steps and some of them need to be faded to place emphasis on other objects. If a path object had a stroke of 100% black and a fill of 100% magenta and 50% yellow, applying a fade of 40% would change the stroke to 40% black, and the fill to 40% magenta and 25% yellow.
Applying the same settings to the above object, but checking “Invert fade” would restore the colors to their previous values.
This menu item is FREE, no activation required.
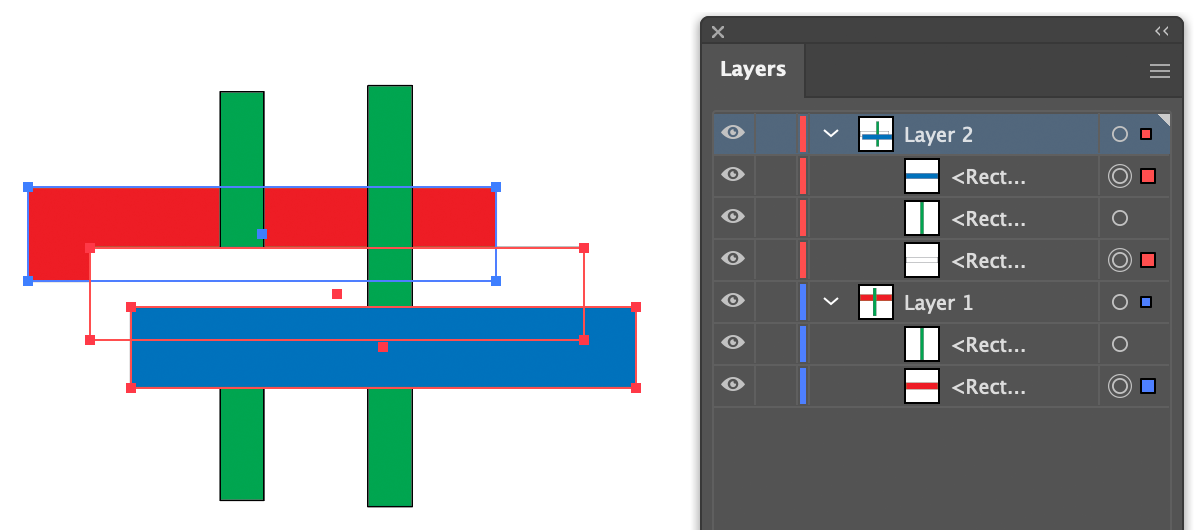
Object > Arrange > Stacking Order> Stack by Location…

Stacking Order by Location lets you change the order of objects based on their position. Options include center, left, right, top, and bottom, ascending or descending. This menu item is FREE, no activation required.
Object > Arrange > Stacking Order> Stack by Size…

Stacking Order by Size lets you change the order of objects based on their size (calculated by the area of the object). This menu item is FREE, no activation required.
Object > Arrange > Stacking Order> Reverse Stacking Order
Object > Isolate
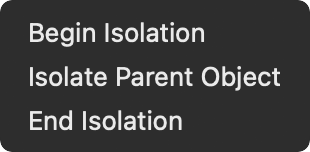 Menu items for isolation enable users to assign keyboard shortcuts to enter and exit isolation mode, and also enables recording these steps as Actions. In addition, you can now isolate items such as text objects that otherwise cannot be isolated. You can even enter isolation mode with nothing selected to begin work in a new blank isolated space.
- Begin Isolation: With nothing selected, Illustrator will enter isolation mode at the top level of the current layer, ready for you to paste or create new art. With an object selected, Illustrator will enter isolation mode as usual, except that if the object type cannot be isolated by Adobe Illustrator, it will be placed into a temporary folder and that folder will be isolated. Note: Only one item at a time can be isolated, so if you select multiple objects to isolate, only one of them will be chosen to isolate.
- Isolate Parent Object: If the item you have isolated is part of a group, this will isolate the group that contains the currently isolated object.
- End Isolation: This works exactly the same as the native Illustrator counterpart, but is included here to allow you to assign a keyboard shortcut or include it in an Action.
When recording Actions, use Insert Menu Item to include these functions.
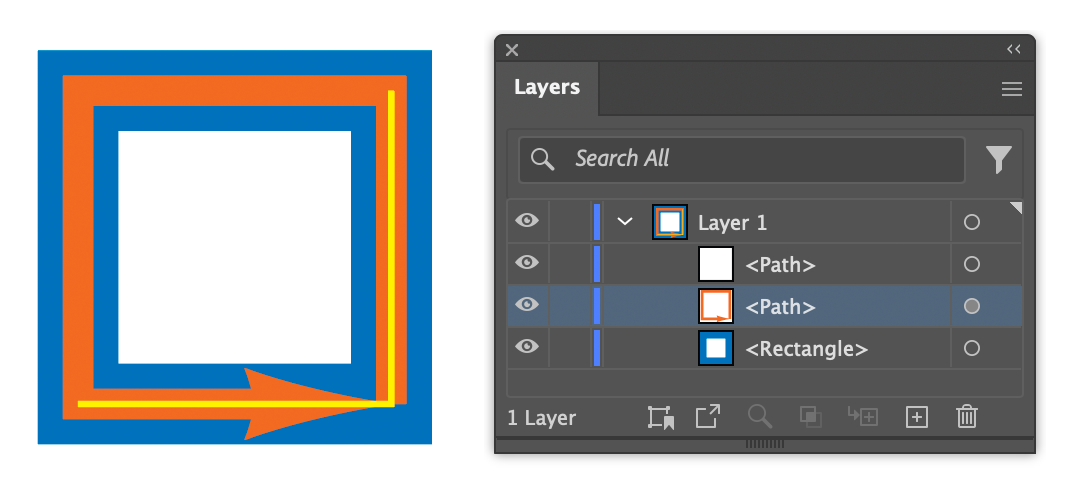
Object > Path > Remove Duplicate Paths
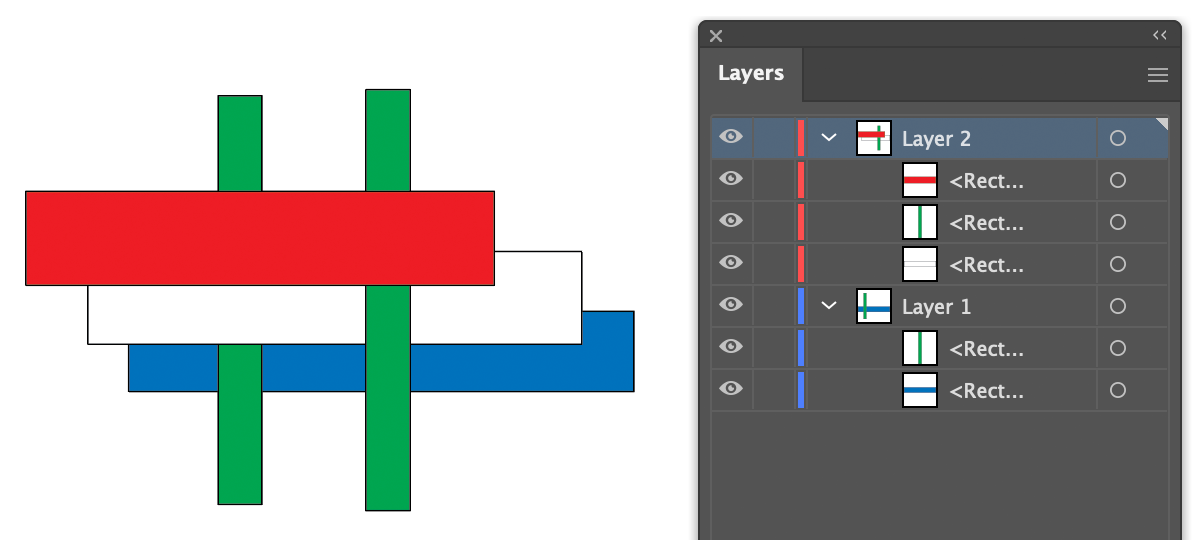
In this example we have a blue rectangle, an orange open path with four segments directly on the rectangle’s sides, and a yellow path over two of the segments. You can select paths to evaluate for duplicate paths, but since this test document has only these three paths, you can choose Object > Path > Remove Duplicate Paths with nothing selected to parse all paths in the document.
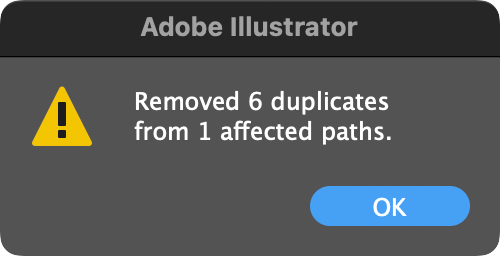
A dialog will inform you that it removed six duplicate segments, or four from the orange path and two from the yellow path.
The blue path was found to have duplicate segments, so it has been selected.
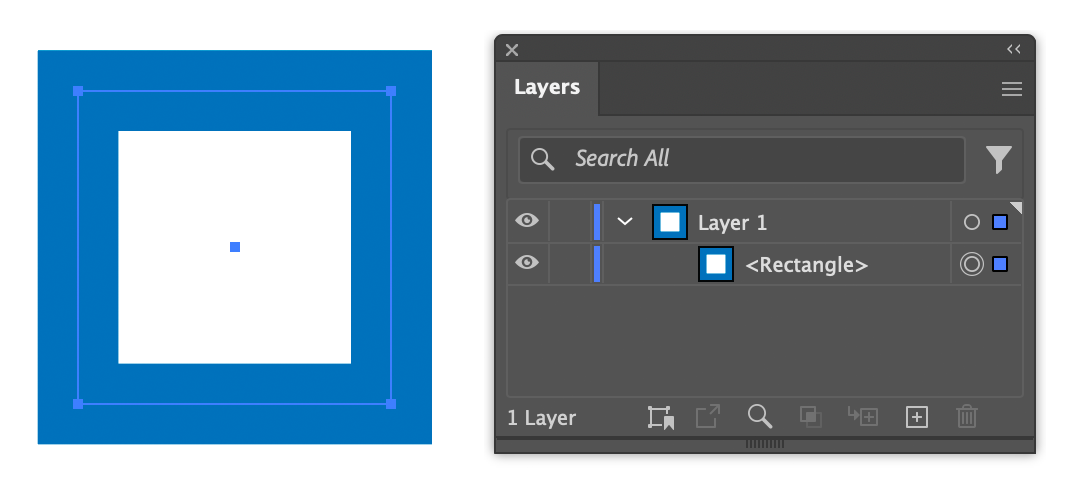
Note that the path on the bottom is preserved, and identical segments above it are removed.
Window > Notes > Document Notes
This resizable panel displays text that is attached to the document. You can use it, for example, to paste instructions sent in an email, which can be visible without switching apps and regardless of where you scroll in the document. It’s especially helpful for a list of callouts that need to be cut or copied and pasted into a document. The text frame by default supports text styles and colors, which can make it hard to read in the panel, so after pasting text you may want to click the Remove Formatting button to make the text easier to read.

This item is currently available as a beta feature. Due to unresolved display problems in multi-column lists in Windows, you may need to resize the panel to make the text frame fit the space available.
Window > Notes > Artwork Notes
In Illustrator’s Attributes panel, you can add notes to any selected artwork. The Artwork Notes panel gathers a list of all art that has notes attached, and displays them in a list.

You have two options. You can Alt/Option-click on the item to select it, or double-click it to edit the note in a dialog (you can also still edit it in the Attributes panel).

This item is currently available as a beta feature. Due to unresolved display problems in multi-column lists in Windows, you may need to resize the panel to make the text frame fit the space available.
Window > Notes > Layer Notes
The Layer Notes panel allows you to assign notes to layers. Double-click a row to bring up a dialog to edit the note.

This item is currently available as a beta feature. Due to unresolved display problems in multi-column lists in Windows, you may need to resize the panel to make the text frame fit the space available.
ToolShed Preferences
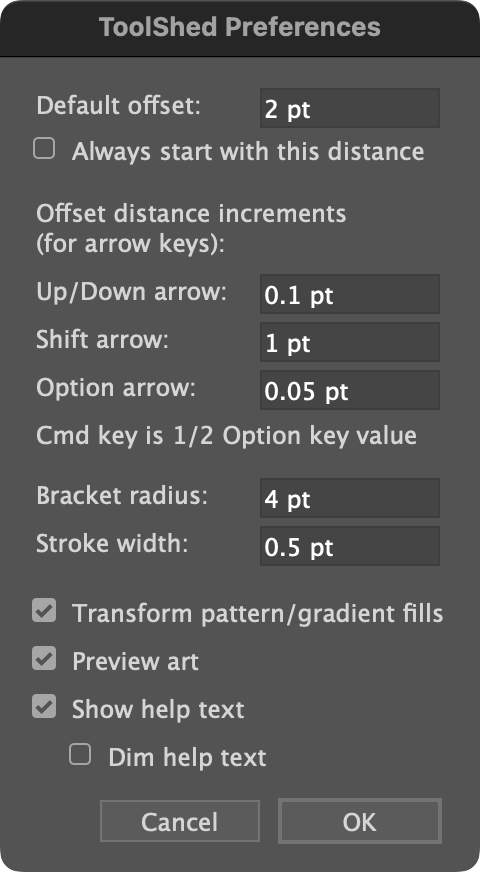 ToolShed’s Preferences dialog can be called by double-clicking any of ToolShed’s tools, or from the “Graffix plugins…” group next to Adobe Illustrator’s preferences.
Default offset refers to the distance ToolShed initially proposes the first time the Offset Open Path tool or menu item is used. The tool and menu item will start with the last-used value, but if you check “Always start with this distance” ToolShed will always propose your default distance every time the tool or menu item is used.
In the Offset Open Path dialog, shown above, you can adjust the offset distance using the up/down arrow keys, or up/down cursor keys. The “Up/Down arrow” field lets you enter the amount that the distance changes when pressing the up/down keys. While pressing the keys, you can also press Shift or Alt/Option to change the value by other increments. Pressing Control or Command along with the cursor key will change your value by 1/2 of the value entered for the Alt/Option key.
Duplicate path precision defines how similar two path segments must be to be considered duplicates when selecting the Object > Path > Remove Duplicate Paths. A setting of 100% will require an exact match, where lower settings will allow for some variation. Values must be in the range of 90 to 100, although very high settings are recommended.
Bracket radius is the radius used for the art drawn with the Bracket tool.
Stroke width applies to the art drawn with the bracket tool and with menu items for Radiant and Latitude Lines.
Check “Transform pattern/gradient fills” to adjust these fills using the Transform tool.
Check “Preview art” to preview the results for the Offset Open Path, Radiant, and Latitude Lines dialogs.
“Show help text” refers to the text displayed next to the cursor of tools explaining what various clicks, drags, and modifier keys do.
The “Dim” option adds some transparency to the help text to make it more subtle.
More functions will likely be added to this plugin over time.
There are 1,000 trial uses, and the Scale Stroke Weight and Minimum Stroke Weight will continue to work for free after the trial of the other functions is used.
System requirements
• Adobe Illustrator CC 2024 through 2026
• Windows 10-11, 64-bit
• macOS
• Legacy support for older versions and 32-bit Windows.