This page will be updated as needed; please check back periodically.
Please refer to the “read-me” PDF which was included with your download. It includes information on that plugin’s features as well as basic support information. More detailed usage information will soon be available here.
Please keep in mind that Tag72a is not a substitute for careful proofing. It is designed to assist in checking your work, and although we strive for the best results, we cannot guarantee that our methods can catch every possible condition within an Adobe Illustrator document.
Go back to Documentation
Introduction
Usage guide
- Document name
- Document path
- User name
- Date saved
- Date printed
- Document spot colors
- Document spot color swatches
- Document fonts
Point text objects with this information are added near the zero point of the current artboard. You can then move the text art and reformat it with other font and paragraph properties. When the information changes, the contents of the revised objects are updated. All information types have options described below.
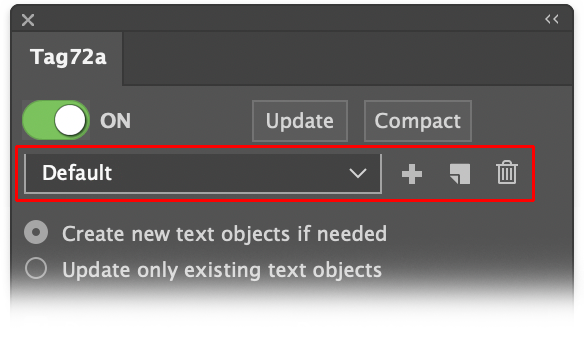
Settings are managed in a panel accessed from the menu item Window > Tag72a.
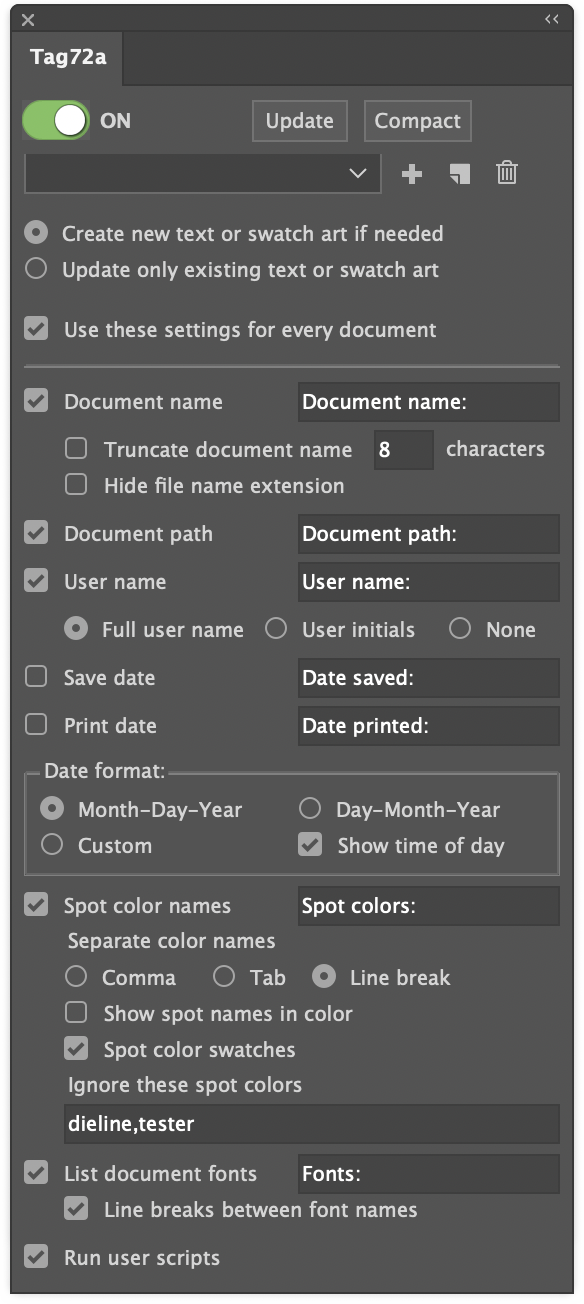
The On/Off switch determines whether items will be automatically added or updated. Radio buttons let you choose whether to create new text or swatch art if needed, or only update existing art.
The Update button will perform a manual update on all checked fields except for Print or Save dates. Date items will only be updated when the document is actually printed or saved, and only if those items are checked in the panel.
Settings are saved with the plugin’s preferences, as well as in the current document. When you have checked “Use these settings for every document,” the panel’s settings will be used for each document that is opened. If this is option is not checked when a document is opened, Tag72a will import the settings last used with that document.
Settings can be saved as presets as described later.
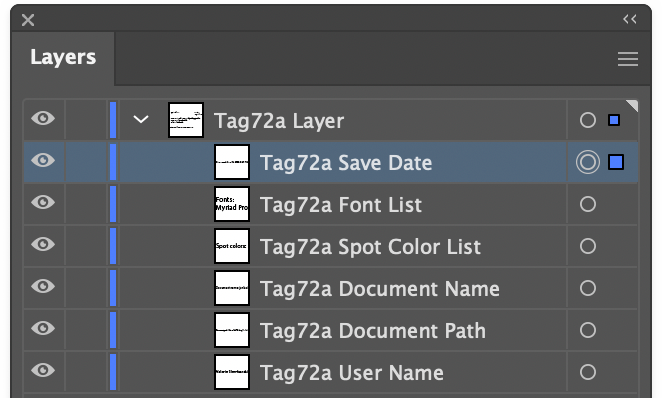
Each art item created by Tag72a is given a special name, which is how Tag72a identifies the art items to update their contents. If there is more than one item whose name includes the original name assigned by Tag72a, all of them will be updated. Existing art can be set to automatically update its contents by giving it one of these names in the Layers panel. These names are:
Tag72a Document Name
Tag72a Document Path
Tag72a User Name
Tag72a Save Date
Tag72a Print Date
Tag72a Spot Color List
Tag72a Font List
If spot color swatches are created, they are named “Tag72a Swatch 01” etc.
This panel has many options, so it takes up a lot of space on your screen! If you always use the same settings, you can check “Use these settings for every document” and either close the panel or click the << in the upper right corner to collapse it to an icon.
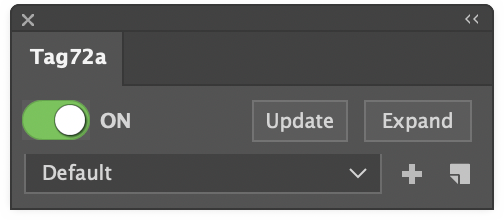
If you use different settings for different documents or at different times, you may prefer another recommended strategy. Create presets for different settings. If the current document’s settings match a preset, that preset’s name will be displayed in the menu. That way you can see at a glance if any of the settings varies from the standard preset you selected. There is a button in the upper-right corner of the panel to Compact or Expand the panel. Click Compact to display only the On/Off switch, the Update button, and menu widgets, or click Expand if you need to see all settings to change any of them.
Settings
You can choose options to customize how Tag72a works. These preferences will be saved and re-used until you change them. Groups of settings can be saved as presets, which will be covered below.
The settings panel can be found with other panels under the menu item Windows > Tag72a.
On/Off/Update toggles the automatic update between On, Off, or Update only.
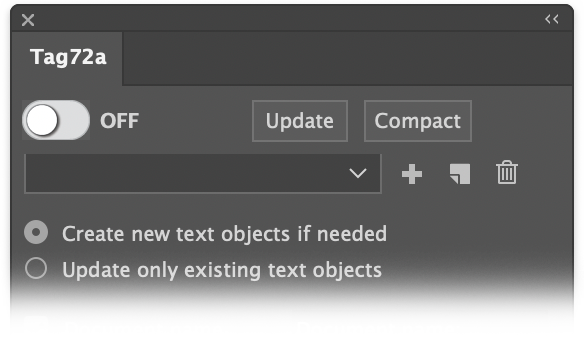
Off: Tag72a does nothing. The switch is shown in gray with the title Off.
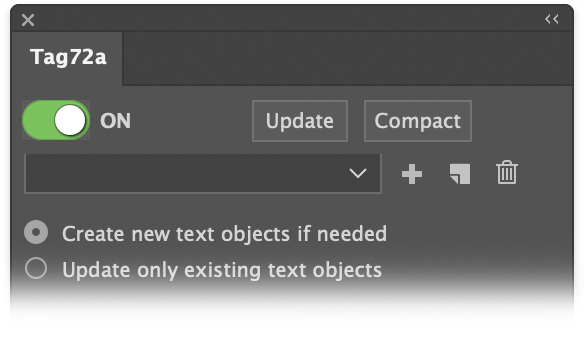
Tag72a can run in either of two modes. First is On where it creates new text objects if needed, as selected with the radio buttons below the switch. The switch is displayed with a green background.
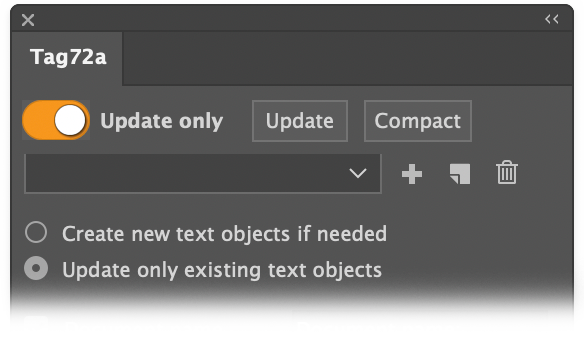
The second “On” mode is Update only where new text items are not created. Here, only existing text objects have their contents updated to reflect the properties of the document. This mode is selected with the radio button below the switch. In this mode, the switch is displayed with an orange background.
Compact panel
Adobe Illustrator has a lot of panels and they can take up a lot of valuable screen real estate. To keep the panel size to a minimum, you can click the Compact button to change the panel’s size to include only then top two rows of controls. If you need to access other items, just click the Expand button.
There are options for each text object. Each can be toggled on/off using the checkboxes. When checked, these attributes will be updated except when the settings are set to “Off.” When in “On” mode (where “Create new text objects if needed” is selected) new text point art will be created as needed to display these results. When in “Update only” mode, only existing fields will be updated, and no new art will be created regardless of which items are checked.Each item includes a text field where you can add a description or label, if desired. In most cases, you will want to add a space at the end of the text to separate the label text from the results. Any text entered in these label fields will be inserted before the data of the fields. Just leave the text field blank if you do not wish to have a label displayed.In the example below, spot colors and document fonts have labels defined, while the document name does not. In addition, the document name has been truncated to four characters.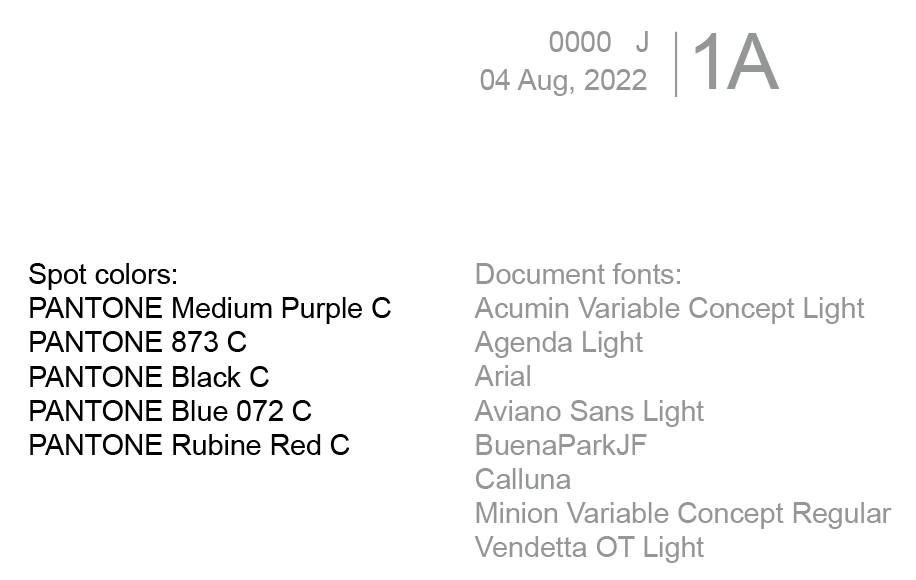
Document name
The first item listed is Document name. Check this item if you want the document name shown in the document and updated when saved or printed. In the text field to the right, you can optionally enter a label for the document name, which will be inserted before the name. If you do not want a label, keep this field blank.
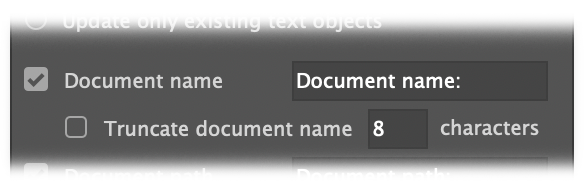
Truncate document name can be used to limit the document name to a given number of characters if, for example, your documents have long names but only the first part of the name is significant for tagging. In the example above, only the first 8 digits of the file name are significant, so “Truncate document name” is checked and the settings are set to show only the first 8 characters.
Document path
Check this item if you wish to include the Document path among the text tags, and add text for a label if desired.
User name
Check this item to display the user name. In the text field to the right, enter a label for the user name if you would like one, or leave it blank for no label. Use the radio buttons to choose whether the user name is represented in full, as initials, or choose None if you want to enter a custom name in the label field. 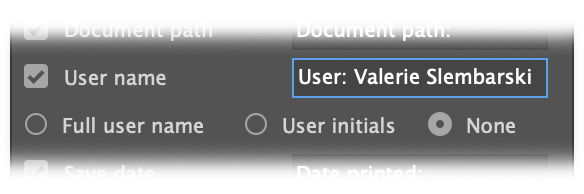 When Adobe Illustrator was installed, the user may have been defined as something less descriptive than you’d like, or maybe just a machine ID like “#168!” Here you have complete control over how your name is displayed. Select “Full user name” to use the name as entered when Adobe Illustrator was installed. Select “User initials” to just use the initials of the names in the Adobe Illustrator installation user field. Use “None” when you want to enter your own name in the user field. That is, you can use the label text field to display the name you want, and select “None” in the radio buttons to prevent the plugin from adding additional text.
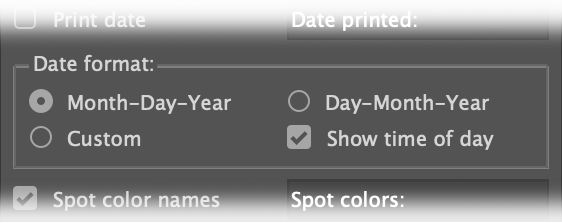
Print date and Save date
Check these items if you wish to include them and add labels as needed. These labels update only when the document is printed or saved. Dates can be represented as either Month-Day-Year or Day-Month-Year format, and can optionally include the time of day from your computer’s system clock.
Spot colors
When this item is checked, Tag72a will add an alphabetized list of spot colors used, as well as a label for it if one is entered in its text field. Tag72a will recognize and report spot colors used in placed EPS and DCS files (but not TIFF, PDF, PhotoShop Native or embedded rasters). If you have spot colors that are used only in images of those types and want Tag72a to include them in the spot color list, create a small object of that color somewhere (off the artboard is OK). 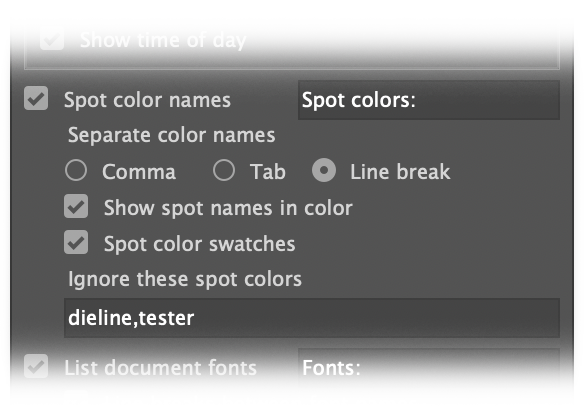
List document fonts
When this item is checked, fonts used in the document will be listed, as well as a label if one is entered in its text field. Like spot colors, this list can be set to add line breaks between items, or it can flow as one long line in either point text or area text.
Presets
If you do work with several clients or departments with different preferences for how the metadata is displayed, you can define presets for each set of settings. Once settings are defined, they can be quickly chosen from the popup menu near the top of the settings panel. Just click in the popup menu and select the preset you want.
Settings presets can be saved in the menu.
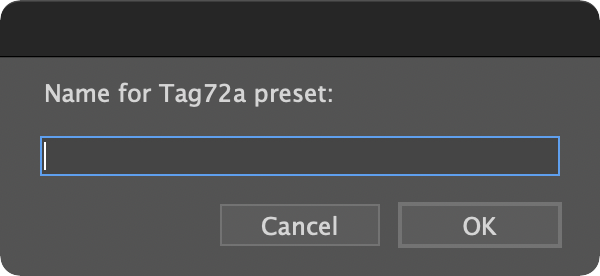
To define a preset, set all of your settings to the values you want in your preset. Click the “+” icon.
![]()
A dialog will appear asking you to name the preset. Enter a new name, or enter the name of an existing press if you’d like to replace it.
To rename a preset, select it in the popup/dropdown menu and click the document icon.
![]()
A dialog will appear prompting you for the new preset name.
To delete a preset, select the preset and click the trash icon.
![]()
Custom dates
Custom date formats are now available in Tag72a. When you define a custom date format, it can include a custom Time format as well, so the “Show time” check item will be disabled when using a custom date format. To use a custom date format, in the Date format section of the Settings panel, click the Custom radio button. A dialog similar to this will appear:
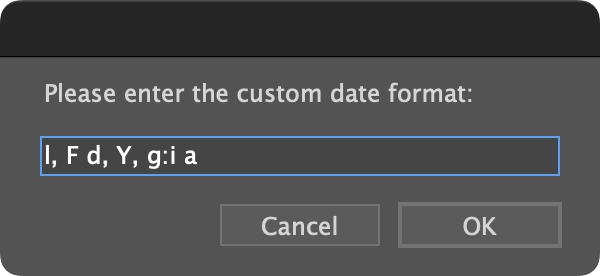
The format formula is really not as complicated as it may look at first, if you consider each item one at a time. The table describes the meaning of each special character.
The default custom format will result in a date and time similar to this:
Sunday, April 16, 2023, 3:38 pm
Note that in the formula, spaces and punctuation separate the individual pieces of the date text. If you change the first character, a lower-case L, to D, it will change to this:
Sun, April 16, 2023, 3:38 pm
In this case, you will probably want to add a period before that first comma, since “Sun” is an abbreviation.
It may be helpful to know that the default date formats are “M d, Y” and “d M, Y” and the default time format is “, g:i A” with the comma meant to follow the date text.
If you click Cancel, the date and time selections will revert to their previous settings.
Date symbols:
Time symbols:
These special characters will be expanded as described, and any other characters
will simply be inserted into the output text. A special character can be preceeded by a ‘\’ (backslash) character to prevent expansion (the backslash will not be inserted in the output text). If a backslash character is desired in the output text, preceed it with another backslash character.
User scripts
The option to “Run user scripts” can serve the purpose of countless additional settings. Your scripts run automatically along with Tag72a’s own updates.
Why would you want to run a custom script? Well, for example:
- Reformat a date to any of the many alternatives to the two formats in Tag72a.
- Parse a filename to derive additional information such as version, language, region.
- Re-order the spot color list so that certain colors are always shown first.
Simply check the “Run user scripts” option and Tag72a will look for and run any found scripts by these names.
- Tag72a_doc_open
- Tag72a_doc_changed
- Tag72a_doc_print
- Tag72a_doc_save
- Tag72a_doc_save_copy_as
- Tag72a_update
- Tag72a_every_event
You only need to use the script (or scripts) that are relevant to you — and most users will likely not want to run any scripts at all. Some things to keep in mind are:
- Doc Changed event happens every time a user switches from one document to another, including when a new document is opened or sometimes when a document is closed. You may not want to use both Doc Opened and Doc Changed events if one or the other does what you want. If both Doc Opened and Doc Changed run, it is not a bug, because Adobe Illustrator signals to the plugin that both events took place.
- Doc Print and Doc Save happen just before the actual save or print takes place.
- Doc Save Copy As happens just after you have saved a copy as, which enables the data to be updated from the saved version back to the currently-open version.
- Update happens only when you click the Update button in the panel.
- Every Event happens right after any of the other scripts runs, and works for all events regardless of what other scripts are there. You may want to put some scripting in Every Event and other scripting in specific events, depending on your needs.
- All scripts run after Tag72a makes its own updates.
- Your scripts may need to check the contents of the document to determine whether the script needs to run, because another event may have just run the script. Then again, it may not hurt anything if your script happens to run twice.
You can use either AppleScript or JavaScript. The plugin will run whichever version of the script Adobe Illustrator added to its Scripts menu. Your panel setting for running scripts will apply globally — that is, it will not change from one document to another.
Sample script
- Copy the contents of this script into a text editor and save it with the name “Tag72a_doc_save.jsx”
- Place the script file in your Scripts folder
- Restart Illustrator
- Check “Run user scripts” in the Tag72a panel
- Save your document
Now modify this script to do things that are useful for your workflow!
goScript();

function goScript(){

/*

You can script Tag72a to customize how it works, by adding
or changing things.
This sample script simply creates a text object with the
current date formatted in the MM/DD/YYYY format. You can
modify this script to replace or modify the text of
Tag72a's "Tag72a Save Date" text object.

*/

var myDoc = app.activeDocument;
var newTextObject;
try {
    newTextObject =
        myDoc.textFrames.getByName("Tag72a formatted string");
}
catch(x_x) {
    newTextObject = myDoc.textFrames.add();
    newTextObject.name = "Tag72a formatted string";
}

newTextObject.contents = formatDate();
}

function formatDate() {
    var today = newDate();
    var dd = today.getDate();
    var mm = today.getMonth()+1;
    var yyyy = today.getFullYear();
    if (dd<10) {
        dd = '0'+dd;
    }
    if(mm<10) {
        mm = '0' + mm;
    }
    todayString = mm + '/' + dd + '/' + yyyy;
    return todayString;
}
Usage examples


System requirements
• Adobe Illustrator CC 2024 through 2026
• Windows 10-11, 64-bit
• macOS
• Legacy support for older versions and 32-bit Windows.