Transformations panel
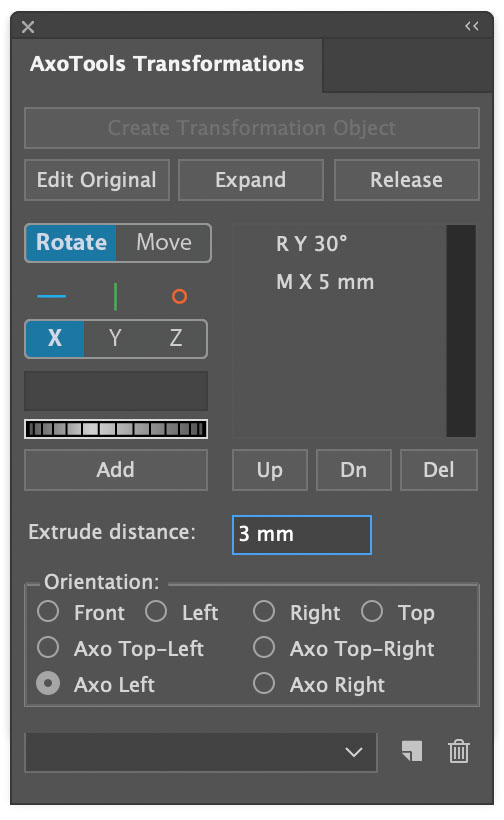 The new Transformations panel allows you to add a series of rotations and movements to art. Open it by selecting Window > AxoTools > AxoTools Transformations. Some features will only be visible when one (and only one) Transformation object is selected. These transformations (both rotations and movements) are applied in a series, as shown in the list. The resulting art is then projected to any of eight orientations shown at the bottom of the panel.
Each item in the list can be edited to change its numeric value, axis, and operation (move or rotate). Items can be rearranged, since the order of the transformations does affect the final art.
When you’re done, you can leave the object as-is in your illustration, click the Expand Object button to convert it to editable art to color and stylize it, or click the Release Object button to revert to the original art.
 With Transformations, you can project artwork at any angle, move it at fixed distances, then project it to your axonometric view where items will appear correctly projected, with offset distances mathematically scaled to place them correctly in your illustration.
This is not a true 3D application, but uses time-tested mathematical formulas to orient your art to match whatever view you need. Illustrations with components that tilt, turn, swivel, and spin are now easier than ever. No more guesstimating, and no more complicated armatures needed to scale and place objects!
Creating a Transformation object
Select art to transform, then click the Create Transformation Object button in the Transformations panel. By default, the art will be copied into the Transformation object, but you can press Alt or Option as you click the Create Transformation Object button to copy the art instead. Remember, too, that you can retrieve the art from the object later on by clicking the Release Object button.
Once your Transformation object is created, the other buttons on the Transformations panel will become enabled.
![]()
Choose whether you want your artwork rotated or moved in the next operation.

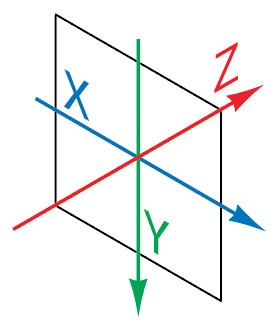
Choose an axis on which to move or rotate your art. The color-coded symbols above the buttons are a quick reminder that the X axis runs horizontally across your art, the Y axis vertically, and the Z axis forward and back. Experiment with it to become more familiar. You can easily change your settings later.

Enter a value in the text field to move or rotate your art. You can type it, or click and drag in the “dial” control in either direction to change the value. The object will be updated in real time. As you drag the dial, you can press Alt or Option for finer control, or Shift to constrain the value to larger increments.
With the cursor in the text field, you can also press the Up or Down arrow keys to increment the value. Holding Shift down as you press Up/Down will increment the value in larger units. Entering “+” will toggle the value between positive and negative.
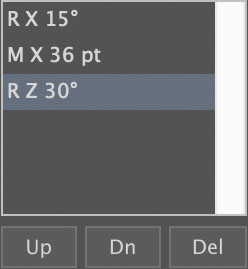 The list shows each operation you’ve entered. The third item is selected. In this case, the R means “Rotate” (M means “Move”), the Z indicates the Z axis, and 30° is the amount of rotation.
When an item is selected, you can change its operation (Move vs. Rotate), its axis (X/Y/Z) and its value. A large button below the dial control will be labeled “Add” or “Update” depending on whether the next operation will add a new transformation or update the selected one.
Below the list are three small buttons. The ones labeled “Up” or “Dn” will move the selected list item up or down in the list — the order of the items is very important. The “Del” button will delete the currently selected list item.

Next you can optionally choose an orientation from which to view your object. It’s probably helpful to keep in mind that the “Front” orientation changes nothing. It shows the object with exactly the rotations and movements you specified. The other options don’t really rotate your object, it rotates you, changing your view of the art. As you work, you may want to occasionally change the orientation to get a better idea of the results of your rotations.
Editing a Transformation object
When you first create a Transformation object, you’ll see it annotated with a horizontal X axis and an anchor point marker in the selection center.

In the radio buttons at the bottom of the Transformations panel, choose another orientation such as Axo Left and you’ll see the art from another vantage point, with the axis line adjusted for that view.
Sometimes it’s easier to understand your transformations (rotations and movements) if you select the menu item View > Hide Edges, or press Cmd/Ctl-H.
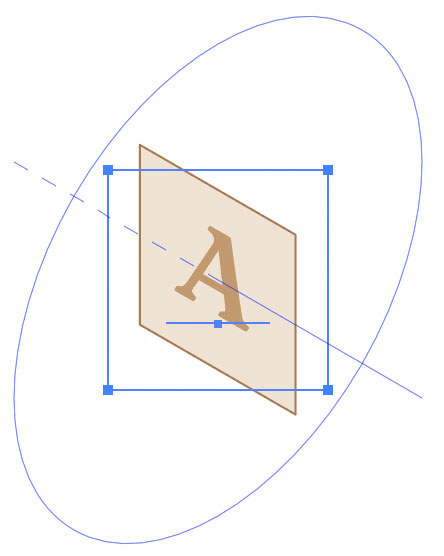
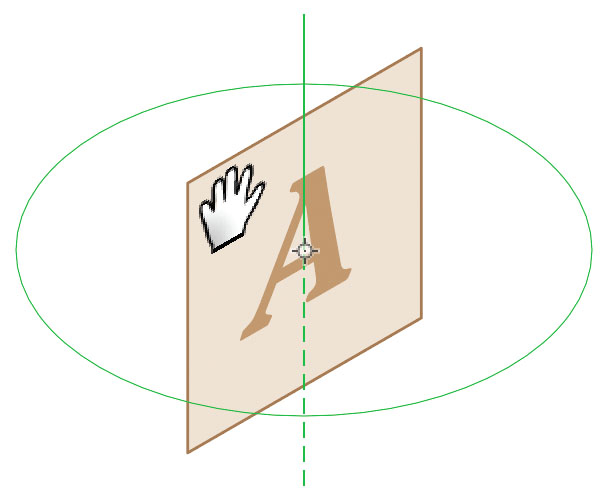
 Try changing to different axes to see the axis annotation and ellipse guide change, and experiment with different values. This diagram shows the direction of the three axes when viewed from an isometric left orientation. It’s important to keep in mind that as the art rotates, the axes belong to the art and “stick” to it. In other words, the X and Y axes correspond to the user’s view when you first create the object in Front orientation, but as it rotates, the axes rotate with it. Rotations and movements are always in relation to the art, not in relation to you, the viewer.
Understanding the effect of positive or negative movements or rotations may be easier to remember using a “left hand pull” method. Imagine your hand in the upper-left corner of the art.
- For positive Z axis rotations, pull down.
- For X axis rotations, pull the top edge toward you.
- For Y axis rotations, pull the left edge toward you.
- For X axis moves, pull left-to-right.
- For Y axis moves, pull top-to-bottom.
- Z axis moves is the one exception: push the art away from you.
Transformation object anchors
By default, each new Transform object’s anchor is located at its selection center. Changing the anchor location can be very useful.
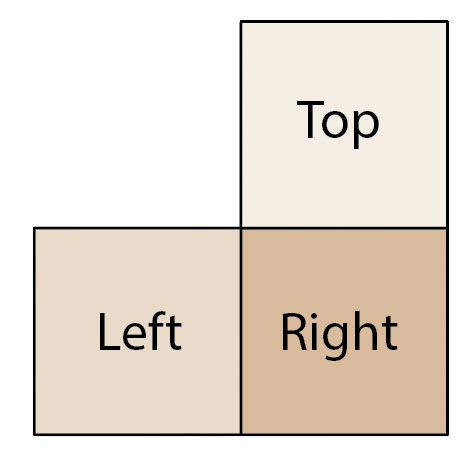
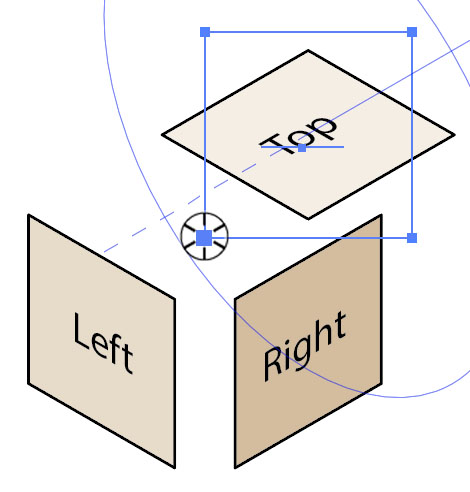
Here’s a simple project that will demonstrate that. Draw left, right, and top views of a box and align them at a common point as shown.
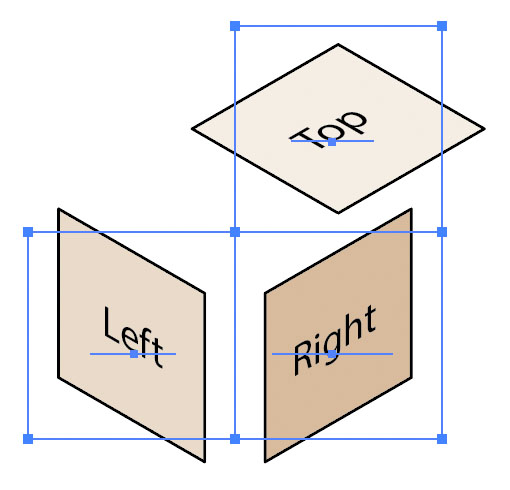 Selecting each face one by one, convert each to a Transformation object, and assign each one to its corresponding orientation of Axo Left, Axo Right, or Axo Top-Right.
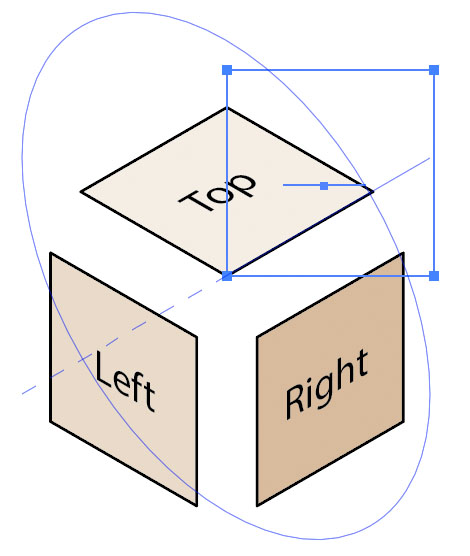
The orientation looks good, but wouldn’t it be nice if the faces aligned at that frontmost corner?
 Select the Axo tool from Illustrator’s toolbox to change each object’s anchor point.
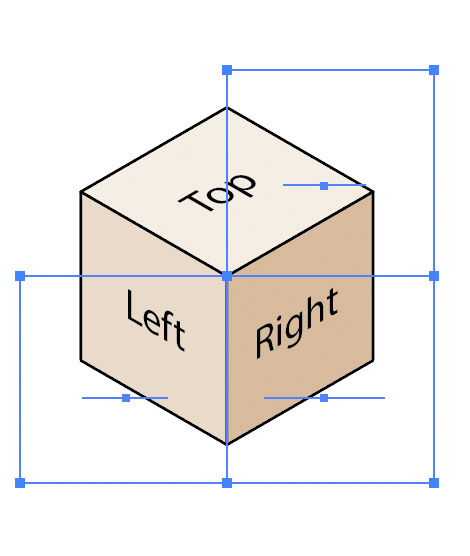
Place the cursor at the point where you want the anchor to be, and click. Note that the point you choose must be located within the object’s bounding box.
Each or the faces will align when their anchors are placed at a common point.
Transformation object axonometric orientations
When you assign one of the four Axo orientations, it doesn’t simply show the art as isometric. Your Projection panel can custom views, and the Transformation objects inherit the document’s Tilt and Turn values, even as those values change.
There’s no need to select and re-apply any settings. They all update automatically.
If you want to keep the settings you see, you may want to click the Transformation panel’s Expand button. The art can then be edited as native Illustrator art, but all stored movements and rotations will be gone.

Transformation movements and compound rotations

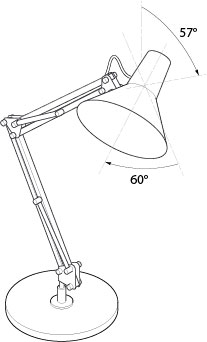
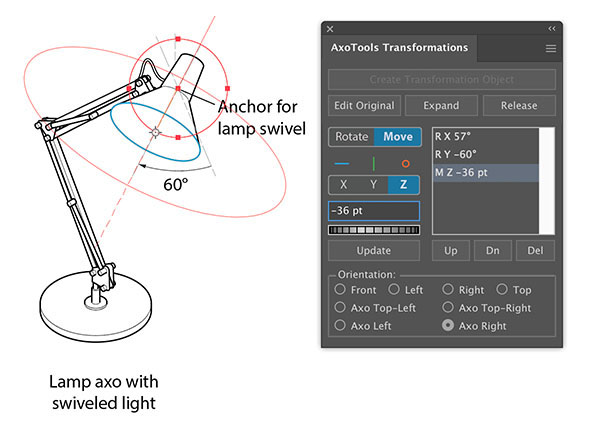
Let’s say we have a lamp with a tilt/swivel head that we’re projecting to isometric. Here we have the common reference points established for the left and right views, so we project it.
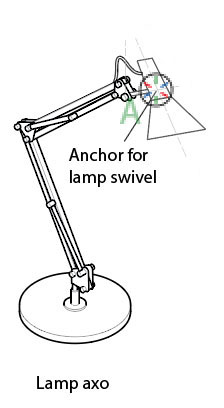
Here we’re ready to draw the lamp head, but wait! What if we need to show the lamp head rotated 60° on the axis of its stem?
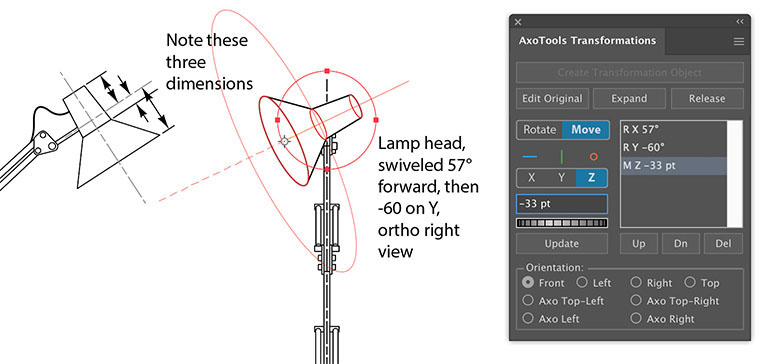
Here the lamp head has been re-drawn in the right view with the help of three guide ellipses. The largest, for the rim, is selected to show how it was built.
First a circle the size of the rim was placed centered on the swivel point. Next it was converted to a Transformation object where it was rotated 57° on its X axis to point downward. Then it was rotated -60°. The distance from the swivel point to the rim center measured 33 points, so it was moved forward -33 (remember positive on the Z axis is away from you).
This is the best part!
Remember that we had our common reference points defined for the right view and for the axonometric view, so we could simply select the three Transformation objects representing the three ellipses and click the Project Axo Right button on the Projection panel. That placed the ellipses into the axonometric view. Note that the settings are all the same except that it was changed from Front orientation to Axo Right orientation. When that happened, the ellipses were re-projected at the proper angle, and the move operation now worked at the different angle, with the distance foreshortened accordingly
Please keep in mind that this is not true 3D, so we can’t just reproject the entire conical shapes of our right-view lamp head. The point here is that we don’t need to export anything to a complicated, expensive 3D application, then do the tedious cleanup of the many masks and multi-lines when we import it again. Everything starts and stays within Adobe Illustrator!
Getting back to editable art
Near the top of the panel are three buttons giving options for accessing editable art from the live Transformation object.
![]()
Edit Original: If you’ve added movements and rotations to your art and then realize you need to other elements such as paths or text, you don’t have to start over. Just click the Edit Original button and your document will temporarily go into isolation mode. This is similar to editing a group or blend using Illustrator’s isolation mode. Your art will display as it began, in an orthographic view without transformations, with other elements of the illustration temporarily hidden.
Here you can change, add, or remove elements of your base art. Please remember that this is a live object, so placing other live objects such as 3D Extrude effects or other Transformation objects into it may produce unexpected results.
You can exit Isolation Mode with any of the methods you would with groups or blends. Some methods may leave your object displaying incorrectly, but the best way exit isolation mode is also the simplest: just press the Esc key.
Expand: In many, or maybe most cases, you’ll want to do additional editing to your artwork after transforming it with movements and rotations. The Expand button will convert it to native Illustrator art objects that are fully editable. This is comparable to expanding a Blend or Compound Shape. Once expanded, the art will no longer be a live object.
Release: To remove all of your Transformation object’s properties, such as rotations and orientation, Release will revert your object to the art that was originally selected to create the Transformation object. Its operation is similar to releasing a Blend or Compound Path in Adobe Illustrator.