Lighting panel
Please note that lighting controls are here for advanced (or “adventurous”) users only. The default settings will work fine for all users, but this panel is available for those who want a little more control over lighting behavior.
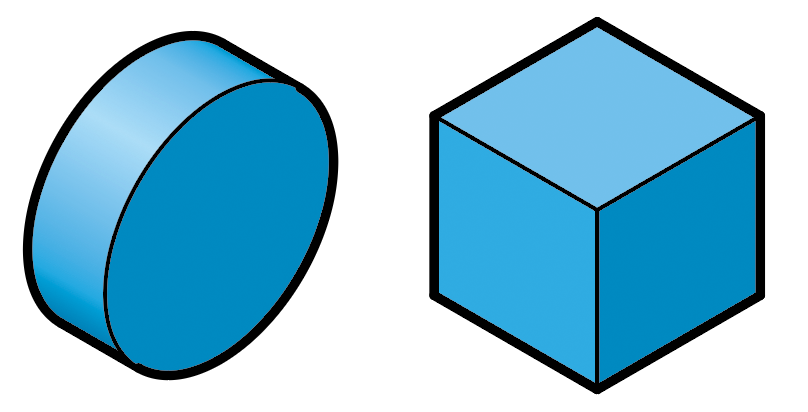
AxoTools’ Lighting panel controls how extruded art is colored when the Draw Settings panel has its fill method is set to “Shaded object color.” This affects both flat surfaces and rounded surfaces with gradient fills.
Before you can understand the controls in this panel, you must first understand the basics of the shading system they work with.
The light gradient ramp
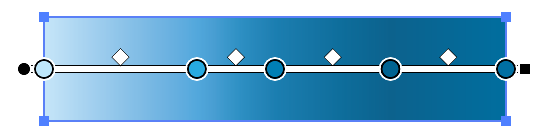
The fill color of the art you’re extruding is used to create a range of light and dark shades that could possibly be applied to your extruded art. These values are saved in a gradient ramp with five stops.
- Stop 1 represents the lightest highlight color where the light hits a surface at a direct angle.
- Stop 2 is set to the original solid fill color (either RGB or CMYK). Using the default settings, the light on a left isometric plane falls very close to this color.
- Stop 3 represents the shade when the light hits an object on its edge.
- Stops 4 is is a shaded area near the back of the object.
- Stop 5 represent the fr rear surfaces, showing the effect of backlighting.
Again, stop 2 is set to the path’s original fill color. The other stops are calculated based on the lighting settings.
AxoTools is not 3D software, but it does calculate a surface’s theoretical angle in relation to an imaginary light source (to the user’s upper left, by default). This angle translates to a position on this gradient ramp, with the lightest colors at the left, and shadow colors on the right.
Please also see “Managing gradients” below.
Lighting properties
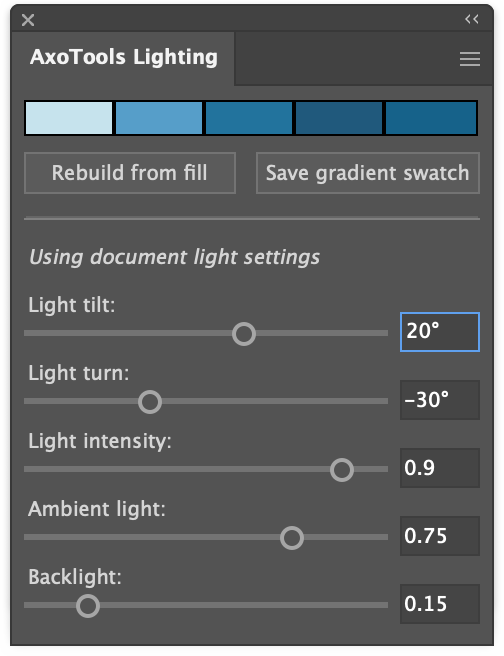 Lighting properties are set in the area below the gradient color wells and buttons. A note reminds you of whether you are currently using settings from the current document or global settings stored with the plugin’s preferences file. See the Flyout menu section for more information.
The location of the light source is determined by two slider controls for the Light tilt and the Light turn. The default settings place it tilted 20° above the viewer, and turned -30°, which is to the left of the viewer.
Changing the light source’s location does not affect art that has already been extruded, only art extruded after the change is made.
The next three sliders control how the highlight and shadow values are calculated. As you make changes, you’ll see the colors in the five color wells update to reflect the new settings. They work in a range between 0 and 1.
Intensity affects the highlights in Stop 1. A setting of 1 forces it to white, while the next highest setting of 0.99 produces the lightest value of the color in lab mode.
Ambient light affects stops 3-5, with higher values casting more light on shaded areas.
Backlight simulates light reflected onto the back surface of an object.
Changes made to the sliders or text fields will be saved in the current document. If there is no current document, they will be saved in the plugin preferences and applied to new documents in the future that have no light settings saved in them.
Customizing the gradient
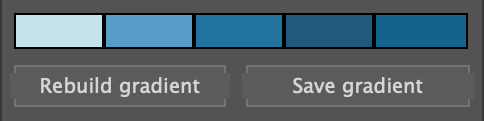
Below the color wells are two buttons relating directly to the five gradient stops.
The “Rebuild gradient” button will generate five shades of the current document color using the current lighting settings of Intensity, Ambient, and Backlight. If there is no current document color, or if the color is a gradient or pattern, this will be a light gray. Click in a color well to change its color using Adobe Illustrator’s Color Picker control.
If you changed the colors in any color well controls, either by changing lighting properties or using the color pickers in the color wells, the “Save gradient” button will overwrite the gradient ramp used for the base color. After redefining the gradient, the new colors will be used next time you extrude path art filled with the base color.
Flyout menu
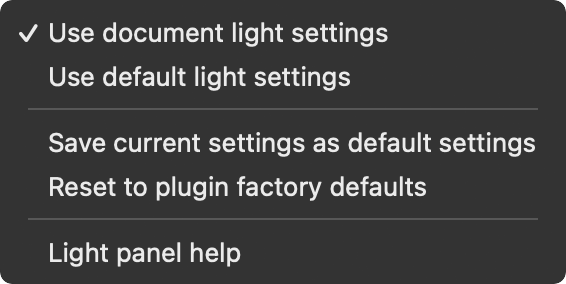
The flyout menu adds some options for the Lighting panel. Settings here can be stored with AxoTools preferences, where they will be available to all documents, or they can be stored in the current document, allowing documents to have different settings. This essentially a shortcut to one of AxoTools’ preferences items, and will be applied globally across all documents until you change it. The Lighting panel displays a note reminding you which settings it is currently using.
Use document light settings tells the Light panel to load the settings stored in the document. If the document has no settings saved in it, the default settings will be copied to the document. From that point, any changes you make will be specific to the open document.
Use default light settings will tell the panel to use the default settings stored with AxoTools preferences. A dialog will appear, asking if you would like to delete the light settings saved in the document. You may want to do this if you are about to save a document as a template or document profile.
Save current settings as default settings will copy your current document settings to the default settings available to all documents. Note that you will still be using document settings, so further changes will affect the current document, not the global defaults.
Reset to factory defaults will restore the settings for all slider controls that applied when the plugin was first installed. These settings are different from the default settings saved with your preferences.
Light panel help will display a quick description of the controls in the panel. For more detailed help, click the Documentation button in AxoTools’ About Box to be taken to this web page.
Managing gradients
Gradients used for shading are saved in the Swatches panel in a group called “Axo Gradients.”
Gradients are named based on their CMYK color values. For example art with the fill color 70% cyan and 15% magenta, would be named “C70-M15-Y0-K0 ramp”. Each time you extrude art set to be shaded, AxoTools looks for a gradient with a name based on the fill color and uses it if available. If a gradient with that name does not exist, it creates it using the Lighting panel settings.
If the selected art’s fill color is a gradient, AxoTools will use that gradient as the gradient ramp. It’s important to understand that the gradient will not be used “as-is” but AxoTools will instead sample the colors corresponding to light-to-dark running left to right.