Auxiliary Projection panel
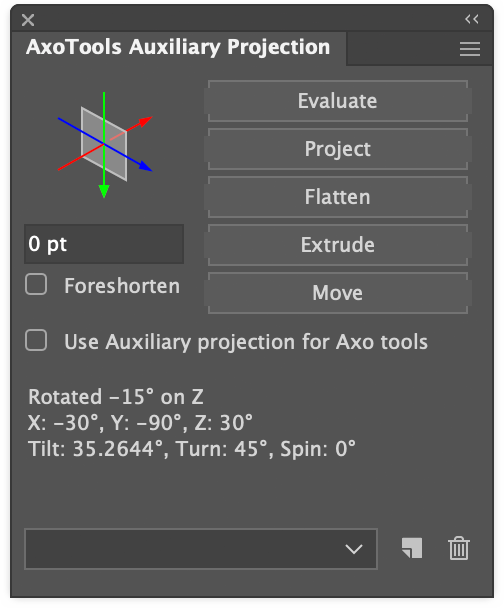 AxoTools includes an Auxiliary Projection panel that helps you determine the projection of an oblique path object (preferably a sheared/rotated rectangle) so that you can:
- Edit its contents in the oblique plane
- Flatten its contents to an orthographic view to edit there
- Project orthographic art to match this projection
Example project
Say we’re working for a medical equipment manufacturer and we have two drawings of a device case from a previous job. We didn’t do these drawings, and don’t know the angles anything had been rotated to.
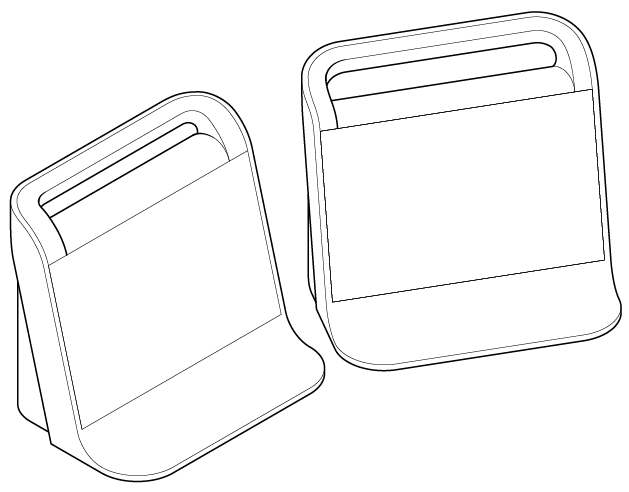
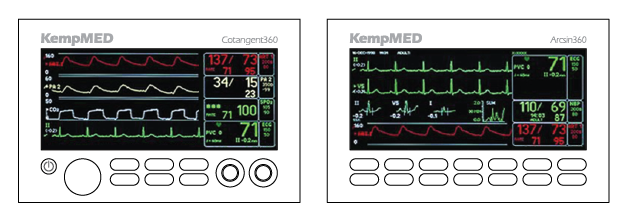
Now the customer/employer wants instrument panels added to the generic equipment cases. We have orthographic art for the panels, but need to project it into the isometric art. We also need to extrude the buttons and dials.
Previously, we’d have to struggle with rotating, scaling, and shearing to coax the ortho art into the iso view. Now with the help of AxoTools’ Auxiliary Projection panel, this becomes a quick and easy project.
1. Determine a path’s projection
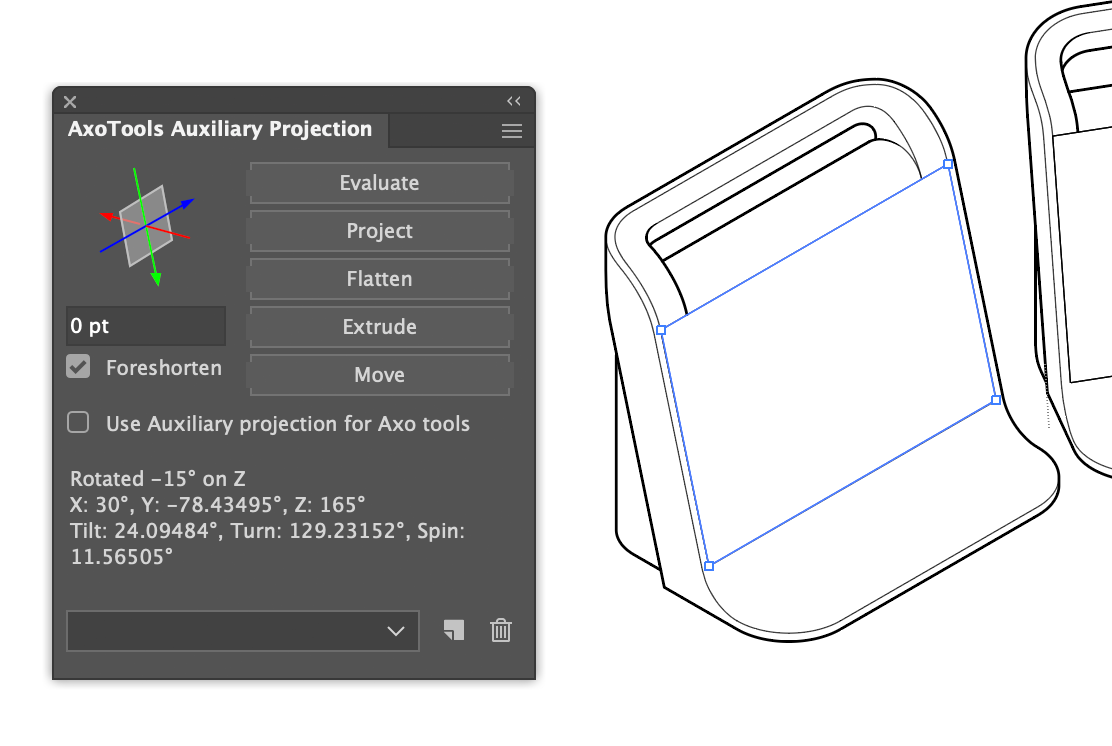
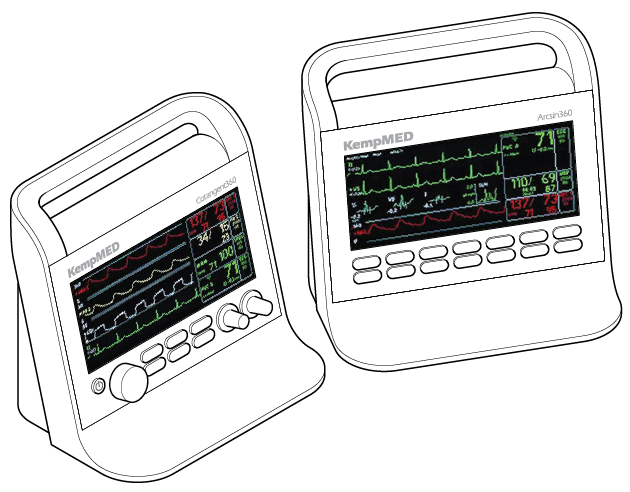
Select the rectangle representing the first panel’s face and click the Evaluate button on the Auxiliary Projection panel. In this case, notice that the panel recognized that one of the main edges lies along one of the axes, so that the surface is rotated along only one axis.
2.Project the ortho art to the isometric auxiliary projection
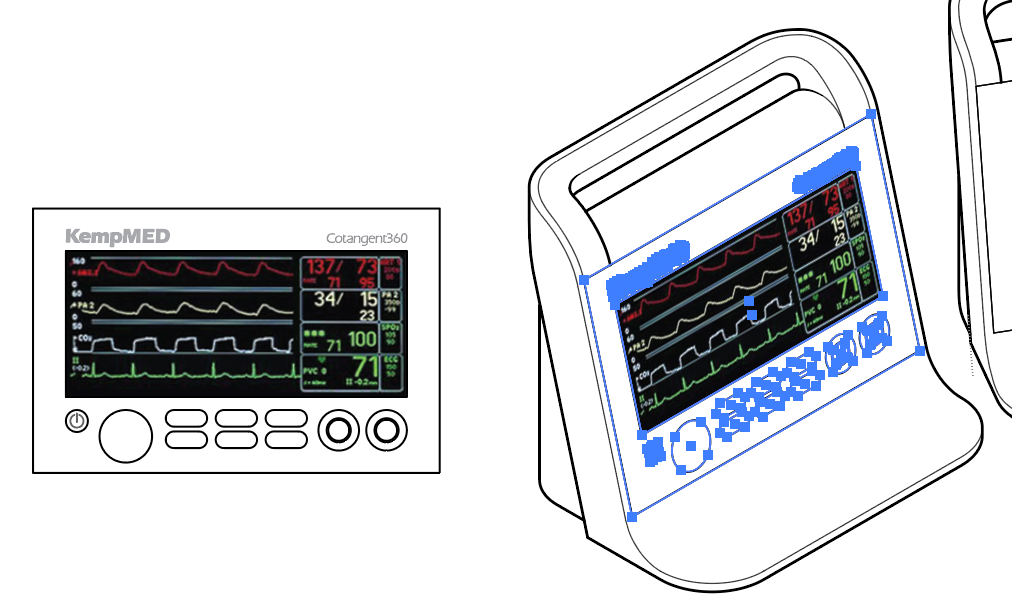
Select the orthographic art for the left panel and click the Project button. Move the selected art into position. Please note that:
- Settings in the Drawing Settings panel will apply to this projection operation the same as it would using the Project buttons on the document Projection panel.
- Also check the quick-preference icons on the Projection panel.
3. Extrude the knobs and buttons
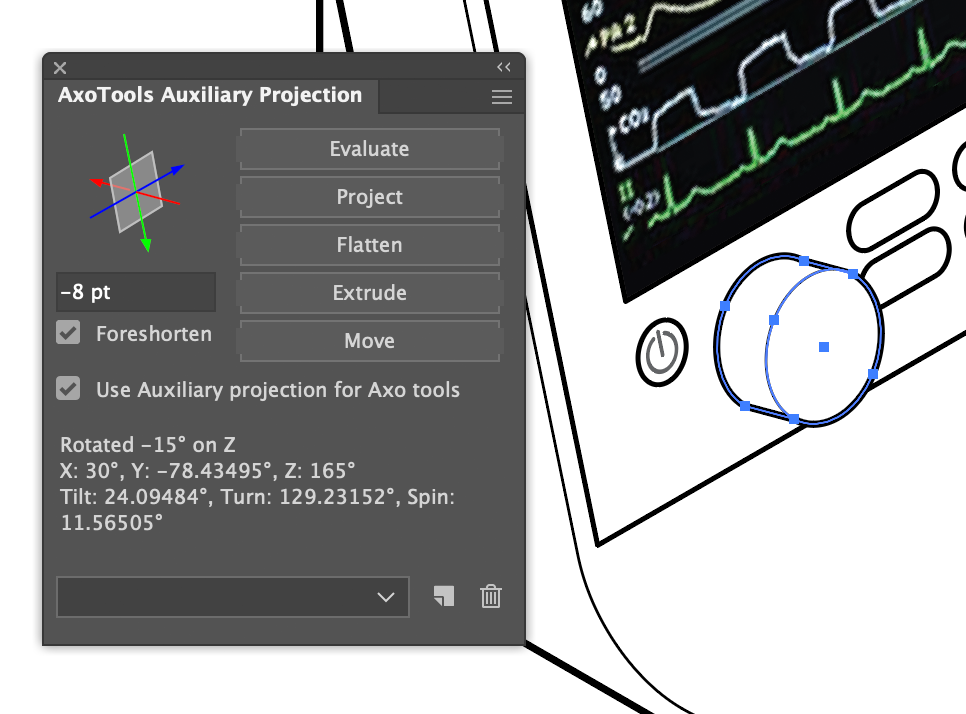
Select a path that represents either a knob or a button. Type a value into the text field and click the Extrude button on the Auxiliary Projection panel. If you check “Foreshorten” that distance will be foreshortened according to the foreshortening factor for the projection’s depth (Z) axis.
4. Alternate extrude method

Check “Use Auxiliary projection for Axo tools” and select the Extrude tool. Select one of the knobs and extrude to an appropriate depth. As you drag, the tool will display indicators for current Draw settings. Visible here are E for rotate ellipses, W for stroke widths and fills, and A for Auxiliary axis constrains for tools. You can press these keys to toggle those settings off or on while dragging.
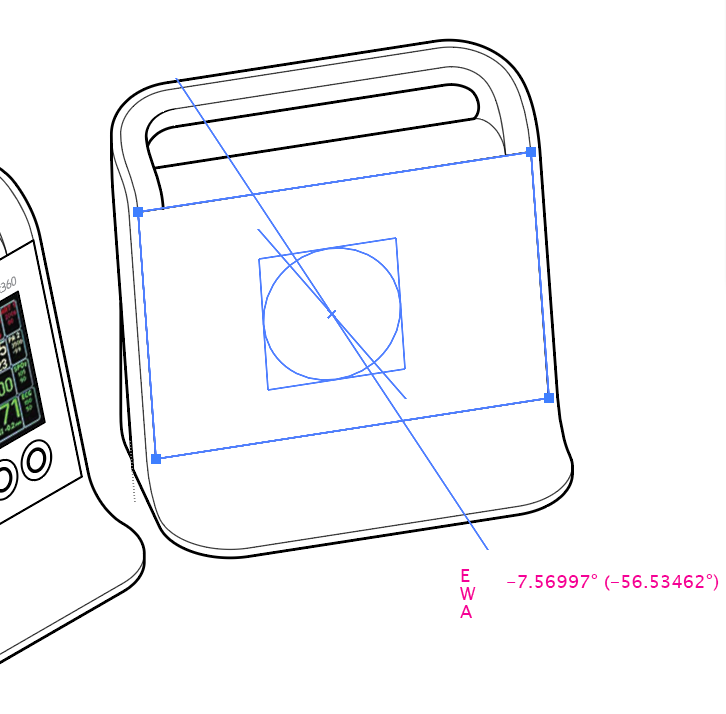
5. Select and Evaluate the second face panel
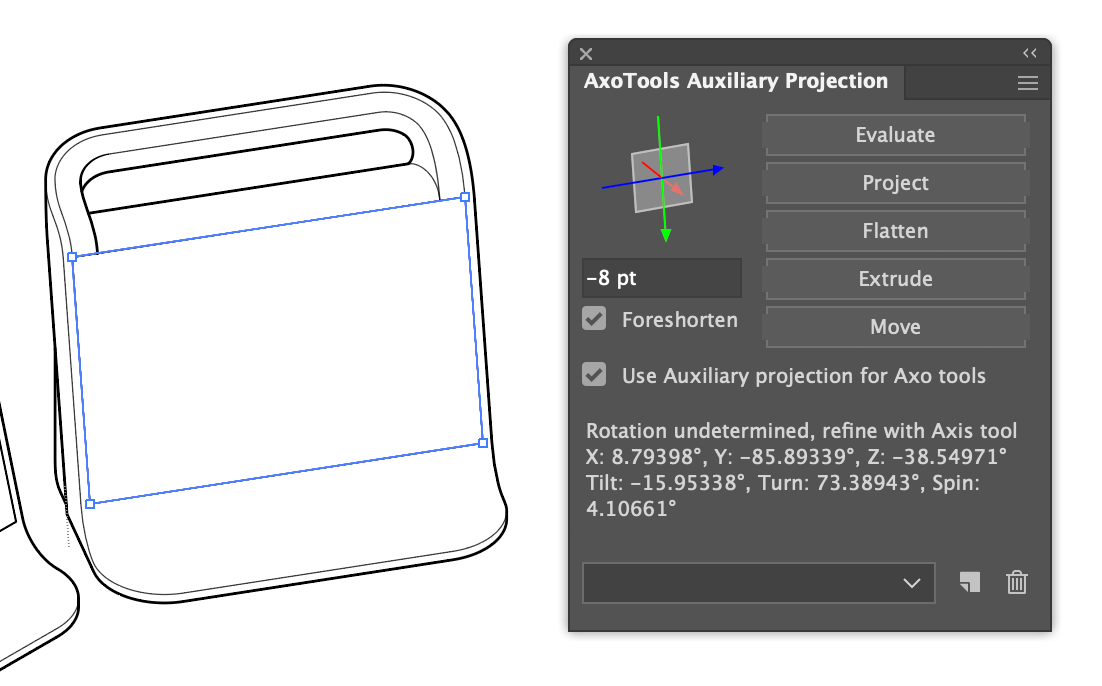
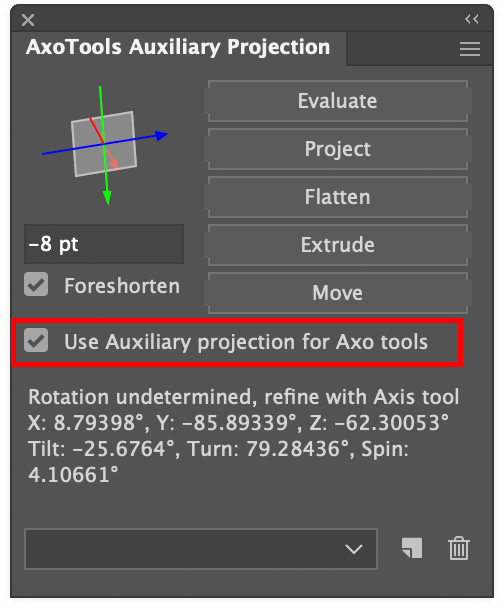
Select the second face panel and click the Evaluate button. Notice that the Auxiliary Projection panel warns that the rotation of this art is undetermined. It has return one of many possible valid projections for the angles in this art.
Note also that the panel displays the projection’s X, Y, and Z axis angles, as well as the tilt, turn, and spin values. The tilt and turn work the same as in the main document projection in the Projection panel. The document, however, does not have a spin value because the Y axis is always vertical.
Note that the three axis lines are colored to match the axes in the Transformations panel, and they have arrowheads on them to indicate the positive direction. For extruding, positive values travel away from the user, negative values toward the user. Sometimes free-form evaluations can result in a backward Z axis. Remember, AxoTools is not 3D, it makes its best guess based on the angles of flat art. Refer to the Tips section below.
6. Refine the Z axis
![]() Select the Auxiliary Axis tool from the tool box. If it’s not visible, you may have to move it out of Illustrator’s “All Tools” drawer.
Select the Auxiliary Axis tool from the tool box. If it’s not visible, you may have to move it out of Illustrator’s “All Tools” drawer.
With the Auxiliary Axis tool, click and drag to establish a new Z axis. The tool displays an ellipse and square to help you gauge how appropriate the angle is when seen in the context of the rest of the drawing. If there’s already a path in the art along that axis, you drag on it to capture its angle rather than guesstimating. Some notes to keep in mind when using the Auxiliary Axis tool:
- As you drag, the tool will display the current Z angle in a shorter line. The annotations show the angle you’re dragging and the difference between your angle and the existing Z axis angle.
- The tool affects the projection settings currently in the Auxiliary Projection panel.
- It doesn’t matter whether any art is selected, because the tool affects the settings in the panel, not in any specific art.
- You can click and drag anywhere in the document, since the tool only measures the angle you drag, nothing more.
- If the ellipse and square are not displayed, then your Z angle is out of the valid range for the X and Y angles evaluated in the panel and nothing will be changed when you release the mouse or stylus.
7. Project and place the second panel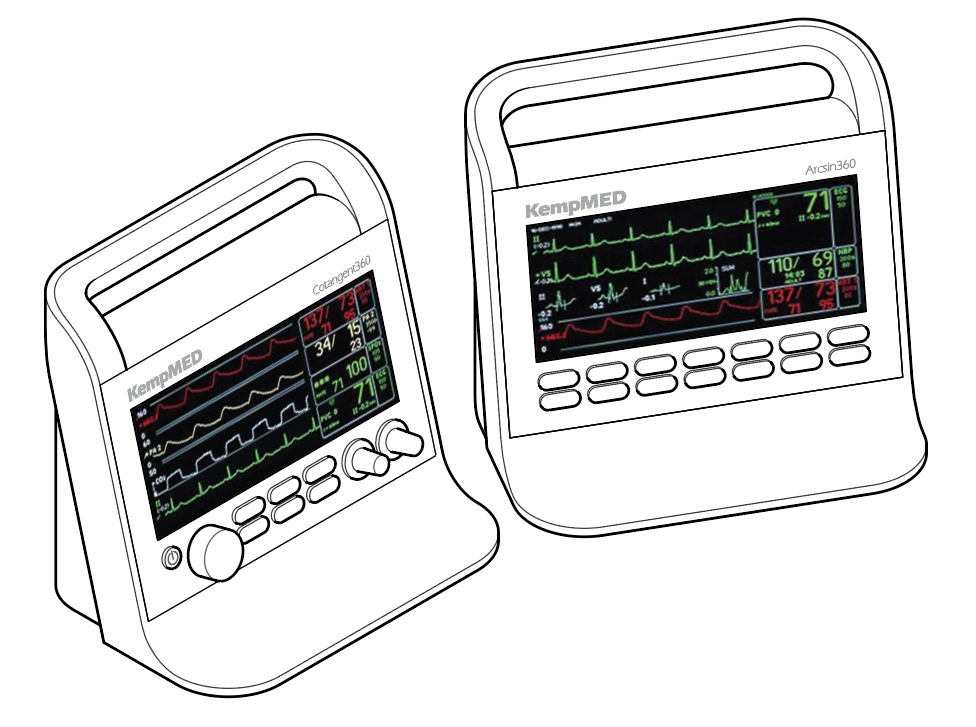
Extrude the buttons using either the Extrude tool or numerically with the Extrude button on the Auxiliary Projection panel.
Tips
The Flatten button is used to un-project selected art from the auxiliary projection to an auxiliary orthographic view.
The Move button moves selected art along the current Z axis. If you select half of an ellipse and repeatedly move it a short distance with the Alt or Option key down, it will move copies. This can be useful for drawing threads in holes or on bolts.
If you check “Use Auxiliary projection for Axo tools,” it will constrain the Axo (move), Draw, and Extrude tools. If you go back to drawing in your document’s projection, be sure to un-check this!
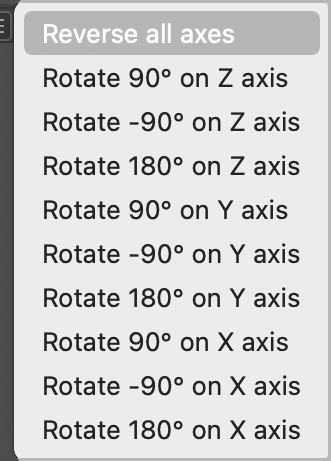 The plugin sees only angles, not a drawing in its context, so it tries to find a projection where the surface faces generally upward. If your surface is the bottom side of an object and it extrudes the wrong direction, select the “Reverse all axes” item in the flyout menu.
The popup/dropdown menu at the bottom of the panel can be used to save Auxiliary projections by name in the current document. Saved projections here will copy to the Transformations panel, and saved projections there will copy to this panel. That will sometimes make it easier to use the two panels in combination with each other.
If you had to guess on your Z axis and flattened art from the panel doesn’t quite match the aspect ratio of your ortho artwork, one workaround is to distort a copy of the accurate art to fit the flattened rectangle, then project that to make it fit the axo view.