How does “project in place” object projection work?
The AxoTools plugin lets users define common reference points in their orthographic and axonometric views, which enables a “project in place” feature. Here’s how it works:
Panel setup
At first you’ll no doubt want to use the buttons on the panel to project selected artwork. If you project art regularly, you’ll probably want to assign keyboard shortcuts to the menu items and show the panel in its compact state for access to the projection options.
The camera drawing above is included with the plugin download. Open the document and assign a projection by entering tilt/turn values, axis angles, or choose one from the popup menu.
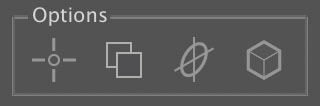
For this exercise, it’s best to use the three options shown here. The first button tells AxoTools to use reference points, if any are defined. Without them, projected art is simply transformed anchored to the center of the selection.
The second icon tells AxoTools to copy art when projecting it. The third shows that ellipses will be rotated when they’re projected so that the anchor points are oriented along its axis to make it easier to create cylinders, etc.
Reference point location

The first tool in the set, the Axo tool, is used for defining reference points, moving reference points, and for moving selected art constrained to the current axes. With this tool, click on the front left corner of the center section of the camera, identifying the same point in each of the orthographic views.
Projecting
Select art from an orthographic view and, using either the panel buttons or menus, project it to the corresponding axonometric plane. All art on the same surface as the reference point will be projected in place. When you need to project art that doesn\’t align with the reference points, you can simply move the points.
Moving the reference points
With the Axo tool, click on a reference point and begin to drag. Before releasing the mouse, press the Control or Command key. As you move a point, you\’ll see other points move to the corresponding location in the other views. Using SmartGuides to snap the cursor to other art is a simple way to get more accuracy in positioning your points.
Moving art by reference
In this example, moving the camera lens is an example of moving art by reference. Select the art to move, and with the Axo tool, drag a line in an orthographic view. AxoTools will calculate the corresponding direction and distance. Many times you\’ll find it easier to project art and then move it by reference rather than moving reference points every time.
When moving art with the Axo tool, press and hold the Alt or Option key to drag a copy of your art, and hold the Shift key to constrain its movement to vertical or horizontal.